January 2, 2024
Celebrate The Joys Of Everyday Life With This Rainbow Scrapbook Spread
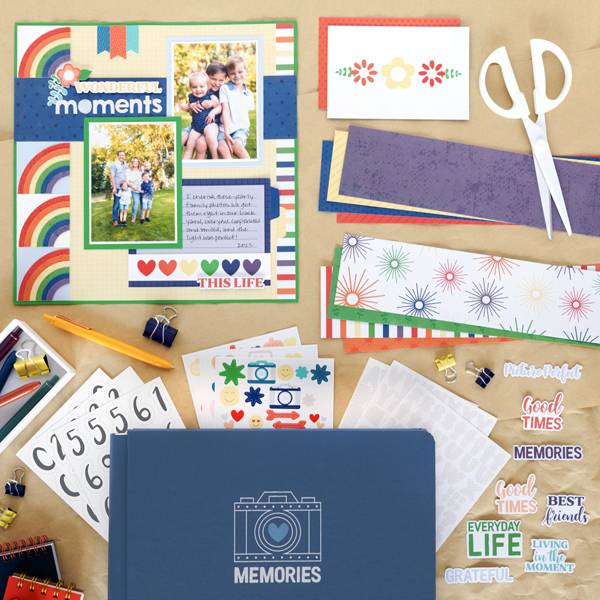
Practice and appreciate living in the moment with the newest This Life collection! This year-round bright and cheery collection will be your go-to for all of your 2024 memories — from family vacations and birthdays to school field trips and extracurricular activities to days spent enjoying the great outdoors and/or relaxing at home. No matter what moments fill your days, this rainbow scrapbook spread is sure to help shine some light on the wonderful lives we live!

To create this spread you will need:
- This Life Paper Pack or (Shop Canada | Shop Australia)
- This Life Tone-on-Tone Paper Pack or (Shop Canada | Shop Australia)
- This Life Variety Mat Pack or (Shop Canada | Shop Australia)
- This Life Word Embellishments or (Shop Canada | Shop Australia)
- This Life Stickers or (Shop Canada | Shop Australia)
- This Life ABC/123 Letters Stickers or (Shop Canada | Shop Australia)
- White, Kelly Green & Baby Blue Cardstock or (Shop Canada | Shop Australia)
- Tab Punch or (Shop Canada | Shop Australia)
- Custom Cutting System with Circle Patterns or (Shop Canada | Shop Australia)
- Circle Punch or (Shop Canada | Shop Australia)
- 12-inch Trimmer or (Shop Canada | Shop Australia)
- Tape Runner or (Shop Canada | Shop Australia)
- Repositionable Tape Runner or (Shop Canada | Shop Australia)
- Foam Squares Variety Pack or (Shop Canada | Shop Australia)
- Black Dual-Tip Pen or (Shop Canada | Shop Australia)
Cherish every vibrant chapter of life with the This Life collection — check it out below!

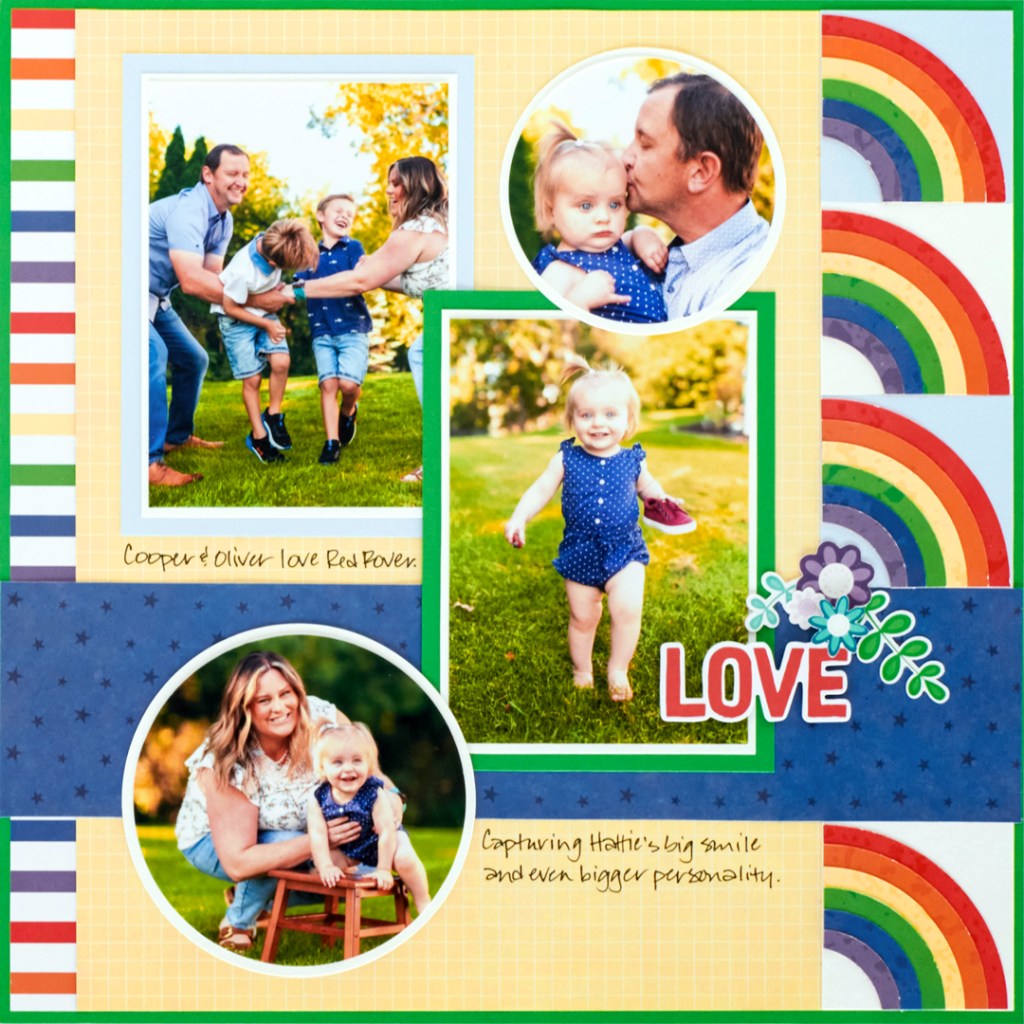
Step 1: Use 2 sheets of Kelly Green Solid Cardstock as the bases for this two-page layout. (To conserve paper, you may wish to remove the insides of the sheets, leaving only the frames.)
Step 2: Cut two 3/4″ x 12” strips with the stripes designer paper. Adhere to the inner edges of the layout, leaving 1/8” of the base showing on three sides. Cut two sheets of canary grid designer paper to 11” x 11-3/4”. Adhere on the layout, leaving 1/8” of the base showing on three sides.
Step 3: Cut four 2-1/4” squares with White Solid Cardstock and four 2-1/4” squares with Baby Blue Solid Cardstock. Adhere as shown on the outer sides of the layout. Cut two 2-3/4” x 12” strips with starry night designer paper. Adhere as shown across both pages.
Step 4: Make a rainbow. Use the guide below to cut two circles for each of the following using the tone-on-tone papers:
- Red canvas = outside Small Pattern, Blue Blade
- Pumpkin canvas = outside Small Pattern, Red Blade
- Canary canvas = inside Large Pattern, Red Blade
- Kelly Green canvas = inside Large Pattern, Blue Blade
- Blue canvas = inside Medium Pattern, Red Blade
- Eggplant canvas = inside Medium Pattern, Blue Blade
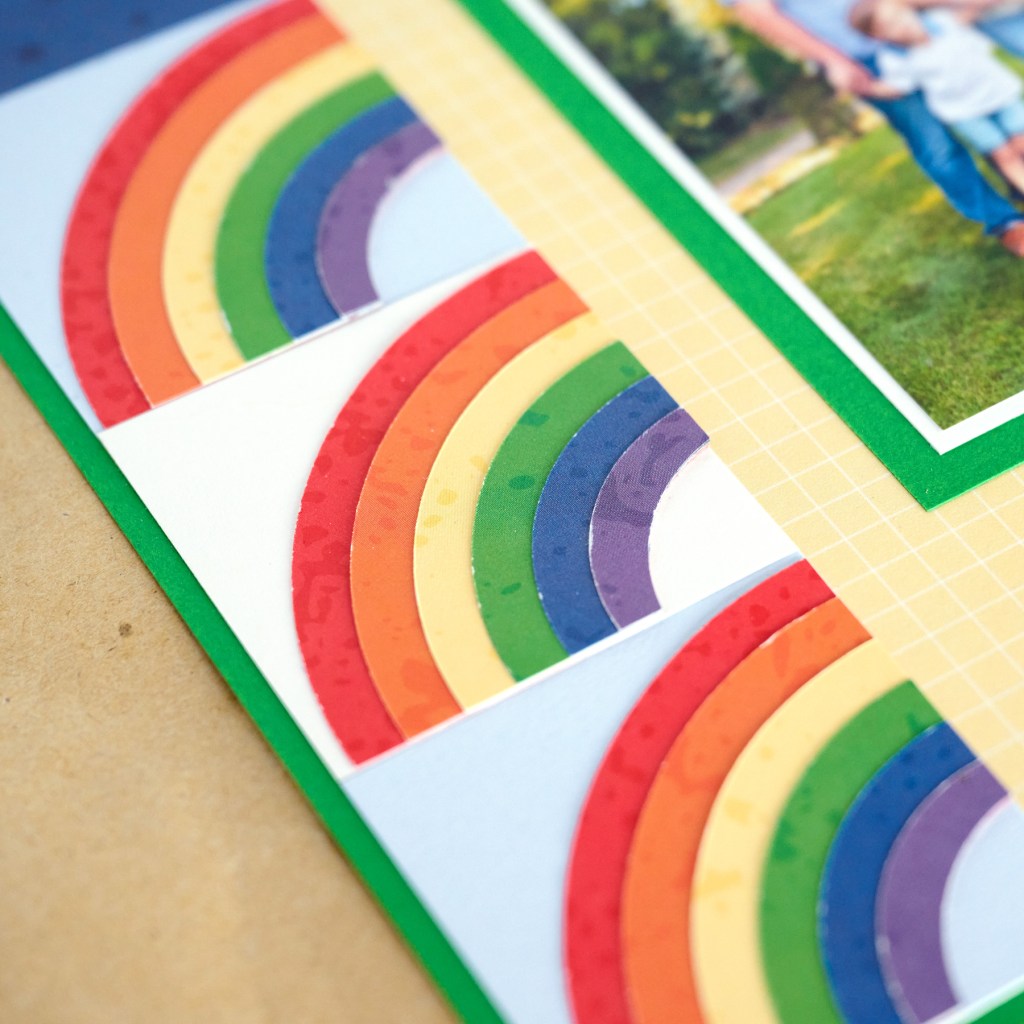
Layer and adhere the circles on top of each other, the largest on the bottom up to the smallest on top. Create two of these. Find the center of each and cut each into four equal pieces. Using the Circle Punch (turned upside down to see what you’re doing), punch an eggplant pie-shaped wedge from each corner. Adhere all eight pieces to the border squares as shown.
Step 5: Choose the blue lined 6” x 4” variety mat — cut the bottom edge off and save it. Choose the 6” x 4” rainbow hearts variety mat — cut out just the hearts strip (1-1/8”). Adhere the pieces on the layout as shown. Using the Tab Punch, punch one tab each with blue canvas and canary canvas tone-on-tone papers. Cut in half and adhere one half of each as shown behind the mat and the canary grid paper.
Step 6: Crop four photos to 3-1/2” x 5” and mount on four 3-3/4” x 5-1/4” pieces of White Solid Cardstock. Cut two 4-1/4” x 5-3/4” photo mats with Kelly Green Solid Cardstock and two with Baby Blue Solid Cardstock. Mount the photos on top and adhere on the layout as shown. Using the inside edge of the Large Circle Custom Cutting System Pattern and the Green Blade, crop a photo. Using the Red Blade, cut a photo mat with White Solid Cardstock. Using the outside edge of the Small Circle Custom Cuttings System Pattern and the Red Blade, crop a photo. Using the Green Blade, cut a photo mat with White Solid Cardstock. Layer and mount the photos on the layout as shown.
Step 7: Adhere stickers and embellishments, popping some up with Foam Squares for dimension. Journal as desired.
What are your thoughts on the decorative paper rainbows? Which photos would you use as the focal feature of this rainbow scrapbook spread?
P.S. Are YOU a member of the Virtual Crop Facebook Group? It’s your go-to place for MONTHLY Virtual Crops, MONTHLY Completed Album Challenges, WEEKLY LIVE STREAMING of Fast & Fun Projects with Noreen, LIVE QUARTERLY Secret Box Openings with project tutorials and so much more! We hope you’ll join our community of more than 37,000 fellow memory-keeping enthusiasts — you’ll feel right at home!

What size are the rainbow circles? It’s not mention in the instructions
Thank you
It’s mentioned under step 4, it doesn’t say the size in measurements just which size custom cutting circle and blade to use.