July 8, 2024
Create Claw-some Crab Scrapbook Borders

Need some creativity in a pinch? Check out these crab-tastic borders using the Curious Crabs BMC! Use it with the Coastal Shore collection, different colored cardstock and more. Keep reading for instructions on how you can create these crab scrapbook borders yourself!
To create these borders you will need:
- Coastal Shore Paper Pack or (Shop Canada | Shop Australia)
- Coastal Shore Stickers or (Shop Canada | Shop Australia)
- White, Black, Navy & Red Solid Cardstocks or (Shop Canada | Shop Australia)
- Original Border Maker System with Curious Crabs Border Maker Cartridge or (Shop Canada | Shop Australia)
- Custom Cutting System with Oval & Circle Patterns or (Shop Canada | Shop Australia)
- 12-inch Trimmer with Straight & Pinking Blades or (Shop Canada | Shop Australia) — Pinking Blade returning in August
- 12-inch Decorative Trimmer or (Shop Canada | Shop Australia)
- Micro-Tip Scissors or (Shop Canada | Shop Australia)
- Handheld 1-Hole Punch or (Shop Canada | Shop Australia)
- Tape Runner or (Shop Canada | Shop Australia)
- Repositionable Tape Runner or (Shop Canada | Shop Australia)
- Foam Squares Variety Pack or (Shop Canada | Shop Australia)
- Black Dual-Tip Pen or (Shop Canada | Shop Australia)
- Optional: Piece by Piece Mini Trio Punch Set or (Shop Canada | Shop Australia)


By the Bay Border
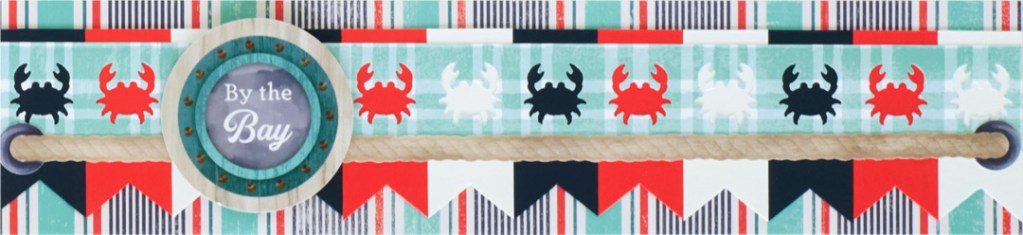
Step 1: Cut a 12? x 2-3/4? strip with nautical stripes paper for the base.
Step 2: Cut twelve 1? x 2? pieces with Navy, Red and White Solid Cardstocks. Using scissors, cut a “V” notch in one short end of each. Adhere on the base, alternating colors as shown.
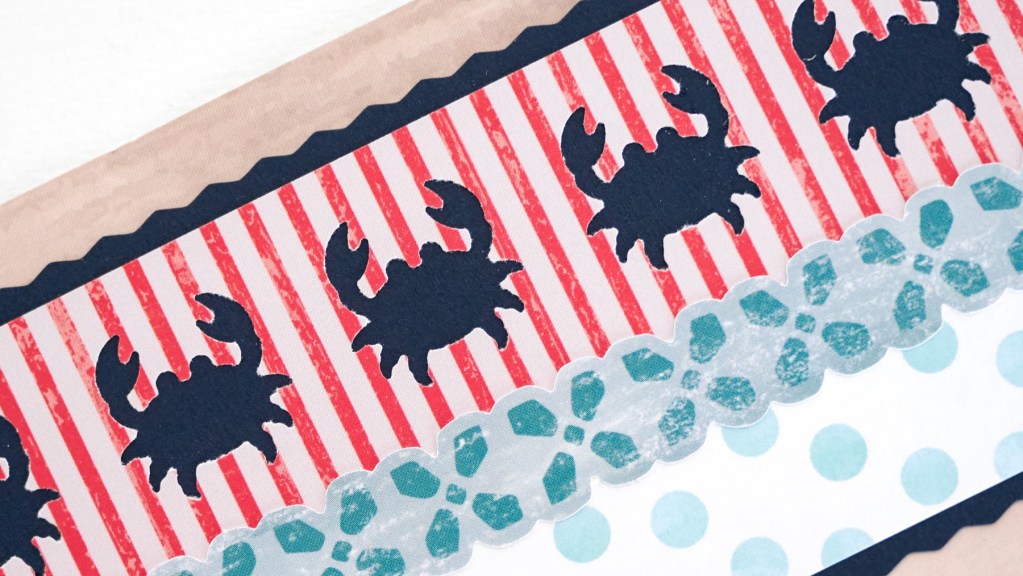
Step 3: Using the Curious Crab Border Maker Cartridge, punch a border with plaid paper. Trim to 12? x 1-1/4? and adhere on the border. Adhere a rope border sticker along the bottom edge.
Step 4: Adhere the “By the Bay” sticker using Foam Squares for dimension.
Friendly Crab Border

Step 1: Cut a 12? x 3-1/4? strip with wood paper for the base. Using the 12-inch Trimmer with the Pinking Blade, cut a 12? x 2-1/2? strip with Navy Solid Cardstock and adhere on the base. Using the 12-inch Trimmer with the Straight Blade, cut a 12? x 1? strip with dots paper and adhere near the bottom of the navy strip.
Step 2: Using the Curious Crab Border Maker Cartridge, punch a border with red stripes paper. Trim to 12? x 1-1/4? and adhere above the dots strip. Place a border sticker along the seam.
Step 3: Make the crab. Using the inside edge of the second smallest (3-1/2? x 5?) Custom Cutting System Oval Pattern and the Green Blade, cut an oval with Red Solid Cardstock for the body. Using the inside edge of the smallest (3? x 3-7/8?) Custom Cutting System Oval Pattern and the Green Blade, cut two ovals with Red Solid Cardstock. Without moving the pattern, cut an oval ring from each with the Red Blade. Using Micro-Tip Scissors, cut a wedge shape from each of the small ovals to make the pincers. Cut pieces of the oval rings to make the legs and arms. Using various hole punches, punch shapes with Red, White and Black Solid Cardstocks to make the eyes. Adhere all on the border. Use a Black Dual-Tip Pen to draw a smile.
Set Sails for Memories Border
Step 1: Cut a 3? x 12? strip with red stripes paper for the base. Cut a 1? x 12? strip with dots paper and adhere 1/4? from the right edge of the base. Using the wavy edge of the 12-inch Decorative Trimmer, cut a 2-1/8? x 12? strip with shells paper and adhere 1/4? from the left edge of the base.
Step 2: Using the inside edge of the small Custom Cutting System Circle Pattern and the Green Blade, cut three circles with each dots and beige wash papers. Adhere on the border as shown, alternating colors. Adhere the title sticker using Foam Squares for dimension.
Step 3: Using the Curious Crabs Border Maker Cartridge, punch a border with Red Solid Cardstock. Adhere a crab to each circle. Optionally, using a Black Dual-Tip Pen, draw eyes and mouths on each.
How did your crab scrapbook borders turn out? Did you try making all of them?
P.S. Are YOU a member of the Virtual Crop Facebook Group? It’s your go-to place for MONTHLY Virtual Crops, MONTHLY Completed Album Challenges, QUARTERLY Secret Box Openings with project tutorials and so much more! We hope you’ll join our community of more than 40,000 fellow memory-keeping enthusiasts — you’ll feel right at home!

Love the crab! Made for us Marylanders! #marylandisforcrabs
Thanks for the ideas and sharing!
Very cute Crab ideas