September 3, 2024
Hit the Books: Bookshelf Border Punch Projects

It’s time to hit the books — scrapbooks, that is! With school starting back up, it’s the perfect time to try out these borders made with the Bookshelf Border Punch. When combined with materials from the School Dayz collection, your spreads are sure to get an A+!

To create these borders you will need:
- School Dayz Paper Pack or (Shop Canada | Shop Australia)
- School Dayz Annual Paper Pack or (Shop Canada | Shop Australia)
- School Dayz Embellishments or (Shop Canada | Shop Australia)
- School Dayz Stickers or (Shop Canada | Shop Australia)
- White & Black Solid Cardstock or (Shop Canada | Shop Australia)
- 12-inch Trimmer with Straight & Scoring Blades or (Shop Canada | Shop Australia)
- Circle Punch or (Shop Canada | Shop Australia)
- All-Purpose Scissors or (Shop Canada | Shop Australia)
- Tape Runner or (Shop Canada | Shop Australia)
- Repositionable Tape Runner or (Shop Canada | Shop Australia)
- Foam Squares Variety Pack or (Shop Canada | Shop Australia)

Books Border:

Step 1: Cut a 12” x 3” strip with yellow general icons paper for the base. Cut a 12” x 2-1/4” strip with White Solid Cardstock and adhere on the base. Cut a 12” x 2” strip with lockers paper and mount on top.
Step 2: Using the Bookshelf Border Punch, punch a border with Black Solid Cardstock. Trim to 12” x 1-3/4” and adhere on the lockers strip. Adhere an alphabet border sticker on top.
Step 3: Add embellishments, popping the books up with Foam Squares for dimension.
Trophy Border:
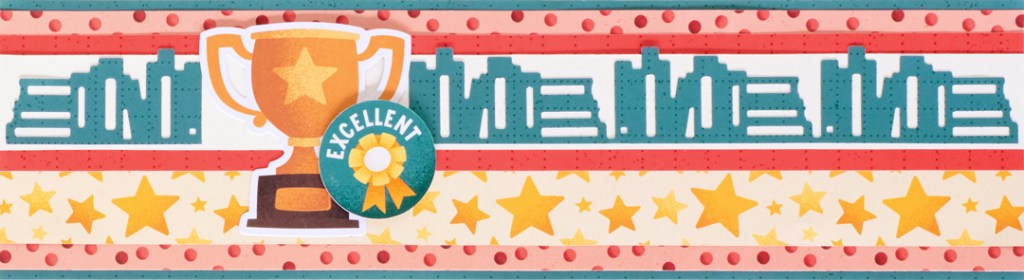
Step 1: Cut a 12” x 3-1/4” strip with dark sea green grid paper (annual paper pack) for the base. Cut a 12” x 3” strip with dots paper and adhere on the base. Cut a 12” x 1” strip with stars paper and adhere on the border.
Step 2: Cut a 12” x 1-5/8” strip with red grid paper (annual paper pack). Cut a 12” x 1-1/8” strip with White Solid Cardstock and adhere on top. Using the Bookshelf Border Punch, punch a border with dark sea green grid paper, only punch just once. Flip the paper to the reverse side and punch from the other end, three times. Trim out the border just past the books (1-1/8”). Using scissors, trim out the single set of books and adhere it on the left side of the white strip. Trim out the the triple set of books and adhere on the right side of the white strip. You now have created “bookends” with a space between. Adhere this border on the border from Step 1.
Step 3: Adhere the trophy embellishments in the open space. Adhere the “Excellent” sticker using Foam Squares.
Congrats Graduate Card:

Step 1: Create the card base. Cut an 8-1/2” x 5-1/2” piece with White Solid Cardstock. Using the 12-inch Trimmer with the Scoring Blade, score along the long edge at 4-1/4” and fold in half.
Step 2: Cut a 4” x 3-7/8” piece with Black Solid Cardstock. Using the Bookshelf Border Punch, punch a border on one 4” edge, aligning the paper in the middle before the first punch (instead of one of the black lines on the front of the punch). Adhere the piece on the card.
Step 3: Using the Circle Punch, punch a circle with White Solid Cardstock. Adhere the “Congrats” sticker on top, then mount on the border using Foam Squares. Adhere the “Graduate” embellishment using Foam Squares.
Are you making any back-to-school spreads this year?
P.S. Are YOU a member of the Virtual Crop Facebook Group? It’s your go-to place for MONTHLY Virtual Crops, MONTHLY Completed Album Challenges, QUARTERLY Secret Box Openings with project tutorials and so much more! We hope you’ll join our community of more than 40,000 fellow memory-keeping enthusiasts — you’ll feel right at home!

Love this! I just ordered this punch and can’t wait to make these layouts.