November 12, 2024
This Layout Is a Perfect Fit for Your Photos

Keeping photos of your loved ones never goes out of style! Preserve your best pictures with this layout created with the Denim Revival collection. With a variety of washes represented, you can create a cohesive, striped design by cutting apart the Denim Revival Paper Pack. Keep reading to see how you can recreate this design!

To create this layout you will need:
- Denim Revival Paper Pack or (Shop Canada | Shop Australia)
- Denim Revival Embellishments or (Shop Canada | Shop Australia)
- Denim Revival Stickers or (Shop Canada | Shop Australia)
- White Solid Cardstock or Write On! Stickers or (Shop Canada | Shop Australia)
- 12-inch Trimmer or (Shop Canada | Shop Australia)
- 2-Way Corner Rounder or (Shop Canada | Shop Australia)
- 13×13 Custom Cutting System Mat or (Shop Canada | Shop Australia)
- Ruler and pencil
- Tape Runner or (Shop Canada | Shop Australia)
- Repositionable Tape Runner or (Shop Canada | Shop Australia)
- Foam Squares Variety Pack or (Shop Canada | Shop Australia)
- Brown Dual-Tip Pen or (Shop Canada | Shop Australia)
- Scrap paper or cardstock

Step 1: Use a sheet of beige wash designer paper as the base for this layout.
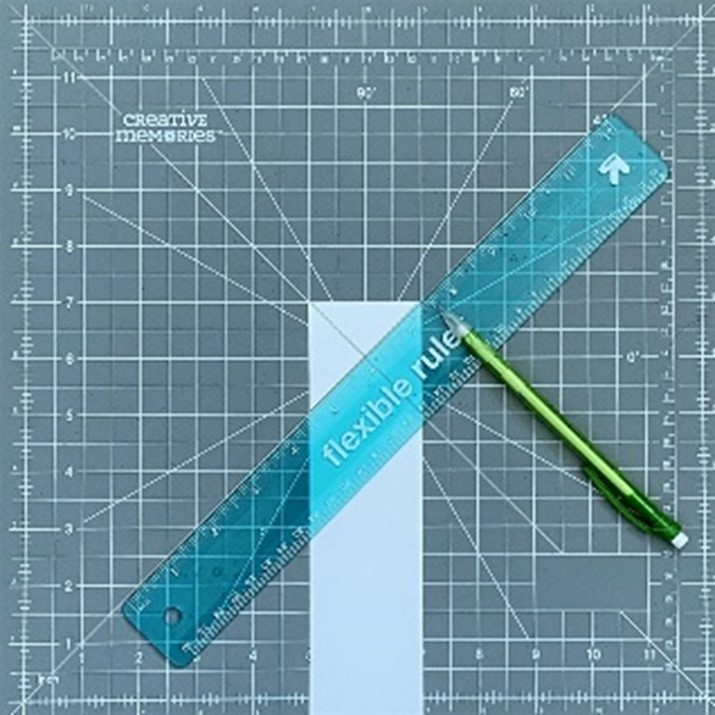
Step 2: Cut a 2” x 12” strip of scrap paper or cardstock. Place the top of the strip in the center of the 13-inch cutting mat so the top edge is on the 7” line. Place a ruler on one 45-degree line and draw a line from the corner down to the other side. Repeat for the other corner.
Step 3: Cut 1” strips with several denim papers. Cut into 2-1/2” lengths. Starting at the drawn lines, adhere one strip along one line. Adhere a second strip along the other line, overlapping the first. Adhere a third strip below the first, the fourth below the second. Repeat all the way down the strip. Finish by filling in strips on the top, tucking behind where needed. Using scissors or the 12-inch trimmer, trim off the excess. Adhere on the left side of the base.


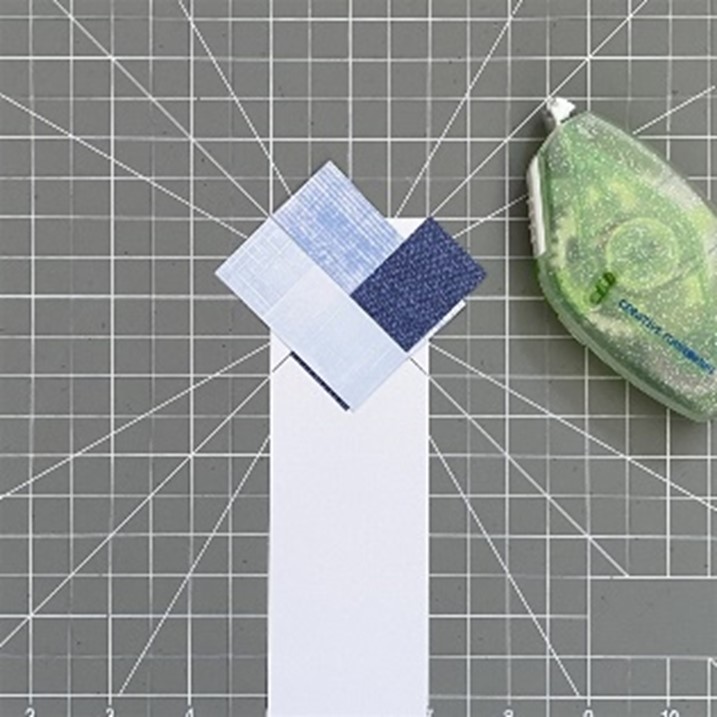
Step 4: Cut a 4” x 12” strip of scrap paper or cardstock. Place the top of the strip in the center of the 13-inch cutting mat so the top edge is on the 8” line. Place a ruler on one 45-degree line and draw a line from the corner down to the other side. Repeat for the other corner.
Step 5: Repeat Step 3, only this time cut 4” lengths from your 1” strips. Adhere on the right side of the layout.
Step 6: Crop one photo to 5-3/4” x 3-3/4”, two photos to 2-3/4” x 3-3/4” and one photo to 5-3/4” x 3”. Round the corners using the 2-way corner rounder. Adhere on the layout as shown.
Step 7: Thread a tag embellishment on a zig zag border sticker and adhere on the layout using foam squares. Adhere additional stickers, popping some up with foam squares for dimension.
Step 8: Cut 3/8” strips with white cardstock and adhere on the bottom right of the layout (or cut Write On! Stickers to desired length). Journal as desired.
What photos are you plan on using with this denim-themed layout?
P.S. Are YOU a member of the Virtual Crop Facebook Group? It’s your go-to place for MONTHLY Virtual Crops, MONTHLY Completed Album Challenges, QUARTERLY Secret Box Openings with project tutorials and so much more! We hope you’ll join our community of more than 40,000 fellow memory-keeping enthusiasts — you’ll feel right at home!

Awesome idea! I bet it would work with a variety of papers too!