November 20, 2024
Get a Taste of This Sugary Sweet Layout
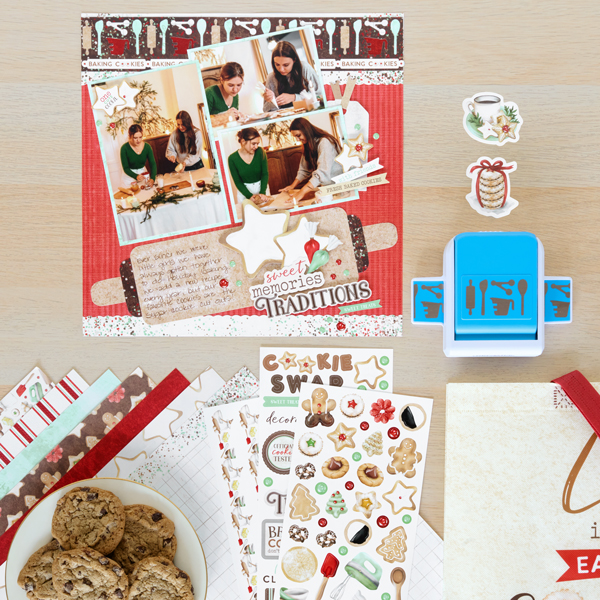
Looking for a layout that’s sugar, spice and everything nice? Look no further — this baking-themed layout is the perfect way to memoralize baking Christmas Cookies, having holiday snacks and gifting food to your loved ones. To make it, you’ll want to check out the Black Friday Promo where you can get the Cookie Exchange Bundle FREE with qualifying orders! Inside you’ll find the Baking Fun Border Punch, Cookie Exchange Stickers (3/pk), Cookie Exchange Paper Pack (12/pk), Cookie Exchange Embellishments (25/pk) and the Cookie Exchange Non-woven Laminate Bag.

To create this layout you will need:
- Cookie Exchange Embellishments
- Cookie Exchange Stickers
- Cookie Exchange Designer Paper
- Baking Fun Border Punch
- 12-inch Trimmer with Straight & Scallop Blades or (Shop Canada | Shop Australia)
- 2-Way Corner Rounder or (Shop Canada | Shop Australia)
- Tape Runner or (Shop Canada | Shop Australia)
- Repositionable Tape Runner or (Shop Canada | Shop Australia)
- Foam Squares Variety Pack or (Shop Canada | Shop Australia)
- Brown Dual-Tip Pen or (Shop Canada | Shop Australia)

Step 1: Use a piece of red stripes paper as the base of the layout.
Step 2: Cut a piece of sprinkles lite paper to measure 12” x 2-3/4” using the Scallop Blade on the trimmer. Adhere to the top edge of the layout.
Step 3: Cut a piece of sprinkles lite paper to measure 12” x ¾” using the Scallop Blade on the trimmer. Adhere to the bottom edge of the layout.
Step 4: Cut a piece of cookie texture paper to measure 8-1/4” x 3”. Adhere at an angle on the lower portion of the layout.
Step 5: Cut two pieces from sprinkles dark paper to measure ½” x 2-1/4”. Use the corner rounder on the outer two corners of each piece, then adhere to the ends of the previous piece.
Step 6: Cut two pieces from cookie texture paper to measure 1-1/4” x 1”. Use the corner rounder on the outer ends of each piece, then adhere to the ends of the previous piece to create the rolling pin.
Step 7: Using the Baking Fun Border Punch, punch a border along the edge of a sprinkles dark piece of paper, then trim to measure 2”.
Step 8: Cut small pieces of a variety of papers to adhere behind the openings of the border. Then adhere the border to the top of the 12” x 2-3/4” on the top of the layout.
Step 9: Cut photo mats from cookie recipe collage paper to measure (2) 4-3/4” x 3-1/2” and (1) 4-1/4” x 6-1/4”. Adhere to the layout.
Step 10: Adhere photos that measure (2) 4-1/2” x 3-1/4” and (1) 4” x 6”.
Step 11: Adhere stickers and embellishments, using Foam Squares on some for added dimension.
Step 12: Journal as desired.
Did you claim your Cookie Exchange Bundle? You won’t want to wait this sweet offer ends November 22 at noon CT or while supplies last!
P.S. You can also choose the Luminous Shimmer Bundle FREE! It includes a Shimmer POD Insert, Glitter Rainbow Dividers (12/pk) and Luminous Rainbow Full Coverage Accent Paper Pack (12/pk), all perfect for making your projects shimmer and shine.
Learn more about our Black Friday Promo ?
P.P.S Are YOU a member of the Virtual Crop Facebook Group? It’s your go-to place for MONTHLY Virtual Crops, MONTHLY Completed Album Challenges, QUARTERLY Secret Box Openings with project tutorials and so much more! We hope you’ll join our community of more than 40,000 fellow memory-keeping enthusiasts — you’ll feel right at home!

Super cute!
Cute and easy layout to adapt to more photos and/or story-telling. In Step 4, remember to corner round the 8.25″ x 3″ cookie texture paper so it resembles the layout photo design and looks like the large roller of a rolling pin. I’m wondering if using the white shimmer pen or the white chalk pen some of us might still have would add the look of sprinkled flour on the rolling pin or even on the red stripes base paper. Maybe experiment first on scraps. Thanks Melissa!