July 21, 2025
Preserve Your Sweet Summer Moments with the Berry Harvest Collection

There’s something so nostalgic about berry picking, and this Berry Harvest collection layout captures that sweetness with rich fruit-themed patterns, adorable mason jar details, and space to highlight your favorite memories from the patch. Whether your tradition includes u-pick farms, garden harvests or making jam with loved ones, this layout is a fun and flavorful way to tell your story.
To create this layout you will need:
- Berry Harvest Paper Pack or (Shop Canada | Shop Australia)
- Berry Harvest Stickers or (Shop Canada | Shop Australia)
- Berry Harvest Mat Pack or (Shop Canada | Shop Australia)
- Berry Harvest Embellishments or (Shop Canada | Shop Australia)
- Bright White Solid Cardstock or (Shop Canada | Shop Australia)
- Canning Jars Border Punch or (Shop Canada | Shop Australia)
- Mason Jar Build-A-Punch or (Shop Canada | Shop Australia)
- Custom Cutting System or ( Shop Canada | Shop Australia )
- Rectangle Pattern or ( Shop Canada | Shop Australia )
- 12-inch Trimmer or (Shop Canada | Shop Australia)
- Photo Trimmer or (Shop Canada | Shop Australia)
- Tape Runner or (Shop Canada | Shop Australia)
- Repositionable Tape Runner or (Shop Canada | Shop Australia)
- Foam Squares or (Shop Canada | Shop Australia)
- Dual-Tip Black Pen or (Shop Canada | Shop Australia)
- Micro-Tip Black Pen or (Shop Canada | Shop Australia)
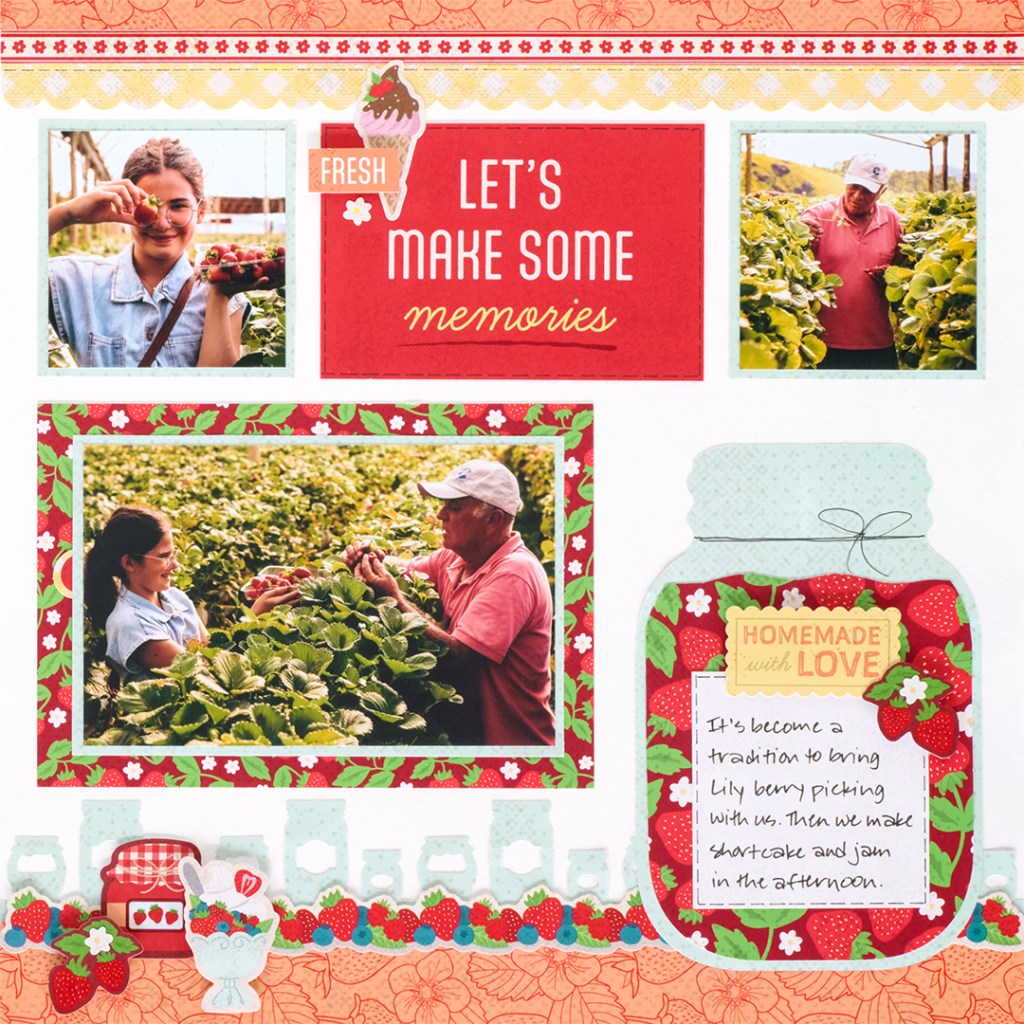

Step 1: Use a sheet of white Cardstock as the base for this layout.
Step 2: Cut a 12″ x 3/8″ strip with the strawberry florals designer paper and adhere on the top edge of the layout. Cut a 12″ x 3/8″ strip with the ribbon stripes paper and adhere just beneath it. Adhere a yellow scalloped border sticker just beneath the ribbon stripes piece.
Step 3: Cut a 12″ x 1-1/4″ strip with the strawberry florals designer paper and adhere on the bottom edge of the layout. Using the Canning Jars Border Punch, punch a border with the light blue dots designer paper. Trim to 12″ x 1-1/2″ and adhere above the strawberry florals strip. Adhere a berries border sticker along the seam.
Step 5: To create the mason jar, use the outside of the largest CCS Rectangle Pattern and the red blade to cut a partial rectangle with the light blue dots designer paper, stopping the cut at approximately 4″. Move the rectangle pattern down so the top curved edge is just above the cuts, and carefully cut just the curves on each side.
Step 6: Switching to the square pattern, place the pattern so the inside top edge is approximately 1″ above the top curved cut. Cut the mouth of the jar using the red blade on the inside of the square pattern.
Step 7: Hold the Mason Jar Build-A-Punch upside down and slide one top side edge of the jar mouth into the punch so that the punch’s curvy lid edge hugs the edge of the jar mouth. Punch to give ridges to the mouth of the jar. Repeat with the other side.
Step 8: Using the outside of the smallest rectangle pattern and the red blade, cut a partial rectangle (3-3/4″) with the strawberries designer paper for the jam. Move the pattern down and cut the top edge so the shape is approximately 4-3/4″ tall. Using micro-tip scissors, cut the top edge off. Adhere the “jam” on the jar.
Step 9: Using a micro-tip black pen, draw string around the top of the jar as shown. Cut a 2-3/4″ square with a variety mat and adhere the “label” on the jar. Draw stitching around the edges and journal as desired.
Step 10: Cut the “Let’s Make Some Memories” mat to 4-1/2″ x 3″ and adhere on the layout as shown. Cut two photos to 2-3/4″ x 2-3/4″ and mount on two 3″ x 3″ squares of the light blue dots paper. Adhere on either side of the mat.
Step 11: Adhere a 6-1/2″ x 4-1/2″ strawberries mat on the layout. Top with a 5-3/4? x 3-3/4″ piece of light blue dots paper and a photo cropped to 5-1/2″ x 3-1/2″.
Step 12: Use a micro-tip black pen to draw stitching along the scalloped border sticker and the title mat. Adhere stickers and embellishments, popping some up with foam squares for dimension.
This layout is a berry sweet reminder of how the smallest traditions can leave the biggest impressions. With the Berry Harvest collection’s fresh colors, charming embellishments and custom punches, it’s easy to bring your favorite summer memories to life. So dig into those photos, grab your favorite tools and let the preserving begin — because memories like these deserve a place on your page.
P.S. Are YOU a member of the Virtual Crop Group? It’s your go-to place for MONTHLY Virtual Crops, MONTHLY Completed Album Challenges, QUARTERLY Secret Box Openings with project tutorials and so much more! We hope you’ll join our community of more than 46,000 fellow memory-keeping enthusiasts — you’ll feel right at home!

Just ordered this, looking forward to using it for an album for my granddaughter!