May 18, 2016
Pinterest Style Scrapbook Layouts Using CM Products
Did someone say PINTEREST? I am a total Pinterest addict! Like I not just like it, but LOVE it! It is a part of my daily routine! You can find lots of great ideas on our Creative Memories Pinterest boards as well—for anything from border ideas to party decor to scrapbooking layouts, of course! Here are a few scrapbooking layouts that I had pinned along the way that I loved. I used them with the Achievements Collection, in a non-graduation format to show just how versatile this collection can be! No need to have a graduate to be able to use this collection!
Pinterest Inspired Layout:

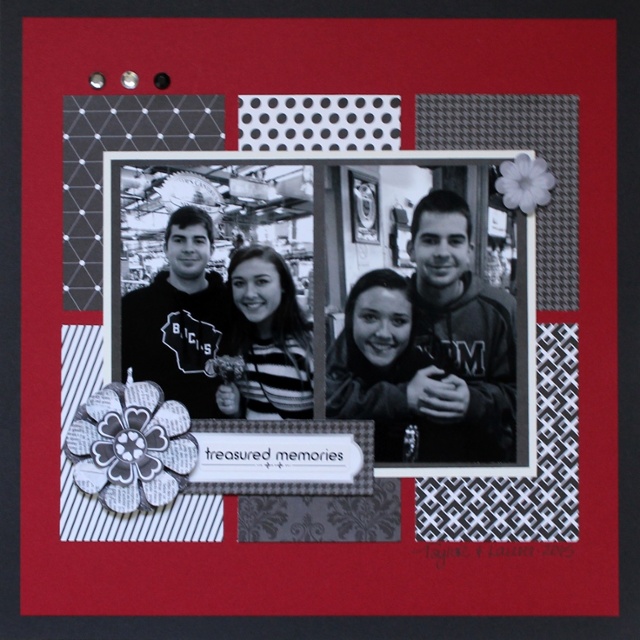
Treasured Memories Layout
To create this layout, you will need:
- Achievements Paper Pack
- Achievements Stickers
- Black and White Embellishments
- Black Cardstock
- Cranberry Cardstock
- White Cardstock
- Foam Squares
- 12-Inch Trimmer
- Tape Runner
Step 1: Use the Black Cardstock as the base for the layout.
Step 2: Cut Cranberry Cardstock to measure 11″ x 11″.
Step 3: Cut six pieces of designer paper to measure 3″ x 4″.
Step 4: Cut a piece of White Cardstock to measure 8″ x 6″.
Step 5: Cut a piece of black paper to measure 7-3/4″ x 5-3/4″.
Step 6: Layer the papers.
Step 7: Adhere two photos that measure 3-1/2″ x 5-1/2″ to the black paper.
Step 8: Adhere the embellishments and gems.
Step 9: Journal as desired.
Pinterest Inspired Layout:

Congratulations Layout

To create this layout, you will need:
- Achievements Paper Pack
- Achievements Embellishments
- Black and White Embellishments
- Cloud Cardstock
- White Cardstock
- Border Maker System with Crown Cartridge
- Foam Squares
- Corner Maker
- 12-Inch Trimmer
- Tape Runner
Step 1: Use the black houndstooth patterned paper as the base for the layout.
Step 2: Cut a piece of black paper to measure 10-1/2″ x 10-1/2″. Round all four corners.
Step 3: Cut a piece of Cloud Cardstock to measure 10″ x 10″. Round all four corners.
Step 4: Cut two pieces from the striped paper to measure 10″ x 2″ and 10″ x 1″. Round the corners on the long edges.
Step 5: Cut a piece of paper to measure 10″ x 1/2″.
Step 6: Punch a border from the Crown Cartridge on the Border Maker from the White Cardstock. Cut to measure 10″ x 1″.
Step 7: Cut a piece of black paper to measure 10″ x 4″.
Step 8: Layer all papers as shown.
Step 9: Adhere the embellishments.
Step 10: Journal as desired.
Pinterest Inspired Card:

WooHoo Card

To create this card, you will need:
- Achievements Paper Pack
- Black and White Embellishments
- Corner Maker
- Cranberry Cardstock
- Achievements Stickers
- Foam Squares
- 12-Inch Trimmer
- Tape Runner
- Scissors
Step 1: Cut a piece of White Cardstock to measure 5-1/2″ x 8-1/2″. Fold in half to create card.
Step 2: Cut a piece of black paper to measure 4″ x 5-1/4″.
Step 3: Cut a piece of White Cardstock to measure 3-3/4″ x 3-3/4″.
Step 4: Cut a piece of Cranberry Cardstock to measure 3-1/2″ x 3-1/2″.
Step 5: Cut four pieces of designer paper to measure 1-1-1/2″ x 1-1/2″. Round opposite corners of each square with the Corner Maker.
Step 7: Cut two strips of paper/cardstock to measure 1-1/4″ x 5-1/4″ and 1-1/4″ x 5″. Cut a “v” into the ends using a scissors.
Step 8: Layer and adhere the papers as shown.
Step 9: Adhere the embellishments and sticker.
So, let’s see what you can create after pinning a few ideas!
Happy Creating!
Melissa
