September 21, 2016
Pinterest Inspired Study Buddies Scrapbook Layout
Pinterest is my never fail go to place when I’m looking for ideas for a new scrapbook layout.
Most often I browse Pinterest looking for inspiration or an idea I can use on my own project. This time though I had something specific in mind – a one photo, school themed layout.
I found quite a few layouts that fit that criteria using Pinterest search. All I had to do was choose which layout I wanted to use.
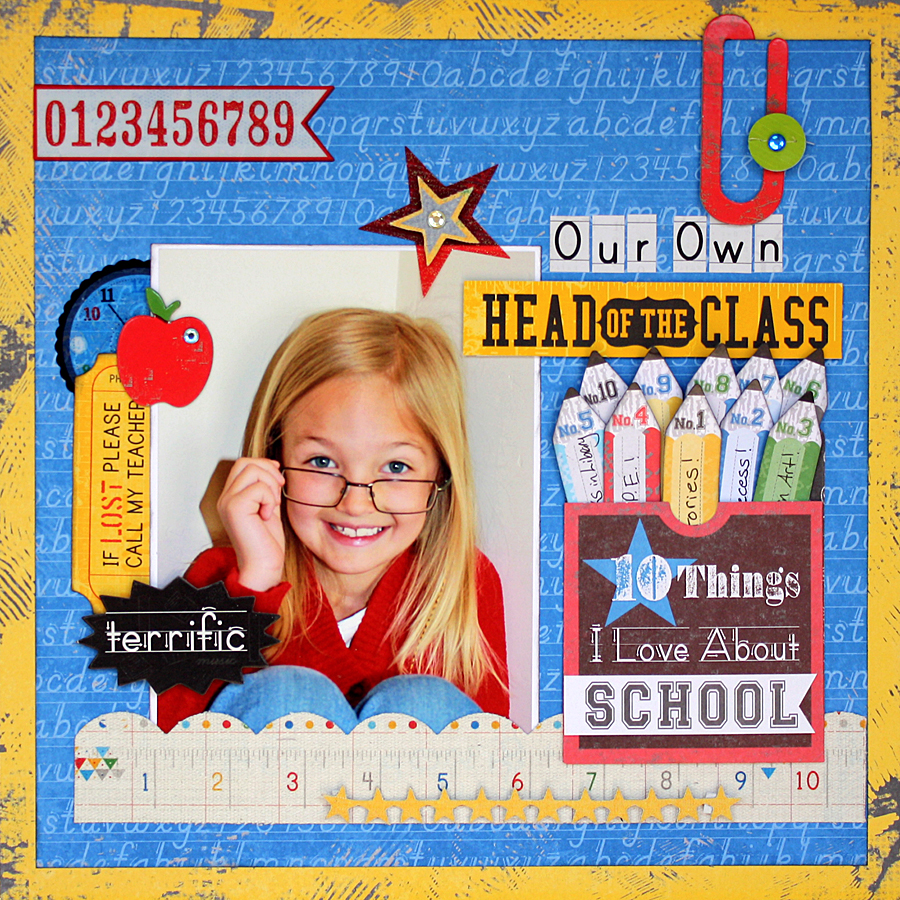
Today I’m going to share my version of a layout created by Liz Qualman at Liz Qualman Designs. Liz created her super cute scrapbook layout for girl. Mine was created for a boy using Creative Memories’ new Study Buddies Collection. I used the same concept for my layout but changed things up a bit.

Here’s what you’ll need to create this layout:
- Study Buddies Paper Pack
- Study Buddies Embellishments
- Study Buddies Slide-In Pack
- 12-Inch Straight Trimmer
- Black pen
- Tape Runner and Foam Squares
Instructions:
- Using plaid pattern paper as your base, layer and adhere one 11 x 11″ square pattern paper as shown.
- Using the 12-Inch Straight Trimmer, cut one 1 1/2 x 10 1/2″ strip from pattern paper. Adhere to layout as shown. Trim star border to about 6 inches and adhere to strip.
- Adhere one 5 x 7″ photo and embellishments as shown. Use slide-in card to journal your story.
There you go! Have fun creating your own school themed layouts with the Study Buddies Collection. And don’t forget to check out Pinterest for some really fun scrapbook layout ideas.


I would so like to see more of the less than 12×12 size album. I am not really into the larger albums. Thanks!
Love this layout. Sue Brady, it can easily be scaled down for an 8×8 album. Just use a smaller photo and smaller journal box. You can adjust the instructions to accommodate the size page you’re working on. For instance, if you’re using an 8×8 album your base layer would be 8×8. Then adhere a 7×7 square pattern paper. Cut a 1″ or 3/4″ x 6 1/2″ strip from pattern paper and adhere to lower 7×7 square leaving a small border on the left side and bottom of the square. (I’d start with a 1″ strip and see if I like it. You can always trim it back to 3/4″!!!
Adhere one 4×6 “or 3×5? photo and embellishments as shown. Trim star border to about 4 or 5 inches and adhere to strip. Again, place the star border on your page and see what size you like and then trim to that size. Use slide-in card to journal your story. You can trim a little of the notebook border to maintain scale. Have fun. Like any recipe, you can add or subtract to your liking. :)
I love this layout for the Study Buddies paper pack..Great idea for our North Carolina Scrapbook Retreat in Raleigh NC for NSD 2017.