August 6, 2019
Take on Terrific Tints with this Rainbow Scrapbook Spread

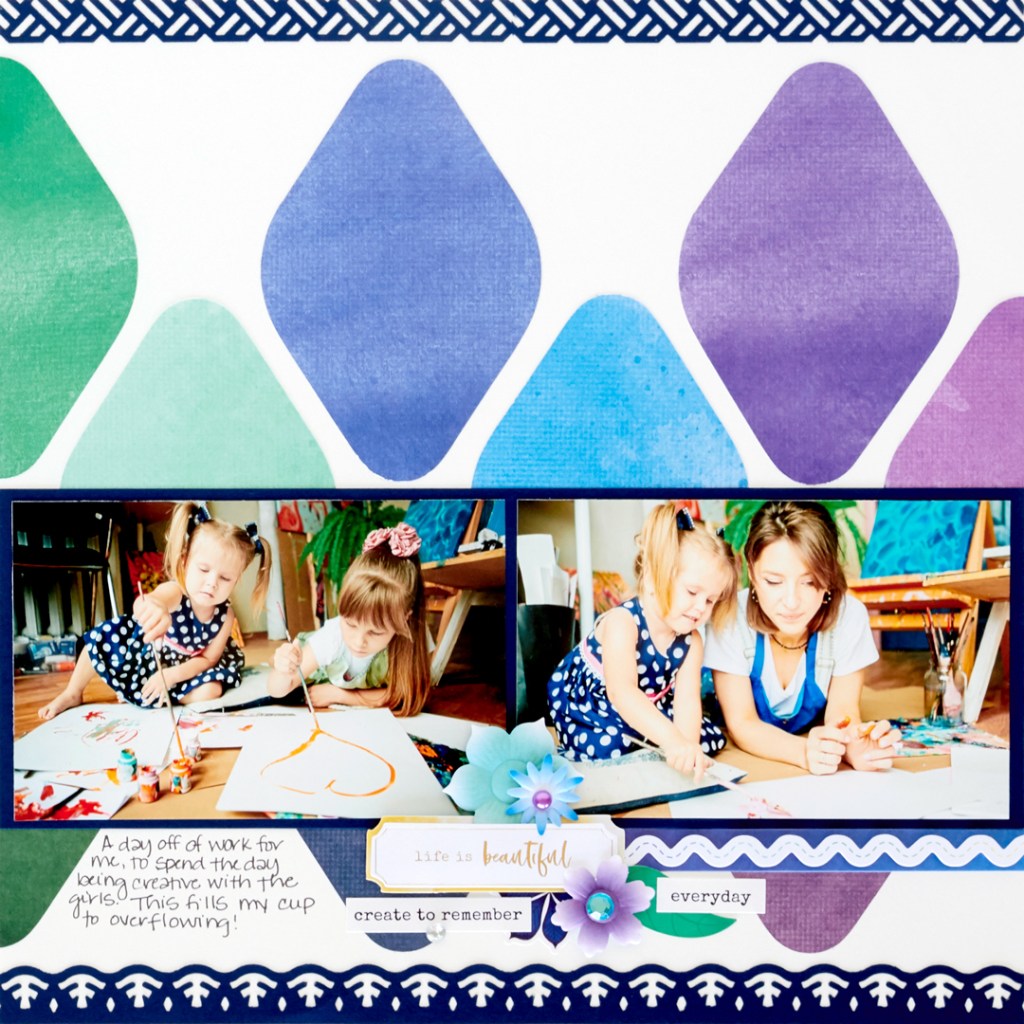
For every photo full of light and life, there needs to be a background that’s equally as joyous and exuberant. When it comes to vibrant whimsy, no collection packs a palette punch better than Rainbow Rush! The different tints and the playful tones make any layout pop – you’ll be an ace of shades before you know it! Enjoy this two-page rainbow scrapbook layout and think of all the bea-hue-tiful possibilities!
To create this layout, you will need:

- Rainbow Rush Decorative Bundle or (Shop Canada | Shop Australia)
- White Cardstock or (Shop Canada | Shop Australia)
- Navy Cardstock or (Shop Canada | Shop Australia)
- Basketweave Border Punch or (Shop Canada | Shop Australia)
- Original Border Maker System with Dips & Diamonds Border Maker Cartridge or (Shop Canada | Shop Australia)
- Custom Cutting System with Gemstone Patterns or (Shop Canada | Shop Australia)
- 12-inch Trimmer or (Shop Canada | Shop Australia)
- Tape Runner or (Shop Canada | Shop Australia)
- Repositionable Tape Runner Refill or (Shop Canada | Shop Australia)
- Foam Squares or (Shop Canada | Shop Australia)
- Black Dual-Tip Pen or (Shop Canada | Shop Australia
Step 1: Use two pieces of White Cardstock as the base for this spread.
Step 2: Cut out 16 pieces from various papers, using the inside of the diamond shape from the Custom Cutting System Gemstone Patterns with the Red Blade. Adhere them to the spread in a rainbow sequence.
Step 3: Punch two borders from Navy Cardstock using the Original Border Maker System with the Dips & Diamonds Border Maker Cartridge. Trim the borders to measure 12″ x 3/4″ and adhere them along the bottom edge of the spread using the Tape Runner with Repositionable adhesive.
Step 4: Cut two pieces of Navy Cardstock to measure 12″ x 4″ and adhere one to each side of the spread. Adhere four photos measuring 5-3/4″ x 3-3/4″ to the Navy Cardstock as shown.
Step 5: Using the Basketweave Border Punch, punch one 12″ strip from Navy Cardstock. Cut it in half lengthwise (3/4″) and adhere both strips along the top edges of the spread with the Tape Runner and Repositionable adhesive.
Step 6: Adhere embellishments and stickers to the spread, popping up some with Foam Squares for added dimension. Journal as desired.
This rainbow scrapbook spread is a great way to highlight multiple photos with a bright and buoyant backdrop. It’s a fun layout you can use for all sorts of different themes and photos — what will you use it for? Does a particular shade stand out and speak to you? Comment below!

Love this layout so much!! I was hoping to see directions here! Thank you!
Great way to use colors and brighten up page…could use any shapes or other ideas with the color scheme.
Love this layout. Striking yet simple!
Great job, Melissa! Love it!
Love it!!
I forget to use my cutting system — I Love this!!!