January 29, 2020
Manifest Masculine Masterpieces with these DIY Cards and Scrapbook Borders

Have you come up with some classic creations using the Genuine collection yet? Drawing inspiration from traditional menswear fabrics, tailor-made textiles and rugged, natural elements, this collection gives all your projects a down-to-earth yet dapper look. Not only can you create authentic layouts, but also fun DIY cards and scrapbook borders that have an incomparably iconic look. Check them out!
To create these borders and card, you will need:
- Genuine Paper Pack or (Shop Canada | Shop Australia)
- Genuine Stickers or (Shop Canada | Shop Australia)
- Genuine Laser Cut Embellishments or (Shop Canada | Shop Australia)
- Beige and Brown Cardstock or (Shop Canada | Shop Australia)
- Original Border Maker System with Timeless Tweed Border Maker Cartridge or (Shop Canada | Shop Australia)
- 12-inch Trimmer with Straight and Scoring Blades or (Shop Canada | Shop Australia)
- All-Purpose Scissors or (Shop Canada | Shop Australia)
- Tape Runner or (Shop Canada | Shop Australia)
- Repositionable Tape Runner Refill or (Shop Canada | Shop Australia)
- Foam Squares or (Shop Canada | Shop Australia)
Get a closer look at the Timeless Tweed Border Maker Cartridge in the video below!
It’s the Little Things Border

Step 1: Cut a piece of Beige Cardstock to measure 12″ x 1-3/4″.
Step 2: Cut two pieces of patterned paper to measure 12″ x 1/2″. Adhere the strips along the top and bottom of the Beige Cardstock.
Step 3: Using the Timeless Tweed Border Maker Cartridge, punch a border strip using the green patterned paper.
Step 3: Cut a piece of Beige Cardstock to measure 12″ x 7/8″. Adhere the green border on top of this piece using the Repositionable Tape Runner. Adhere this whole strip to the middle of the border.
Step 4: Using the Timeless Tweed Border Maker Cartridge, punch a border strip from the dark blue patterned paper. Adhere the inside punched pieces to the top of the border using Foam Squares.
Step 5: Adhere sticker “flags” and a sticker title using Foam Squares.
Lead By Example Border

Step 1: Cut a piece of green patterned paper to measure 12″ x 2″. Use this piece as the base for the border.
Step 2: Cut a piece of Brown Cardstock to measure 12″ x 1-1/4″.
Step 3: Punch two border strips using the Timeless Tweed Border Maker Cartridge. Adhere them using the Repositionable Tape Runner to the back side of the Brown Cardstock, leaving the edges showing. Adhere this whole piece to the green border base.
Step 4: Cut a piece of brown patterned paper to measure 12″ x 1″ and adhere it to the border.
Step 5: Adhere the blue border sticker strip to the border. Finish by adding stickers and the “Lead By Example” laser cut embellishment.
Life is Good Card
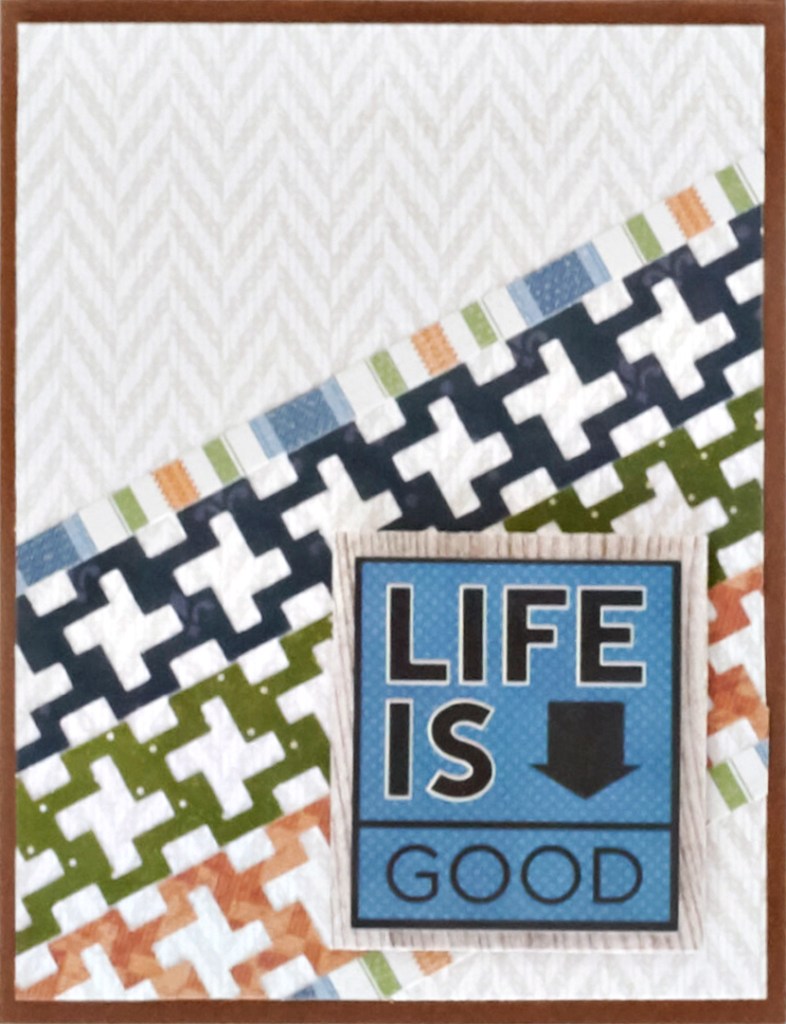
Step 1: Cut a piece of Brown Cardstock to measure 5-1/2″ x 8-1/2″. Using the 12-inch Trimmer Scoring Blade, score it at 4-1/4″ and fold it in half to create your card base.
Step 2: Cut a piece of the cream patterned paper to measure 4″ x 5-1/4″.

Step 3: Punch several strips using the Timeless Tweed Border Maker Cartridge from various pattered papers. Adhere them to the cream paper at an angle using the Repositionable Tape Runner, as shown above.
Step 4: Cut two strips of stripe patterned paper to measure 6″ x 1/4″. Adhere them at an angle to the top and bottom edges of the border strips. Use All-Purpose Scissors to trim away any overhang. Adhere this whole piece to the front of the card.
Step 5: Cut a piece of the wood grain patterned paper to measure 2″ x 2-1/4″. Adhere the “Life is Good” sticker to the top of it using Foam Squares. Adhere this whole piece to the card using Foam Squares.
The Genuine collection gives you everything you need to create sincere stories with these DIY scrapbook borders and DIY cards. Which one of these projects will you create first? Let us know in the comments below!

[…] You can learn how to create these two Genuine projects (and more!) with instructions in this blog post! […]