March 11, 2020
Sprout in a Special Way with these Spring Borders & DIY Card
Almost everyone has a smile on their face during the springtime (except for maybe people with pollen allergies). The Spring Medley collection captures all the positive vibes of spring – translate this happiness to your pages and projects with these spring borders and a DIY card idea. Read on to find out how!

To create these borders and card, you will need:
- Spring Medley Paper Pack or (Shop Canada | Shop Australia)
- Spring Medley Tone-on-Tone Paper Pack or (Shop Canada | Shop Australia)
- Spring Medley Stickers or (Shop Canada | Shop Australia)
- 12×12 Beige, Gray & Navy Solid Cardstock or (Shop Canada | Shop Australia)
- Original Border Maker System with the Spring Leaf Chain Border Maker Cartridge or (Shop Canada | Shop Australia)
- Custom Cutting System with Circle Patterns or (Shop Canada | Shop Australia)
- 12-inch Trimmer or (Shop Canada | Shop Australia)
- All-Purpose Scissors or (Shop Canada | Shop Australia)
- Tape Runner or (Shop Canada | Shop Australia)
- Repositionable Tape Runner or (Shop Canada | Shop Australia)
- Foam Squares or (Shop Canada | Shop Australia)
- Denim Dot Pen or (Shop Canada | Shop Australia)
Get a closer look at the Spring Leaf Chain Border Maker Cartridge in the video below!
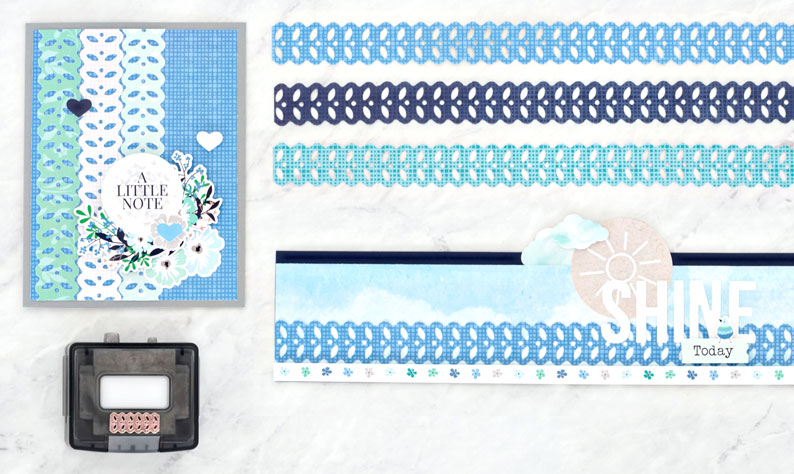
Shine Border

Step 1: Cut a piece of Navy Cardstock to measure 12″ x 2-1/2″.
Step 2: Cut a piece of the cloud patterned paper to measure 12″ x 2″ and adhere it to the cardstock, leaving 1/4″ on the top and bottom.
Step 3: Using the Spring Leaf Chain Border Maker Cartridge with the Border Maker System, punch a border from the blue patterned paper. Adhere it to the lower edge of the cloud patterned paper.
Step 4: Adhere a sticker border along the bottom edge using Foam Squares.
Step 5: Adhere stickers for a title, using Foam Squares on some for added dimension.
Get Outdoors Border

Step 1: Cut a piece of Beige Cardstock to measure 12″ x 1-3/4″.
Step 2: Cut a piece of mint green patterned paper to measure 12″ x 1-1/2″.
Step 3: Using the Spring Leaf Chain Border Maker Cartridge, punch a border from the white patterned paper. Adhere it along the top back edge of the mint paper so that you only see the scallop and adhere it to the cardstock.
Step 4: Using the medium Custom Cutting System Circle Pattern with the Red Blade, cut a circle from the light blue patterned paper.
Step 5: Using the medium Custom Cutting System Circle Pattern with the Green Blade, cut a circle from the dark blue patterned paper.
Step 6: Adhere the circles together, then adhere them to the border. Cut the bottom portion of the circle off.
Step 7: Using the Spring Leaf Chain Border Maker Cartridge, punch a border from the green patterned paper and cut it into shorter segments. Adhere the segments to the circle as flower stems.
Step 8: Cut/tear a piece of the sand patterned paper to measure 12″ x 1/2″. and adhere it to the bottom edge of the border.
Step 9: Adhere stickers, using Foam Squares on some for added dimension. Doodle with the Denim Dot Pen as desired.
A Little Note Card

Step 1: Cut a piece of Gray Cardstock to measure 8-1/2″ x 5-1/2″ and fold it in half.
Step 2: Cut a piece of the blue patterned paper to measure 4″ x 5-1/4″.
Step 3: Using the Spring Leaf Chain Border Maker Cartridge, punch a border from green, mint and white patterned papers. Adhere to the blue piece along the left edge. Trim any excess borders away with scissors.
Step 4: Adhere stickers, using Foam Squares on some for added dimension.
Will you be creating this DIY card or any of these spring borders? If so, which one will you create first? Tell us below in the comments!

I think I’m making cards!! But I will show the borders too!
[…] Help your projects blossom into something better with the spring scrapbook borders found in this blog post! […]
I have used the entire Spring collection! 5 double layouts, 4 borders, 3 cards, and enough scraps to make 6-8 tags! Wonderful!
[…] Want to create this card? Then let’s get to it, shall we? Learn more in this blog post! […]