May 14, 2020
Congratulate Your Grad With This DIY Gift Card Holder
Graduation season is upon us, and even though we may not be able to see the graduate in person, you can still find (and create!) ways to show your support! Blog contributor Tina Kistinger came up with a fun DIY gift card holder using the Graduation Day Theme Pack that is sure to make any grad feel loved and appreciated. Check it out!
Tina’s Inspiration
My nephew is graduating from high school in June and the Graduation Day Theme Pack is perfect for any high school or college graduation. The positive and encouraging messages celebrating his achievement add a shining touch to this project. I tried to make the instructions as simple as possible — it’s not a difficult project when broken down into steps, and I still have plenty of product left over!
To create this project, you’ll need:
- Graduation Day Theme Pack or (Shop Canada | Shop Australia)
- Black Cardstock or (Shop Canada | Shop Australia)
- Tape Runner or (Shop Canada | Shop Australia)
- Mini Tape Runner Refill or (Shop Canada | Shop Australia)
- Foam Squares or (Shop Canada | Shop Australia)
- 12-inch Trimmer or (Shop Canada | Shop Australia)
- Scoring Blade or (Shop Canada | Shop Australia)
- Circle Custom Cutting System or (Shop Canada | Shop Australia)
- Blue Custom Cutting System Blade Cartridge or (Shop Canada | Shop Australia)
- Green Custom Cutting System Blade Cartridge or (Shop Canada | Shop Australia)
- All-Purpose Scissors or (Shop Canada | Shop Australia)
- 3-in-1 Scallop Tag Punch or Traditional Hole Punch
- 4-Way Hearts and Stars Corner and Hole Punch (optional)
- Ribbon
- Gift Card

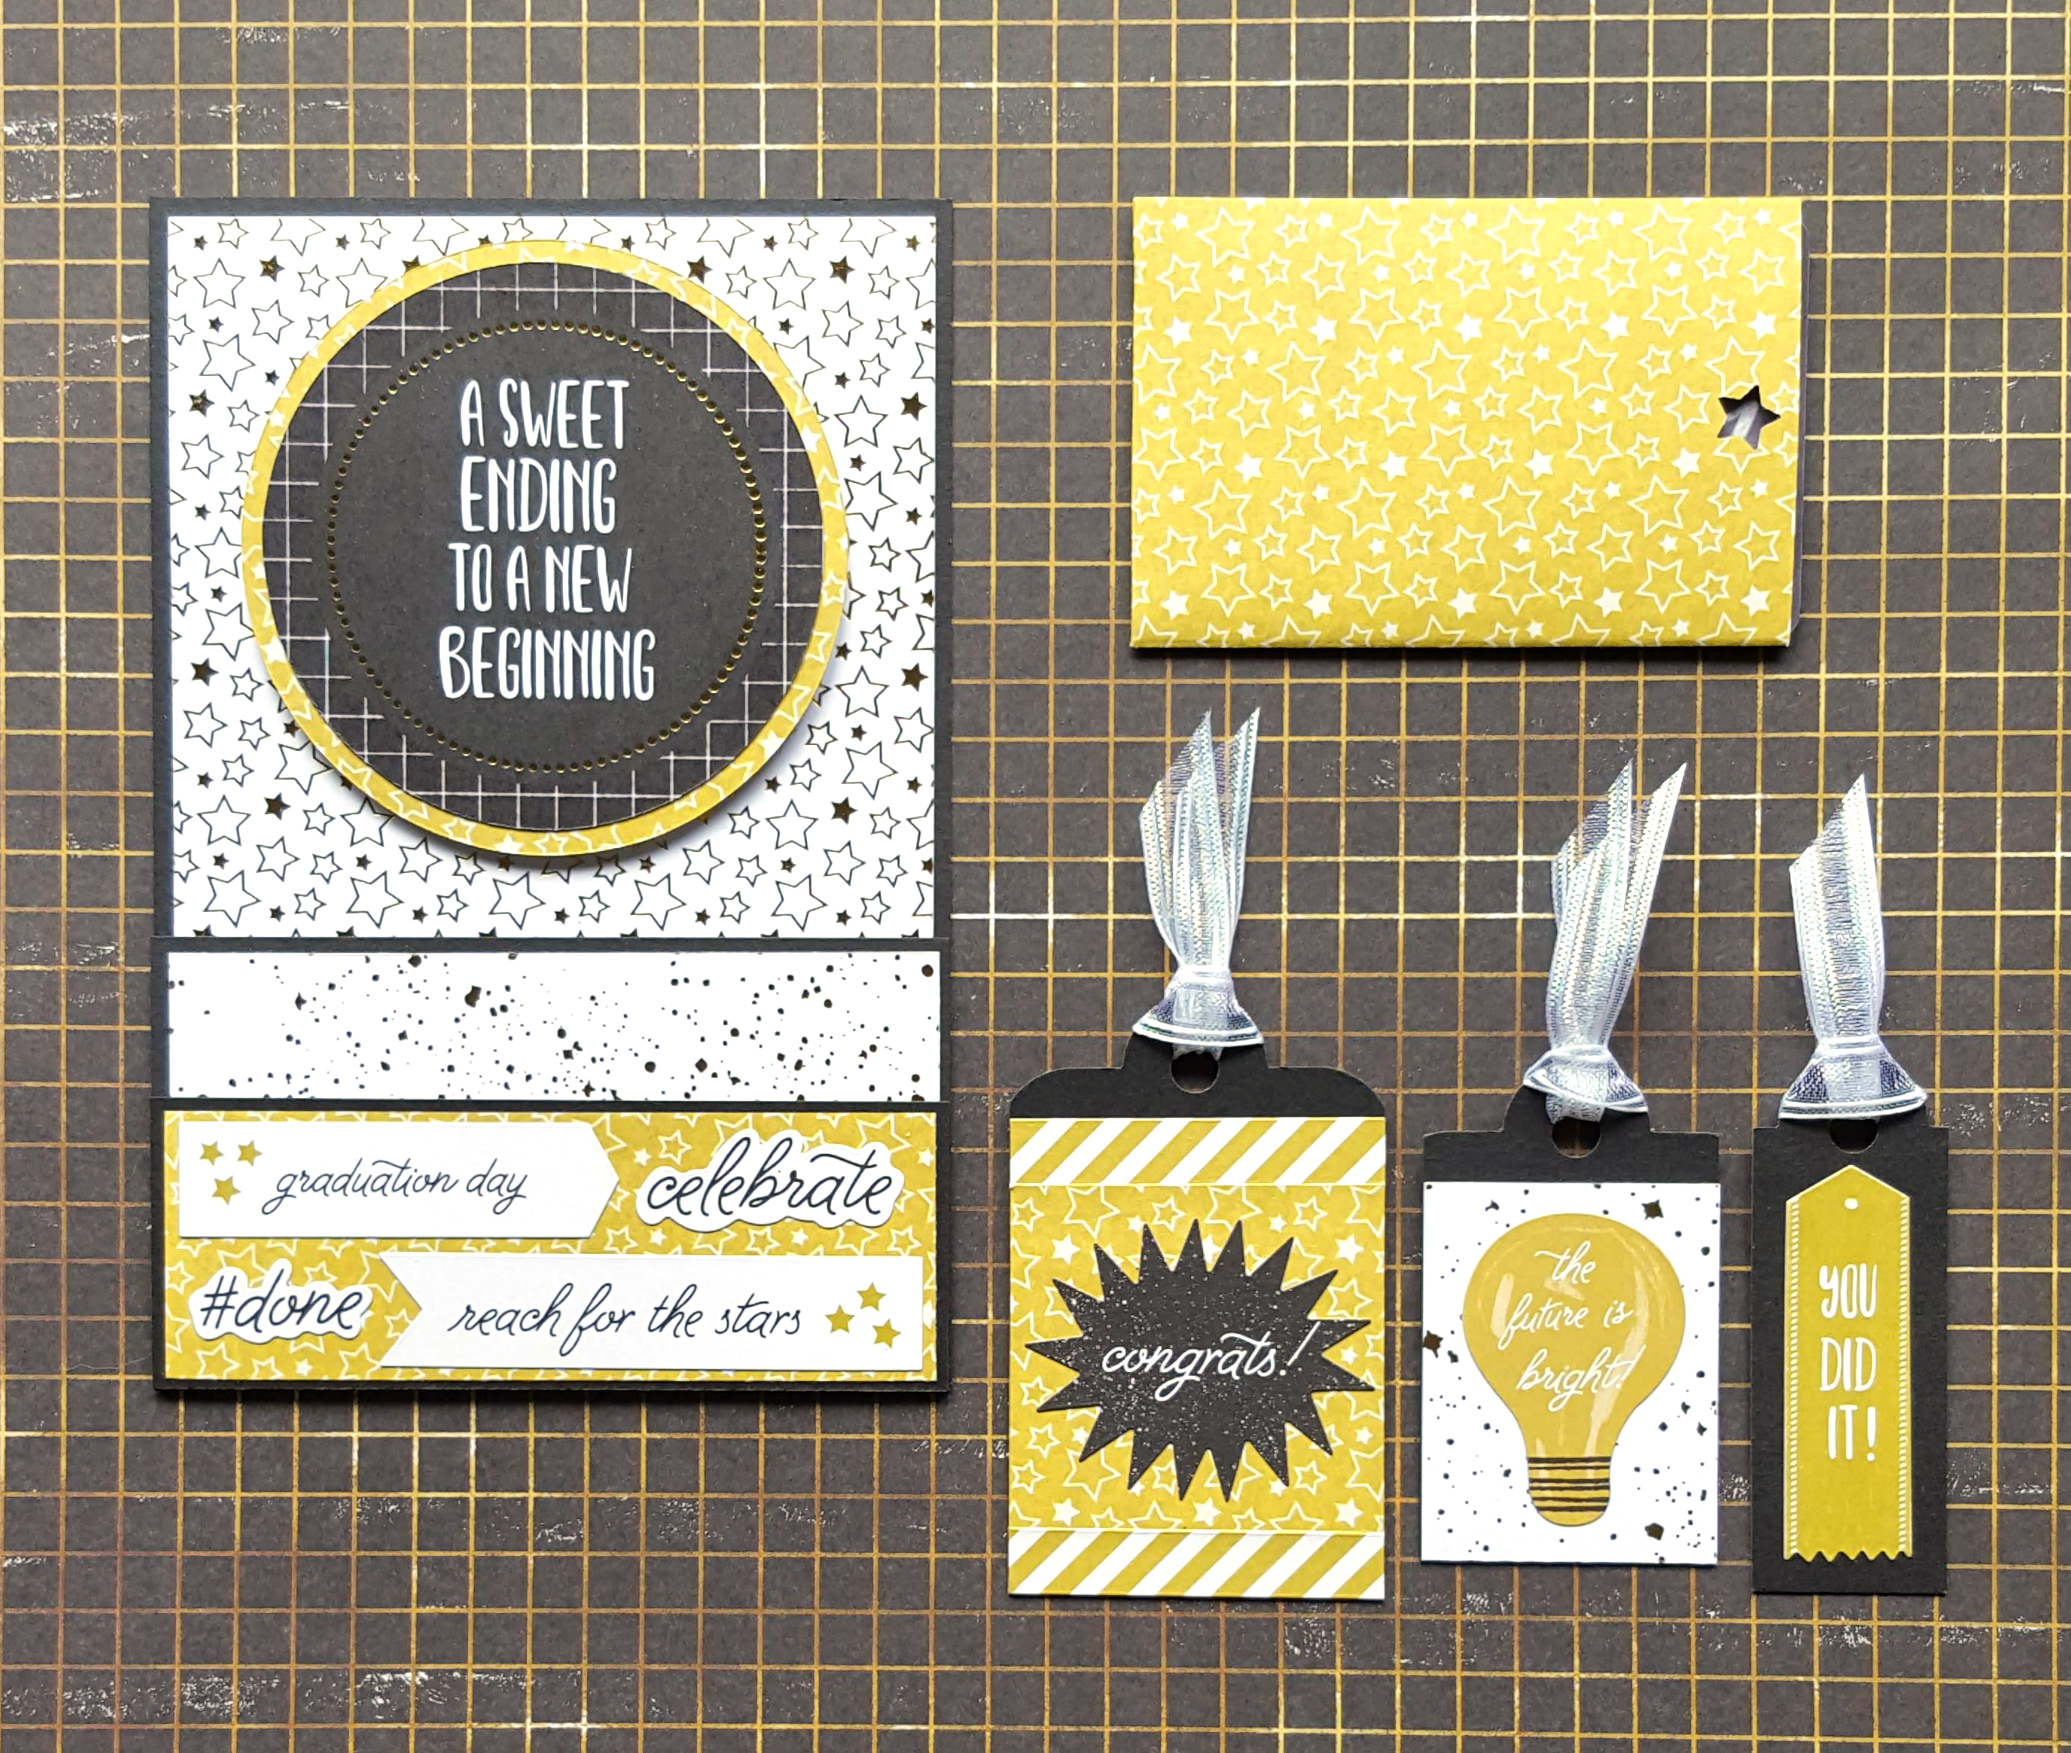
Step 1: Cut three pieces of Black Cardstock: 6-1/8″ x 4-1/8″, 2-3/8″ x 4-1/8″ and 1-1/2″ x 4-1/8″.
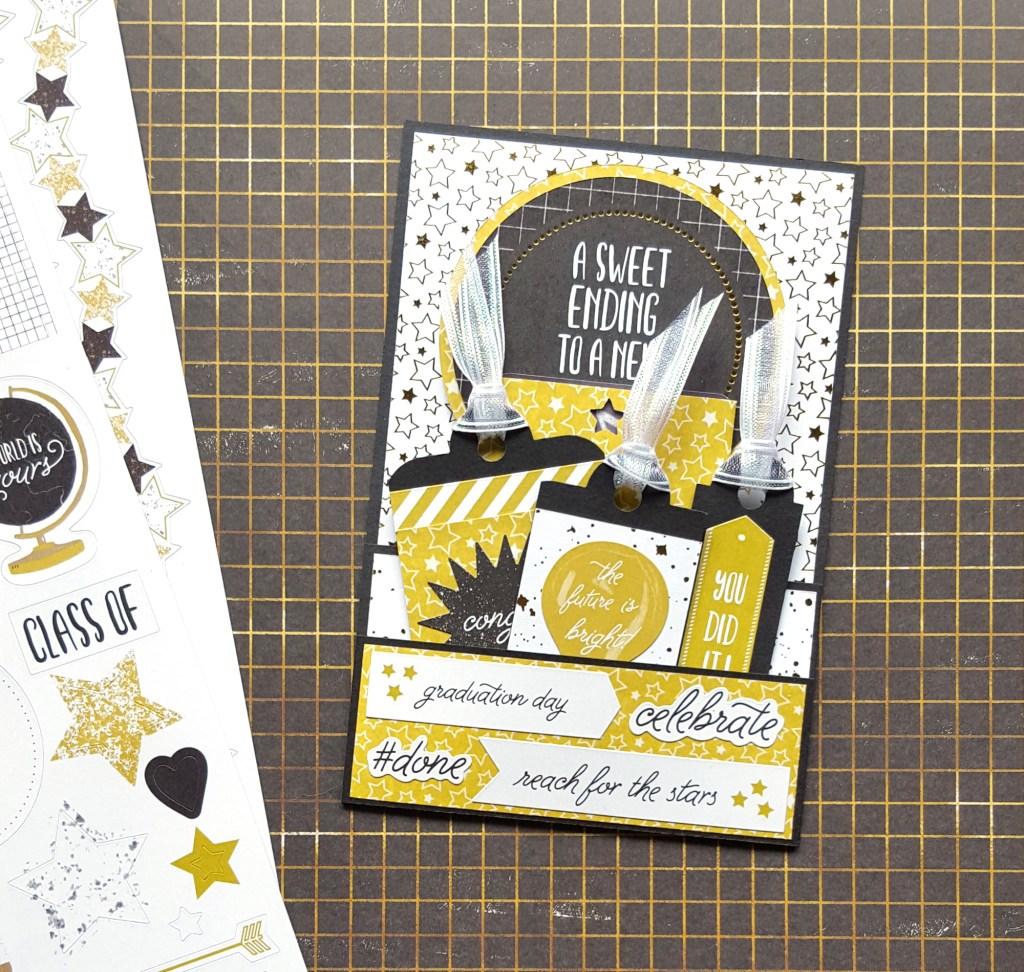
Step 2: Cut out the star block from the cut-apart sheet. Adhere it to the largest black piece of cardstock using a Tape Runner.
Step 3: Cut out “A Sweet Ending” from the cut-apart sheet using the large circle template from the Custom Cutting System. Using the Blue Blade, cut along the inside track so that the finished circle will be 3″. Cut a circle mat out of the gold star paper using the Green Blade. Adhere the two together using Tape Runner adhesive. Adhere the “A Sweet Ending” emblem toward the top of the sheet using Foam Squares.
Step 4: Take the two remaining paper strips and make pockets. Mat the larger pocket using white confetti paper and the smaller pocket with gold star paper. Using a Tape Runner with the Mini Tape Runner Refill, run adhesive along three sides of the backside of the largest pocket and adhere to the star block paper. Repeat with the smaller pocket.
Step 5: Decorate the small pocket with stickers.

Step 6: Make three tags using the 3-in-1 Scallop Tag Punch.
- First tag: Make a 2″ tag and adhere the striped sticker and “Congrats” sticker.
- Second tag: Make a 1-1/2″ tag and adhere the “The future is bright!” sticker.
- Third tag: Make a 1″ tag and adhere the “You did it!” sticker. Add ribbon to all three tags to finish them.

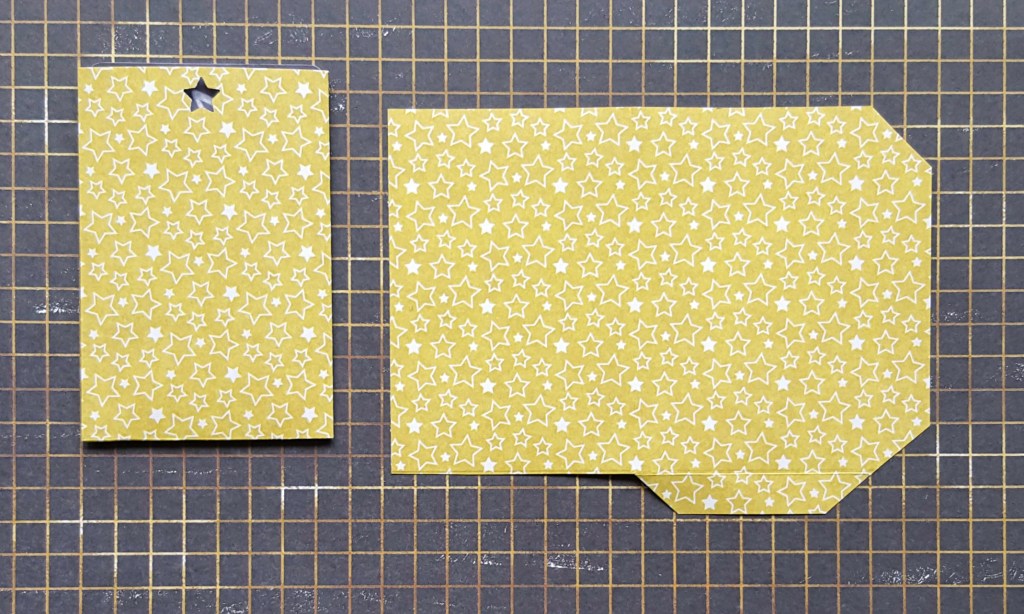
Step 7: Make a gift card holder. Cut a piece of gold star paper: 5″ x 3-3/4″. Score along the long side: 2-1/4″ and 4-1/2″. Turn to the short side and score at 3-3/8″. Crisp the folds. Cut tabs as shown in the photo using scissors. Flip the paper over to have the white confetti paper facing up and the tabs on the left and bottom. Use Mini Tape Runner Refill adhesive along the tabs to finish the gift card holder.
Optional: Find the middle of the non-tabbed panel and draw a short pencil line. Line up the pencil line with the centerline of the 4-Way Hearts and Stars Corner and Hole Punch and punch out a star.
Step 8: Add the tags and gift card holder and give it to the proud graduate.
All I need to do is buy the gift card and it’s ready to go. I can’t wait to give it to my nephew!
What sorts of crafts do you create to celebrate graduations in the family? Let us know in the comments below — and bravo to all the graduates out there!

beautiful card
Great idea Tina. I need to make 3 of them!
I love this idea! I’m having difficulty with the length of the tags and size of the background paper in the two larger tags. Any assistance would be a great help. TIA Janet
I like how you said that the graduation card should include a positive and celebratory message. I want to get a custom-made graduation stole for my nephew to wear when he gets his bachelor’s degree this May. Thanks for teaching me how to make a really meaningful card to go along with his graduation stole!
[…] Get instructions to create the “Congratulate Your Grad With This DIY Gift Card Holder” […]