July 22, 2020
Project Paradise Is Calling You With These Tropical Scrapbook Layouts
Tropical locations can be great fun with their hot-weather days, but the fantastic You-Pick-It Promo is even hotter! For a limited time when you make a qualifying purchase, you can pick your choice of promo bundles! Choose from two amazing bundles — and each features an exclusive album cover, a Fast2Fab™ Paper Pack and a border punch! Blog contributor Noreen Smith got her hands on both of the bundles, and she was able to put them to work in some truly creative and crafty ways — check out these tropical scrapbook layouts!

Noreen’s Inspiration
I got my hands on both border punches to play with and decided they were a perfect match to pair with the Vitamin Sea collection (they would also be fantastic with the Electric Summer collection, too!) Check out how I used them to create the fun borders on these two layouts!

To make the layout with the Palm Trees Border Punch you will need:
- Vitamin Sea Paper Pack or (Shop Canada | Shop Australia)
- Vitamin Sea Stickers or (Shop Canada | Shop Australia)
- Vitamin Sea Laser Cut Borders or (Shop Canada | Shop Australia)
- Vitamin Sea Embossed Embellishments or (Shop Canada | Shop Australia)
- Vitamin Sea Variety Mat Pack or (Shop Canada | Shop Australia)
- Dark Green & Leaf Green Cardstock or (Shop Canada | Shop Australia)
- Promotion: Palm Trees Border Punch or (Shop Canada | Shop Australia)
- 12-inch Trimmer or (Shop Canada | Shop Australia)
- Custom Cutting System with Oval Patterns or (Shop Canada | Shop Australia)
- All-Purpose Scissors or (Shop Canada | Shop Australia)
- Tape Runner or (Shop Canada | Shop Australia)
- Repositionable Tape Runner or (Shop Canada | Shop Australia)
- Foam Squares or (Shop Canada | Shop Australia)
Step 1: When punching borders with the Palm Trees Border Punch, insert paper or cardstock into the paper slot and line up the edge with one of the black lines on the front of the punch. Punch, then slide cardstock along the base plate and align the punched shape with the image of the shape printed on the base plate.
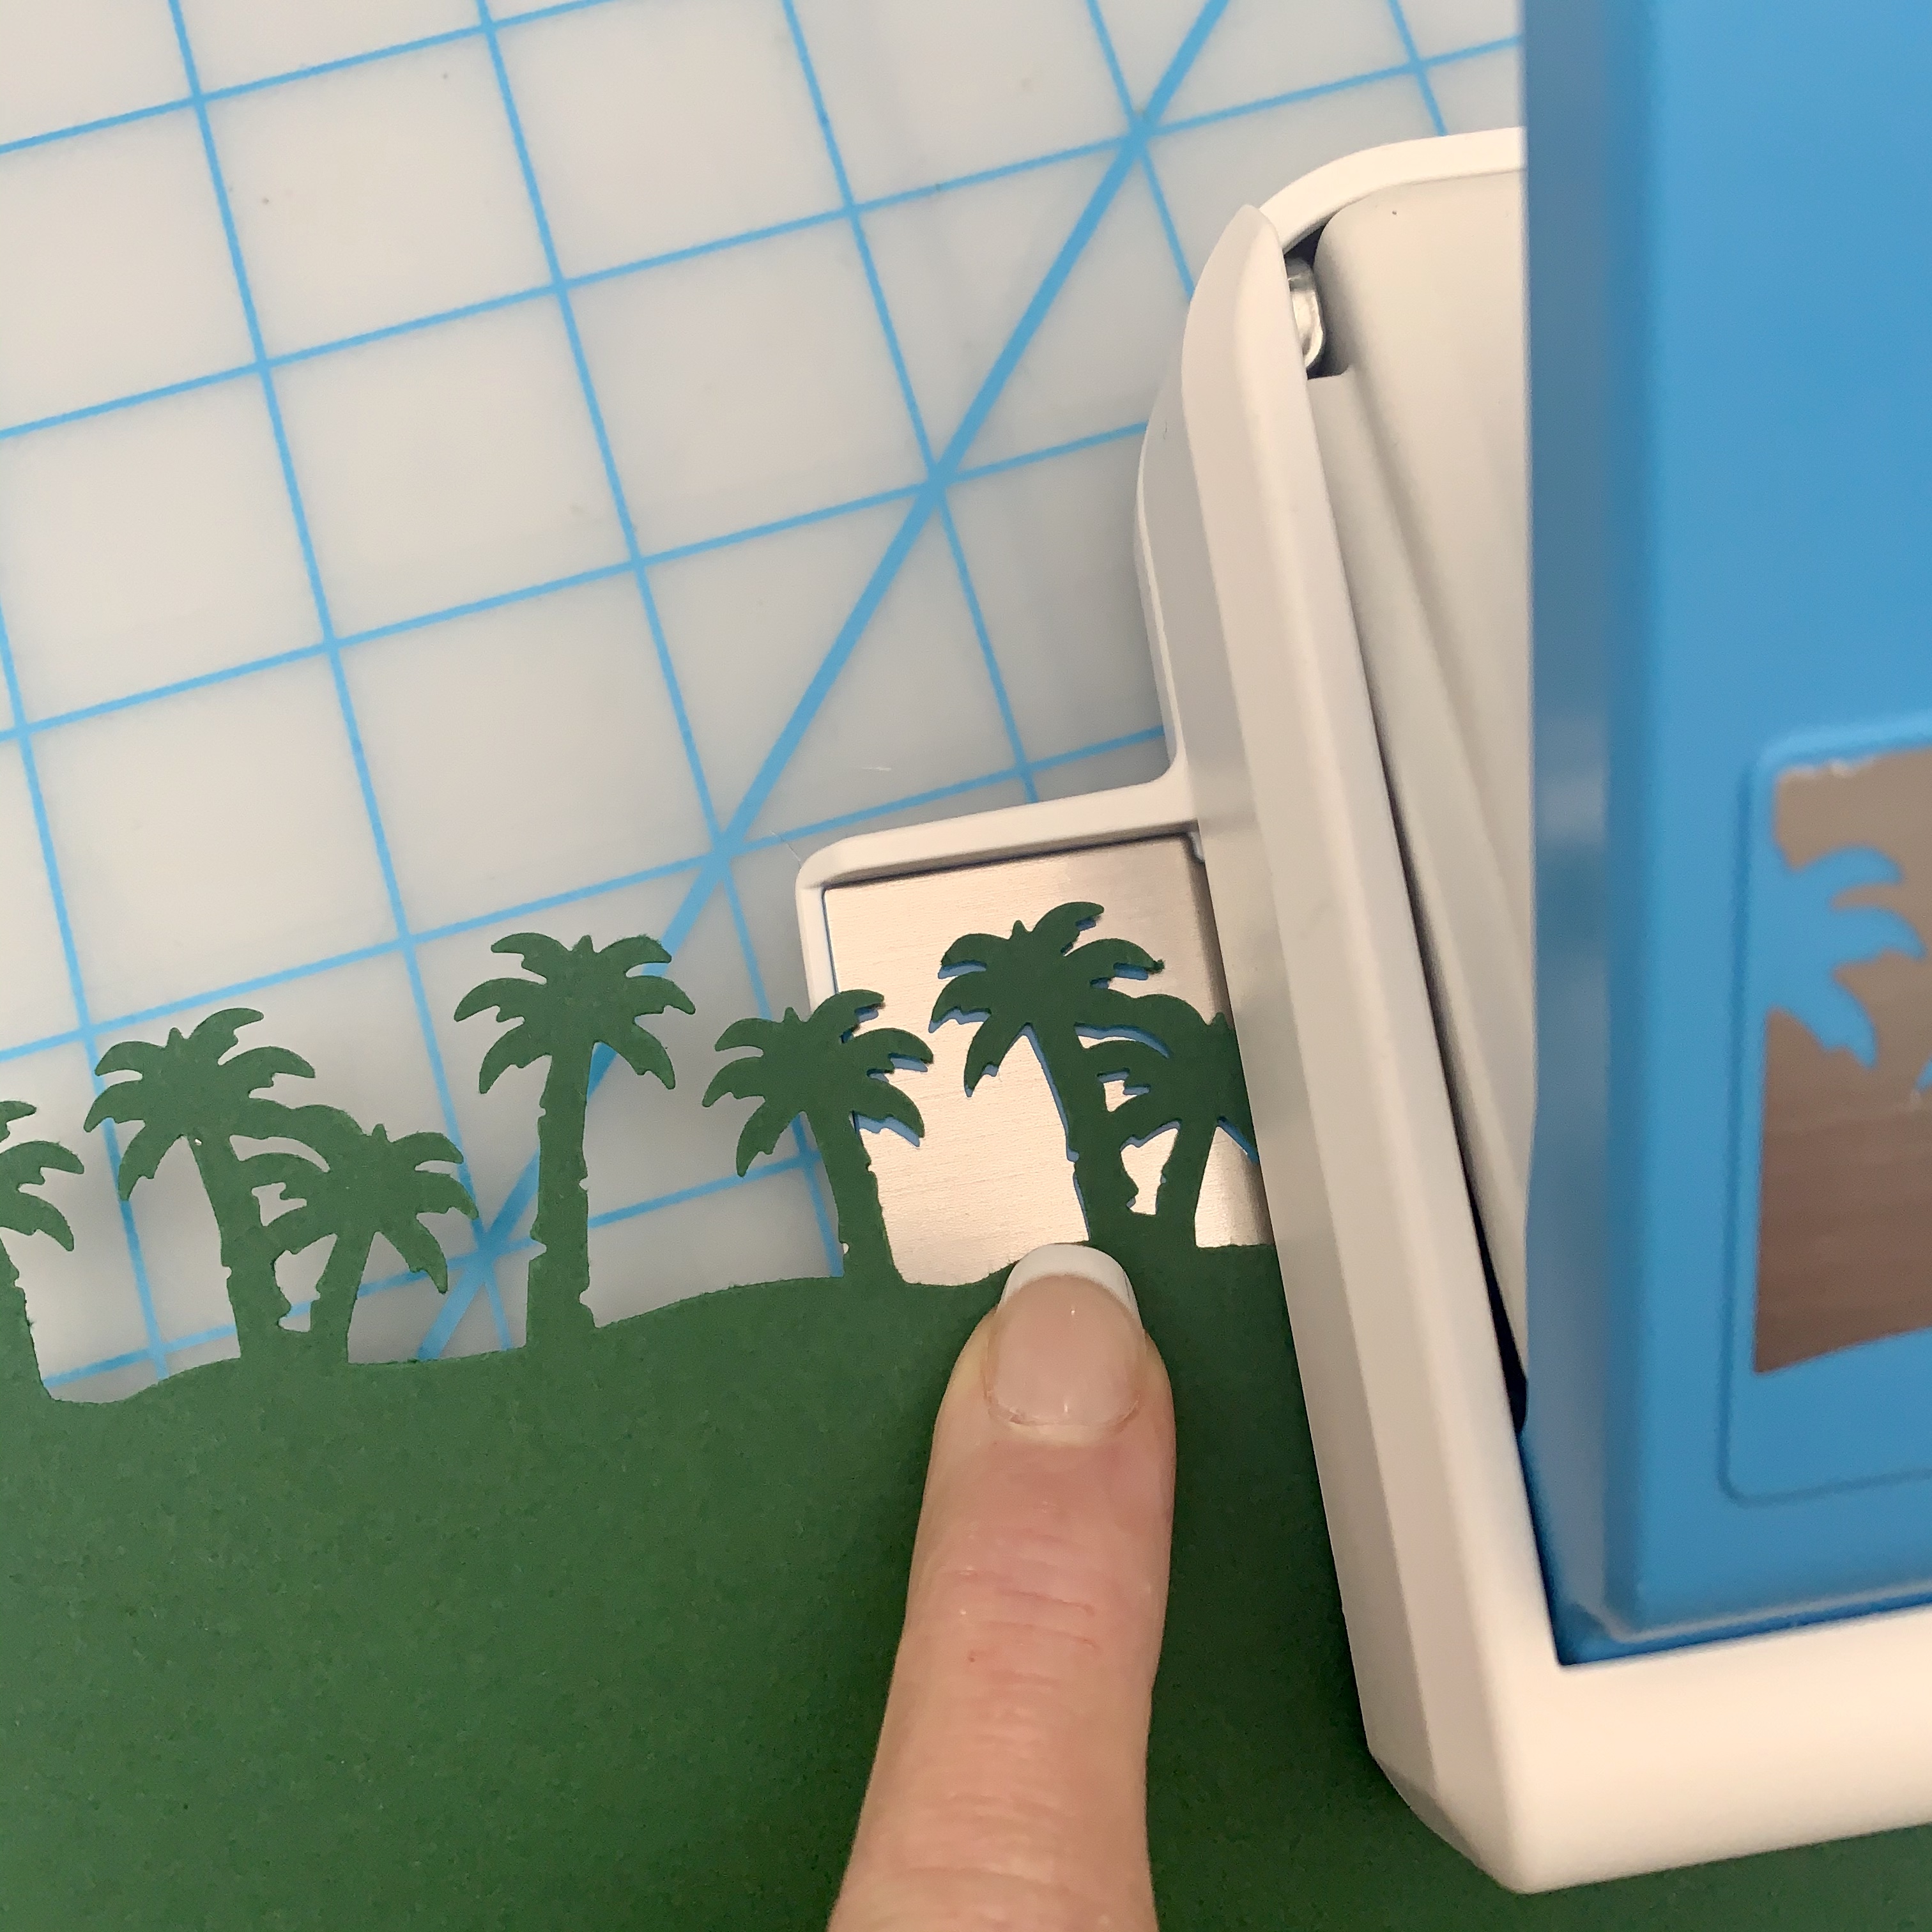
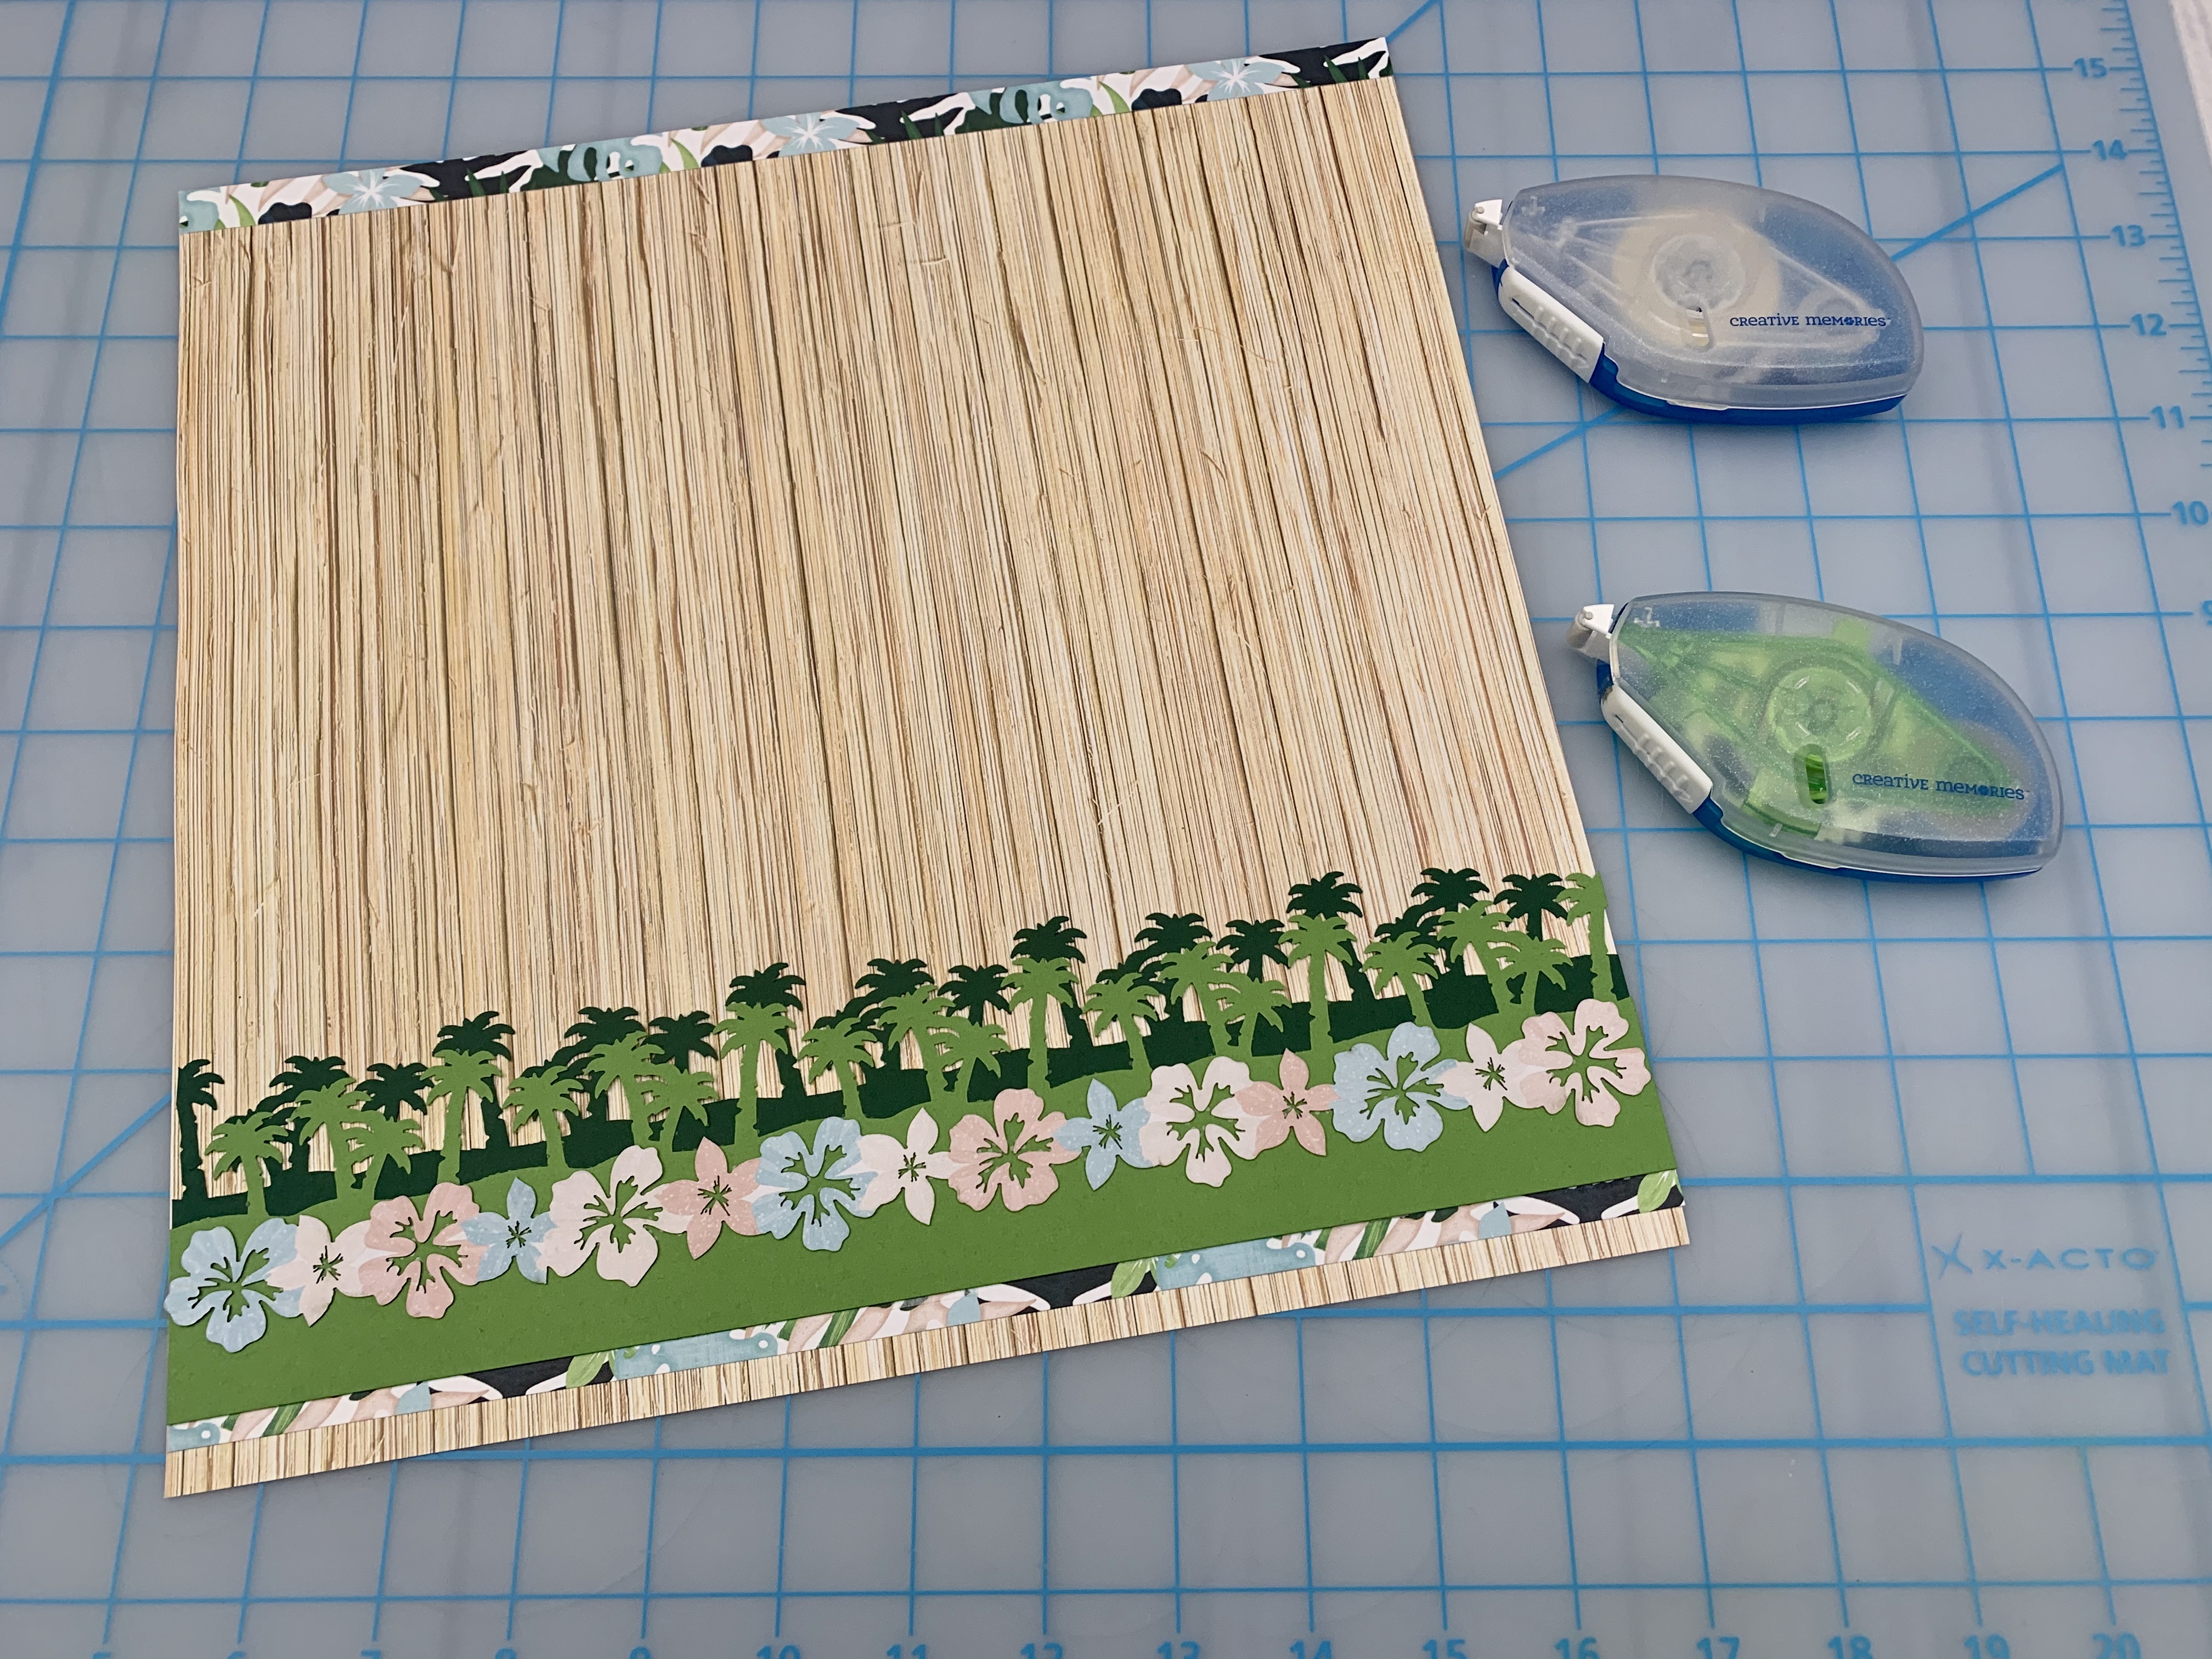
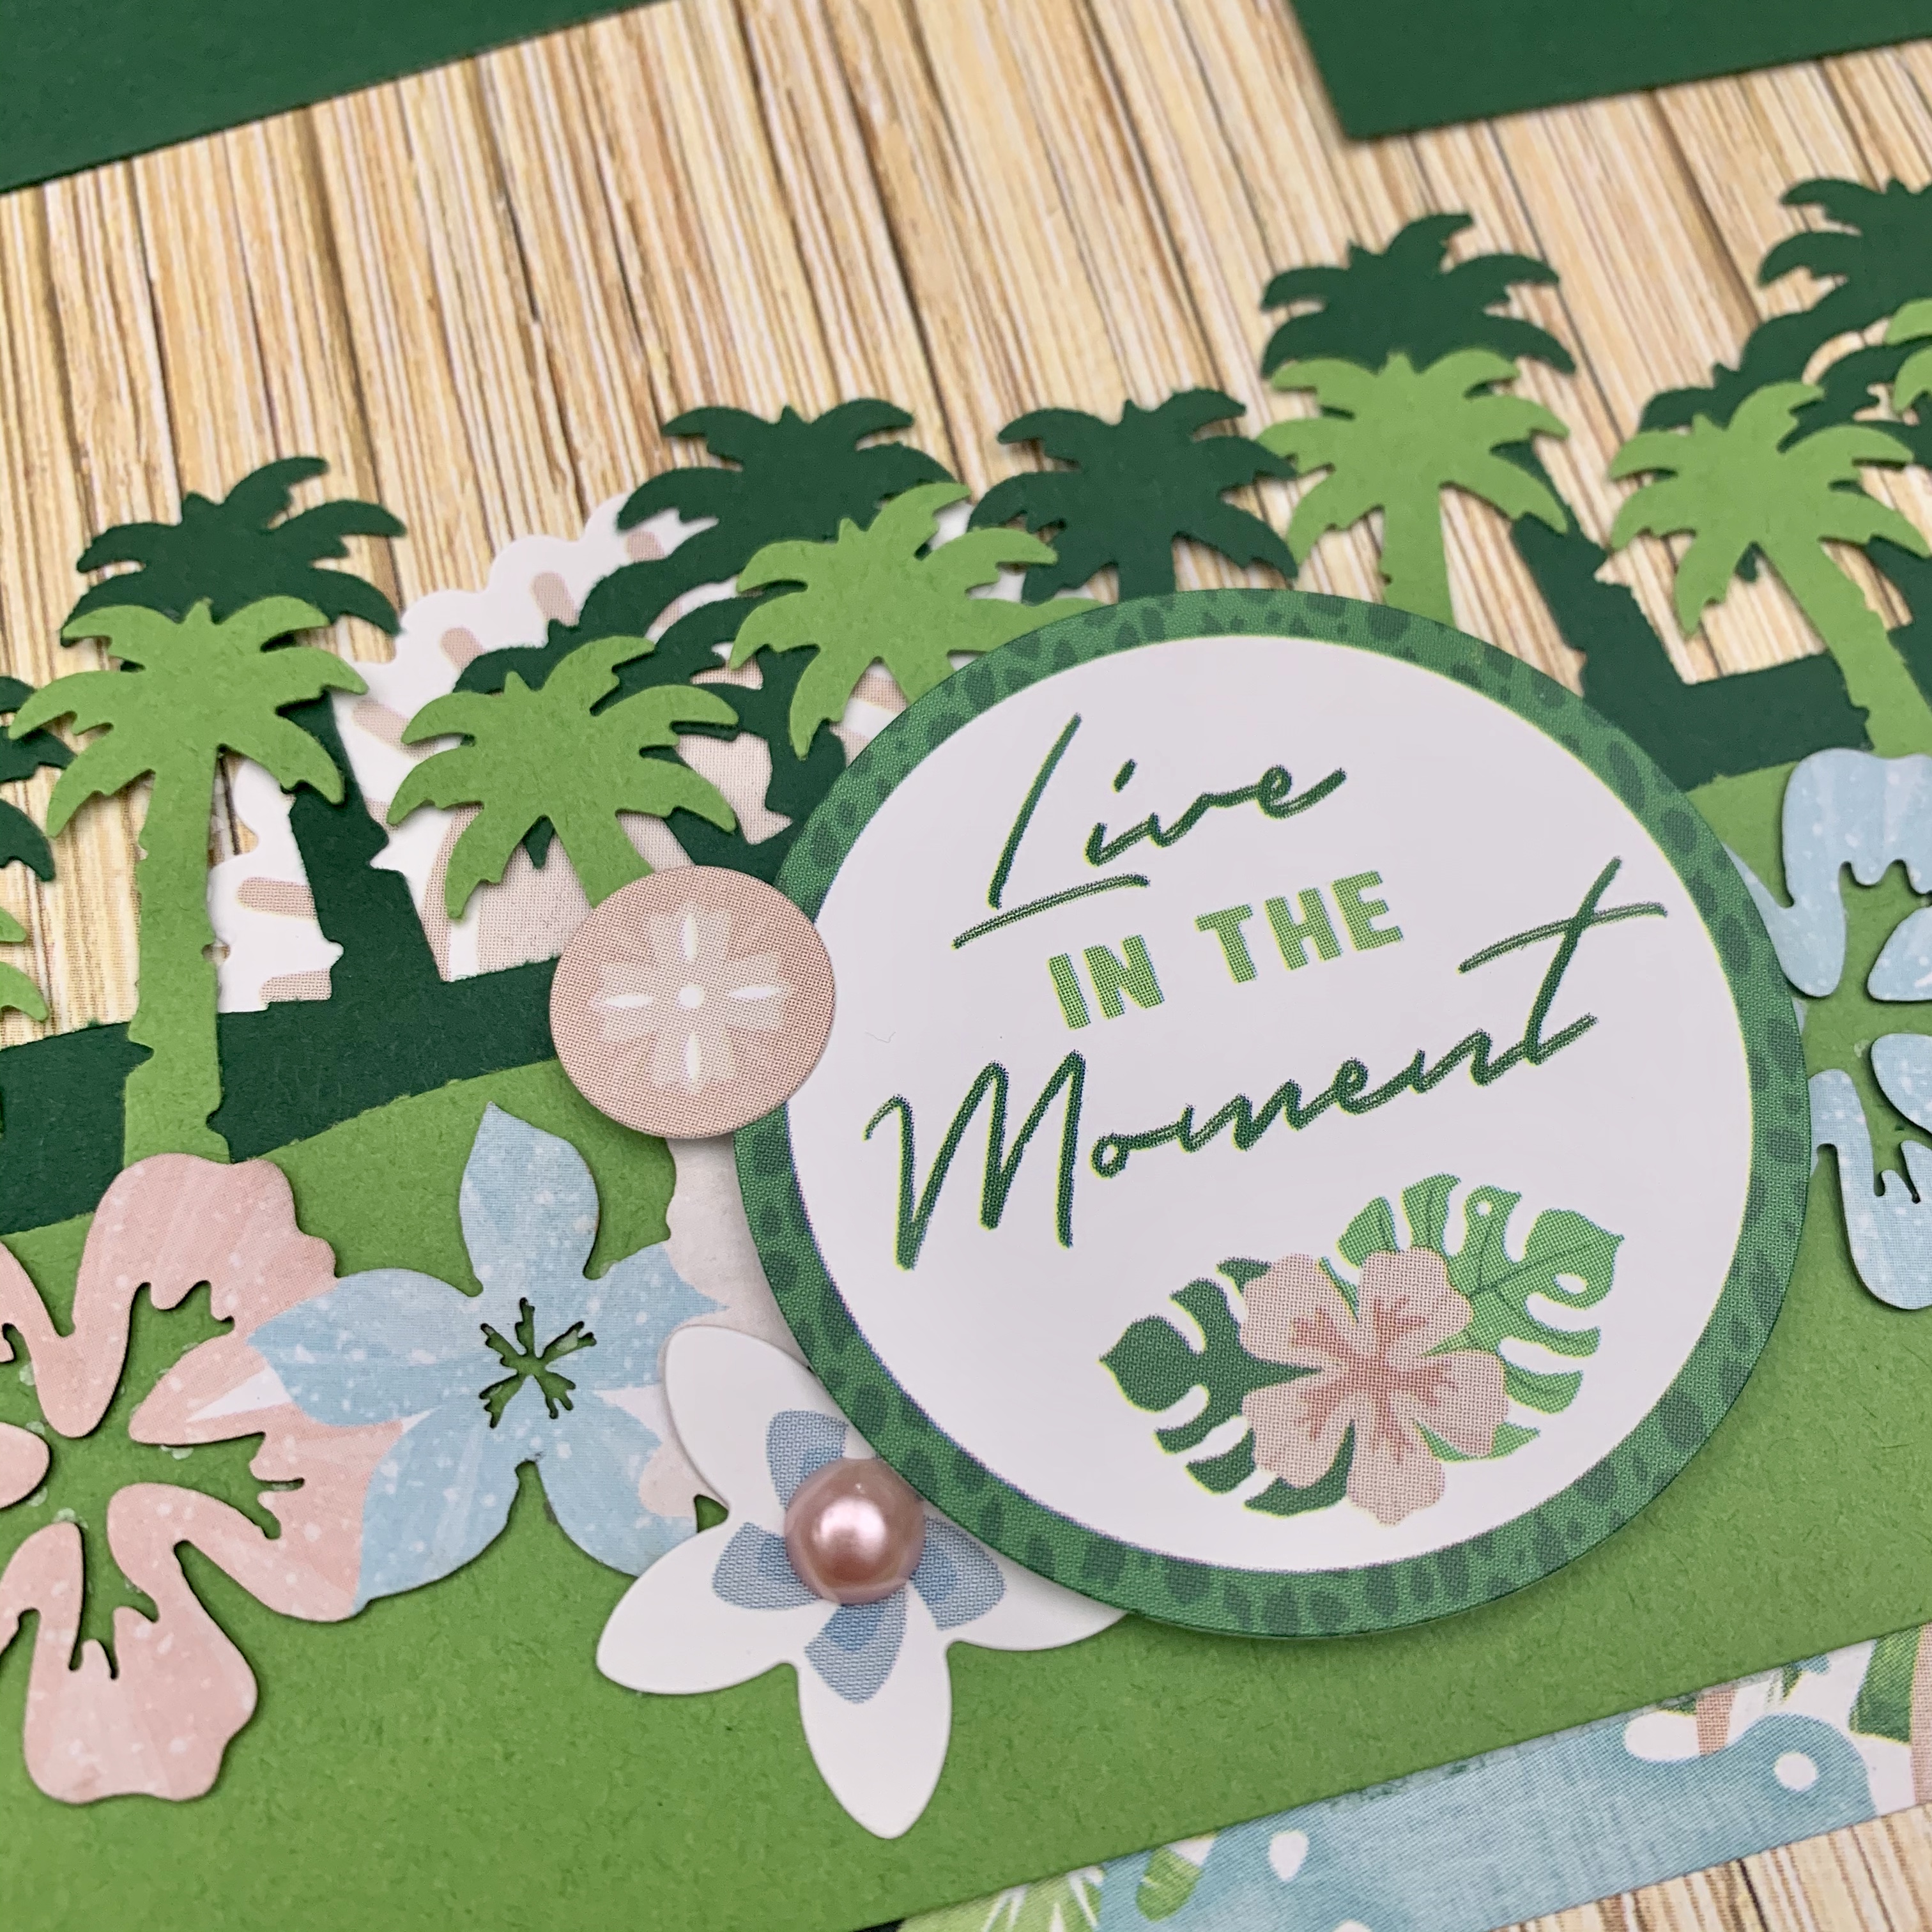
Punch one Palm Trees border from Dark Green Cardstock and one from Leaf Green Cardstock. Trim borders to approximately 2-3/4″ x 12″. Flip over one of the borders so the palm trees are facing in opposite directions and adhere borders together with Repositionable Adhesive.
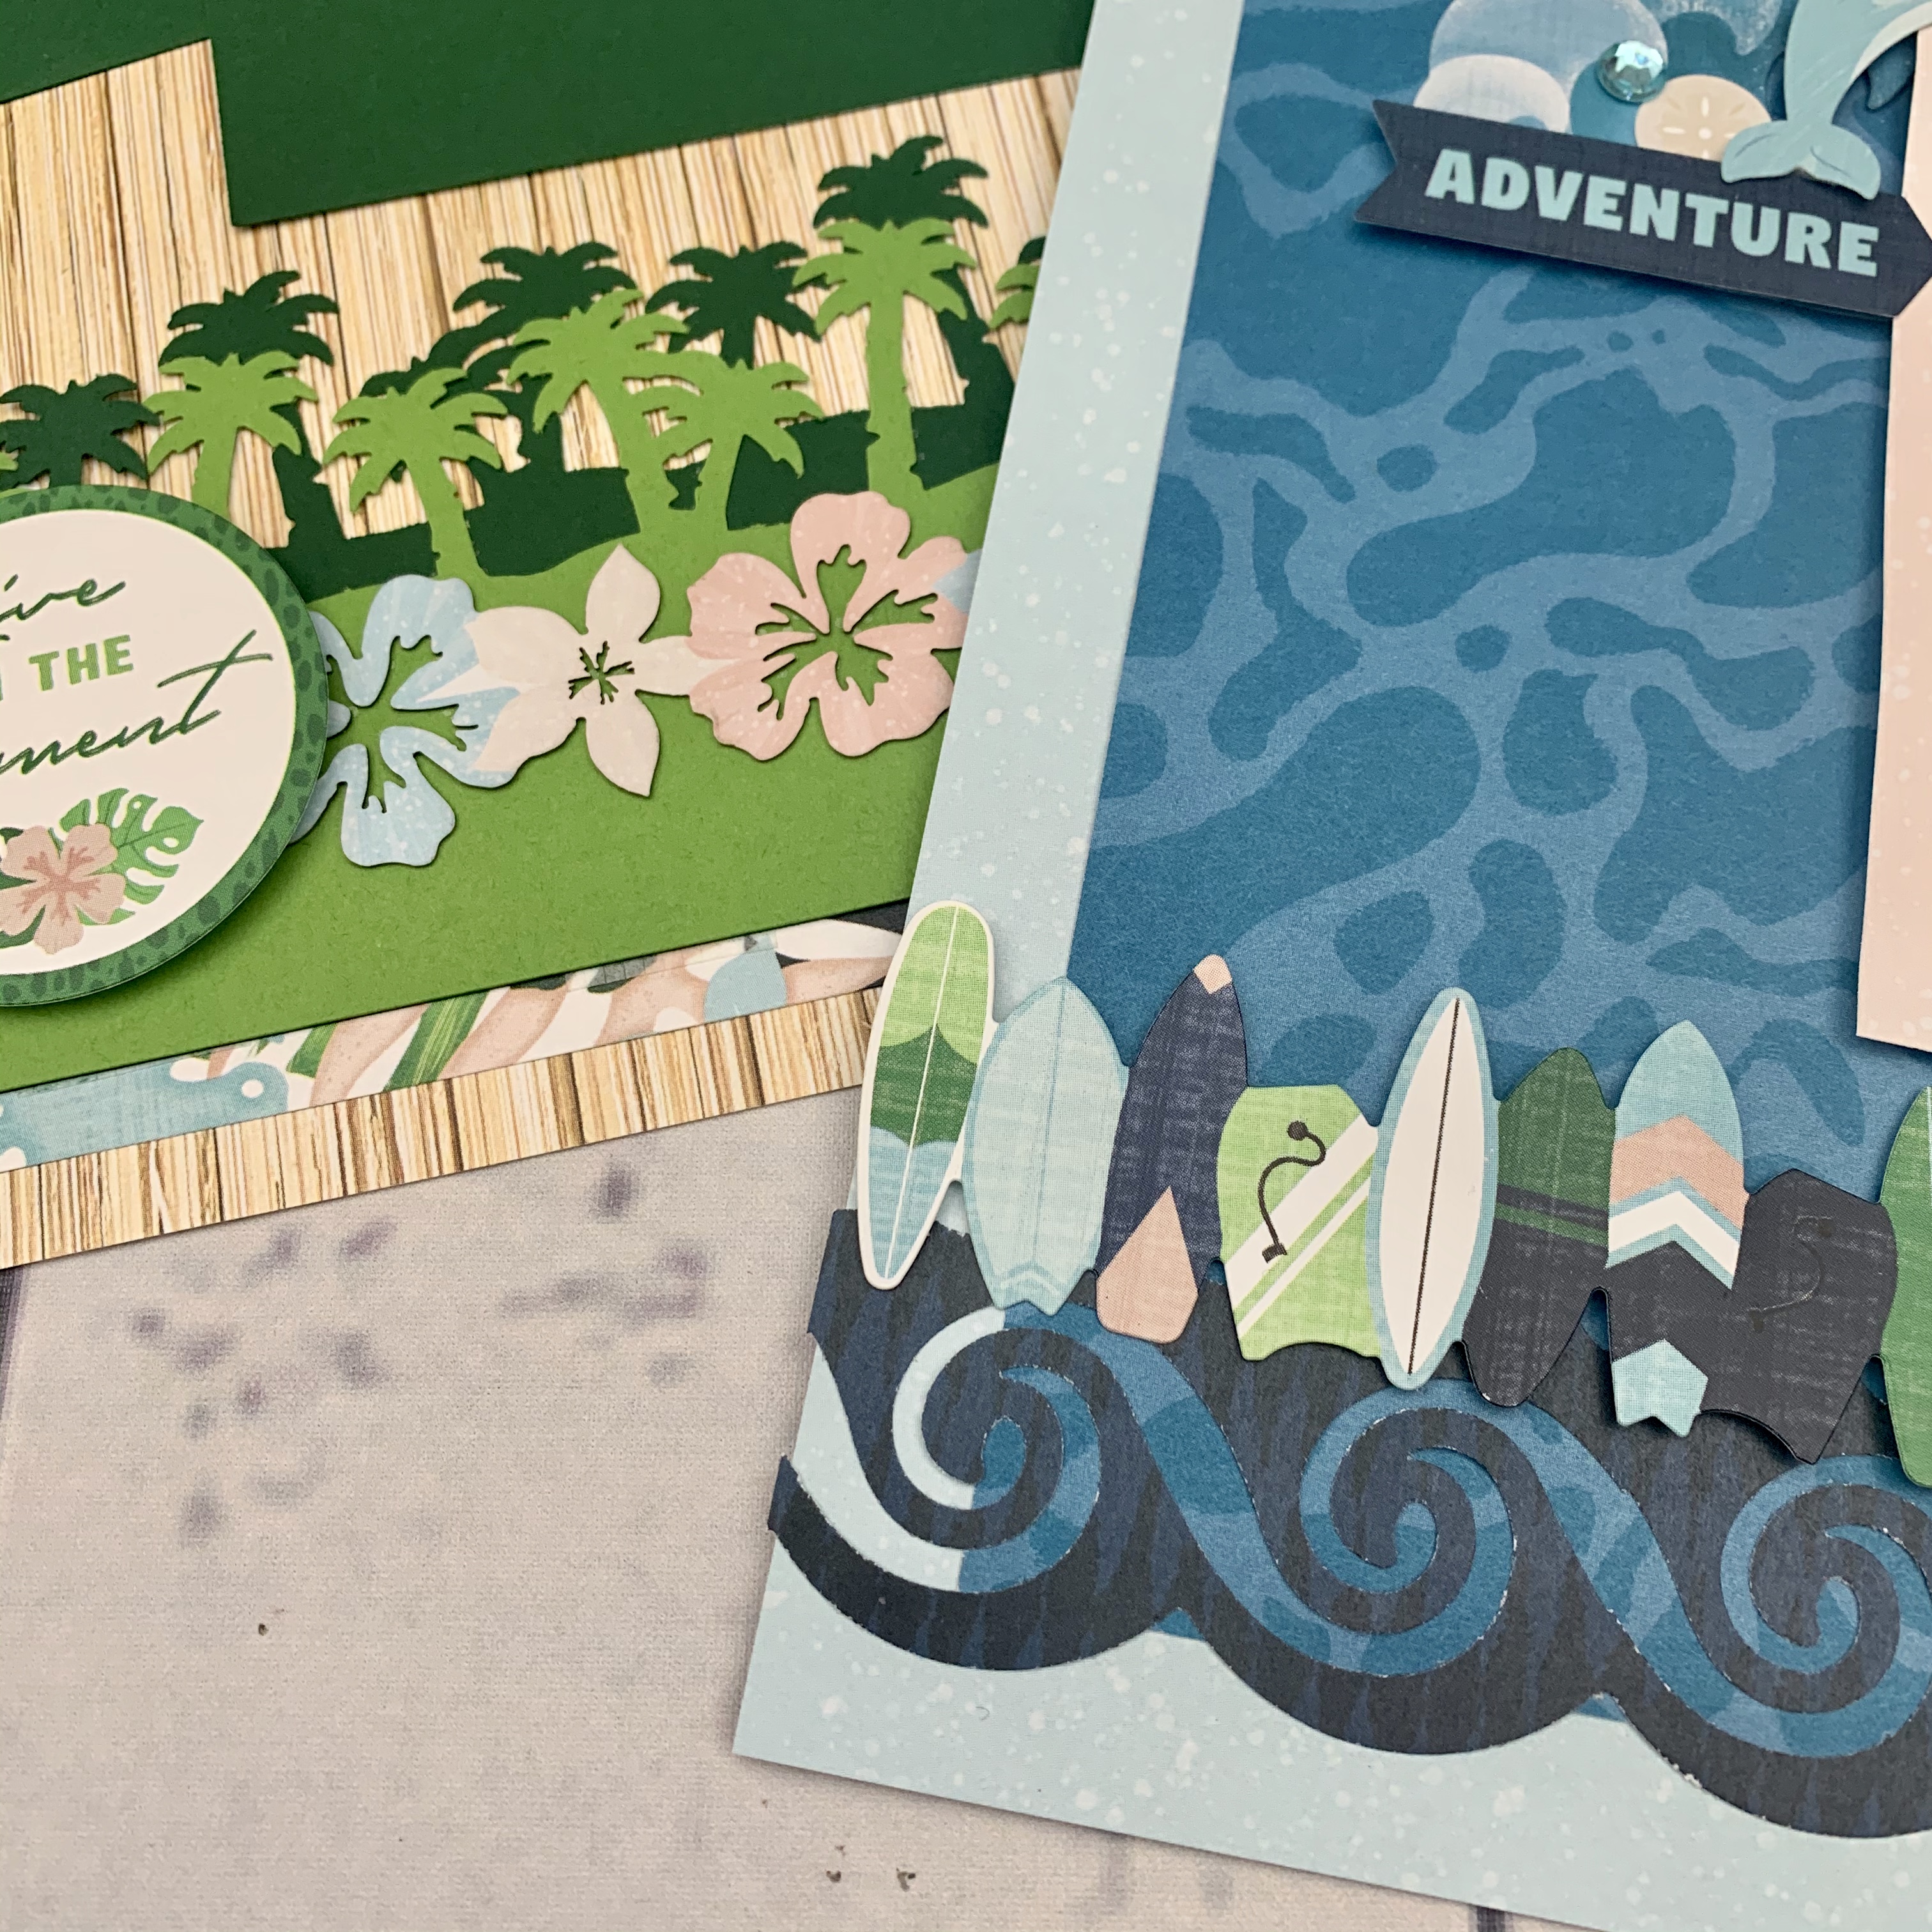
Step 2: Use the bamboo patterned paper from the Vitamin Sea Paper Pack as the base of this layout. Trim two 1/2″ x 12″ strips of the tropical floral patterned paper. Adhere one of the strips along the top edge of the bamboo paper. Adhere the other strip under the bottom edge of the palm trees border, then layer the tropical floral border from the Laser Cut Embellishments pack over the Leaf Green Cardstock under the palm trees. Adhere the entire border 1/2″ up from the bottom edge of the bamboo paper. Tip: Use Repositionable Tape Runner adhesive to adhere the palm trees themselves and Tape Runner adhesive on the other areas of the border.
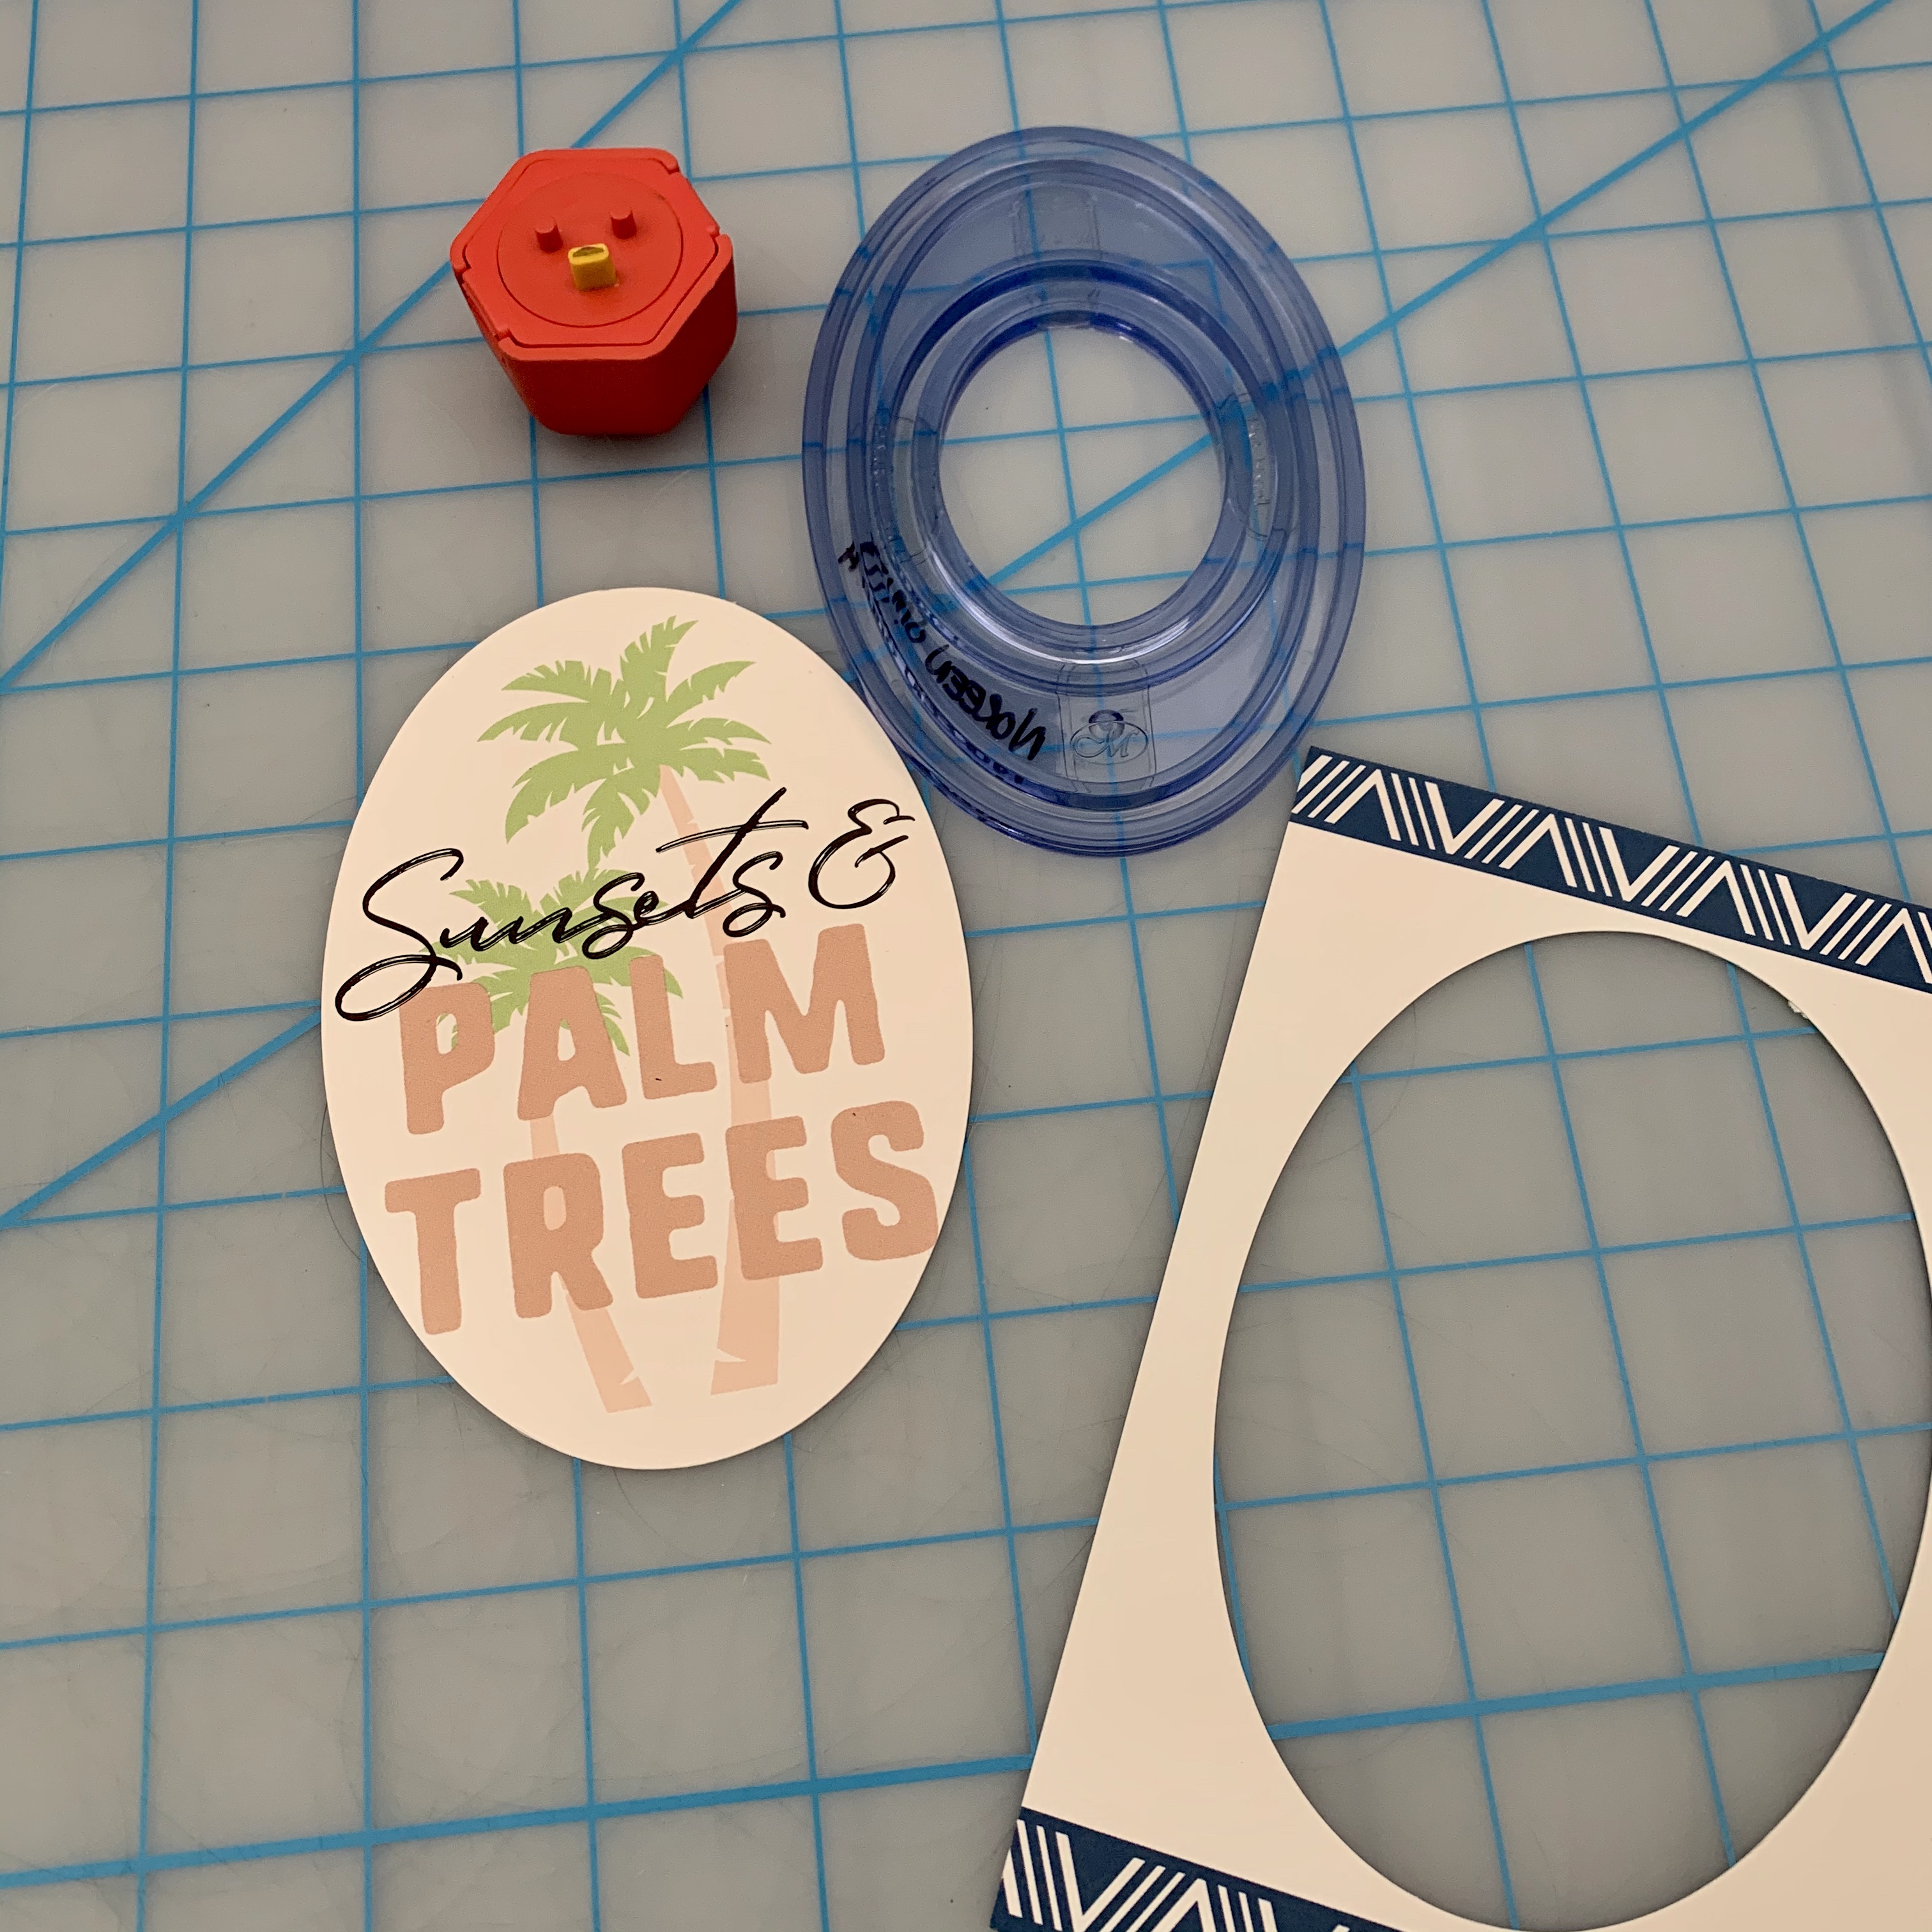
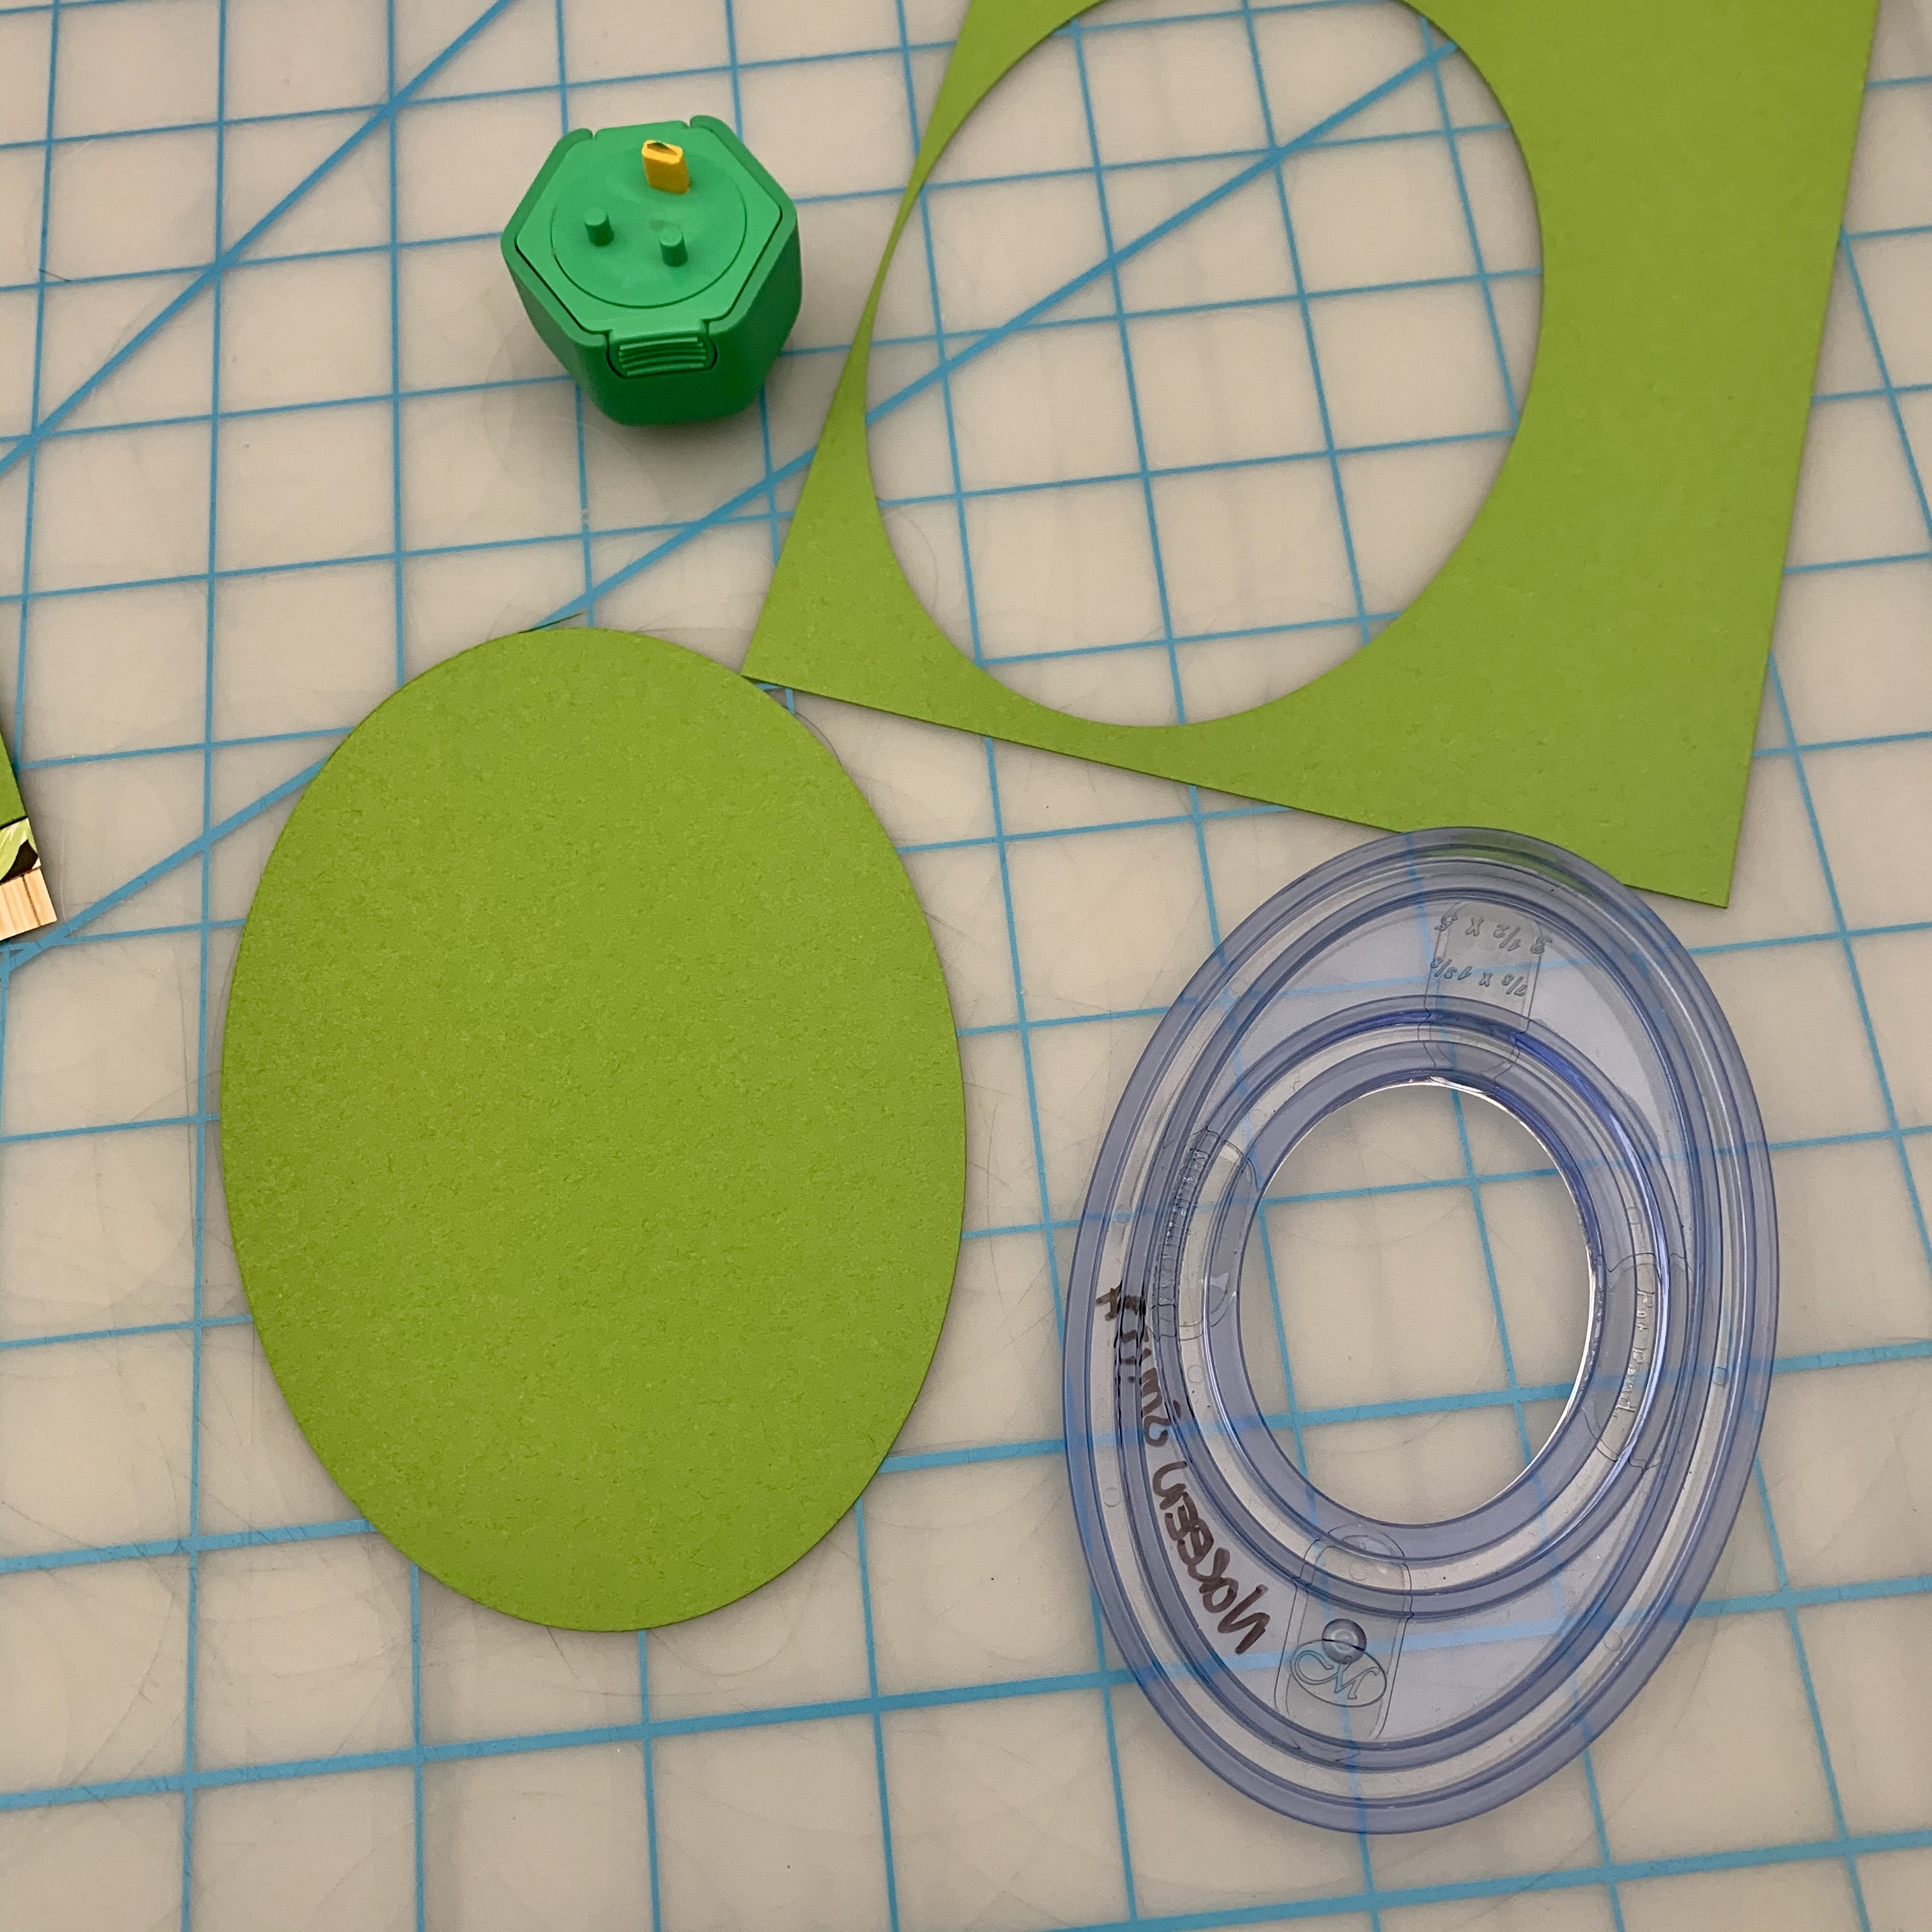
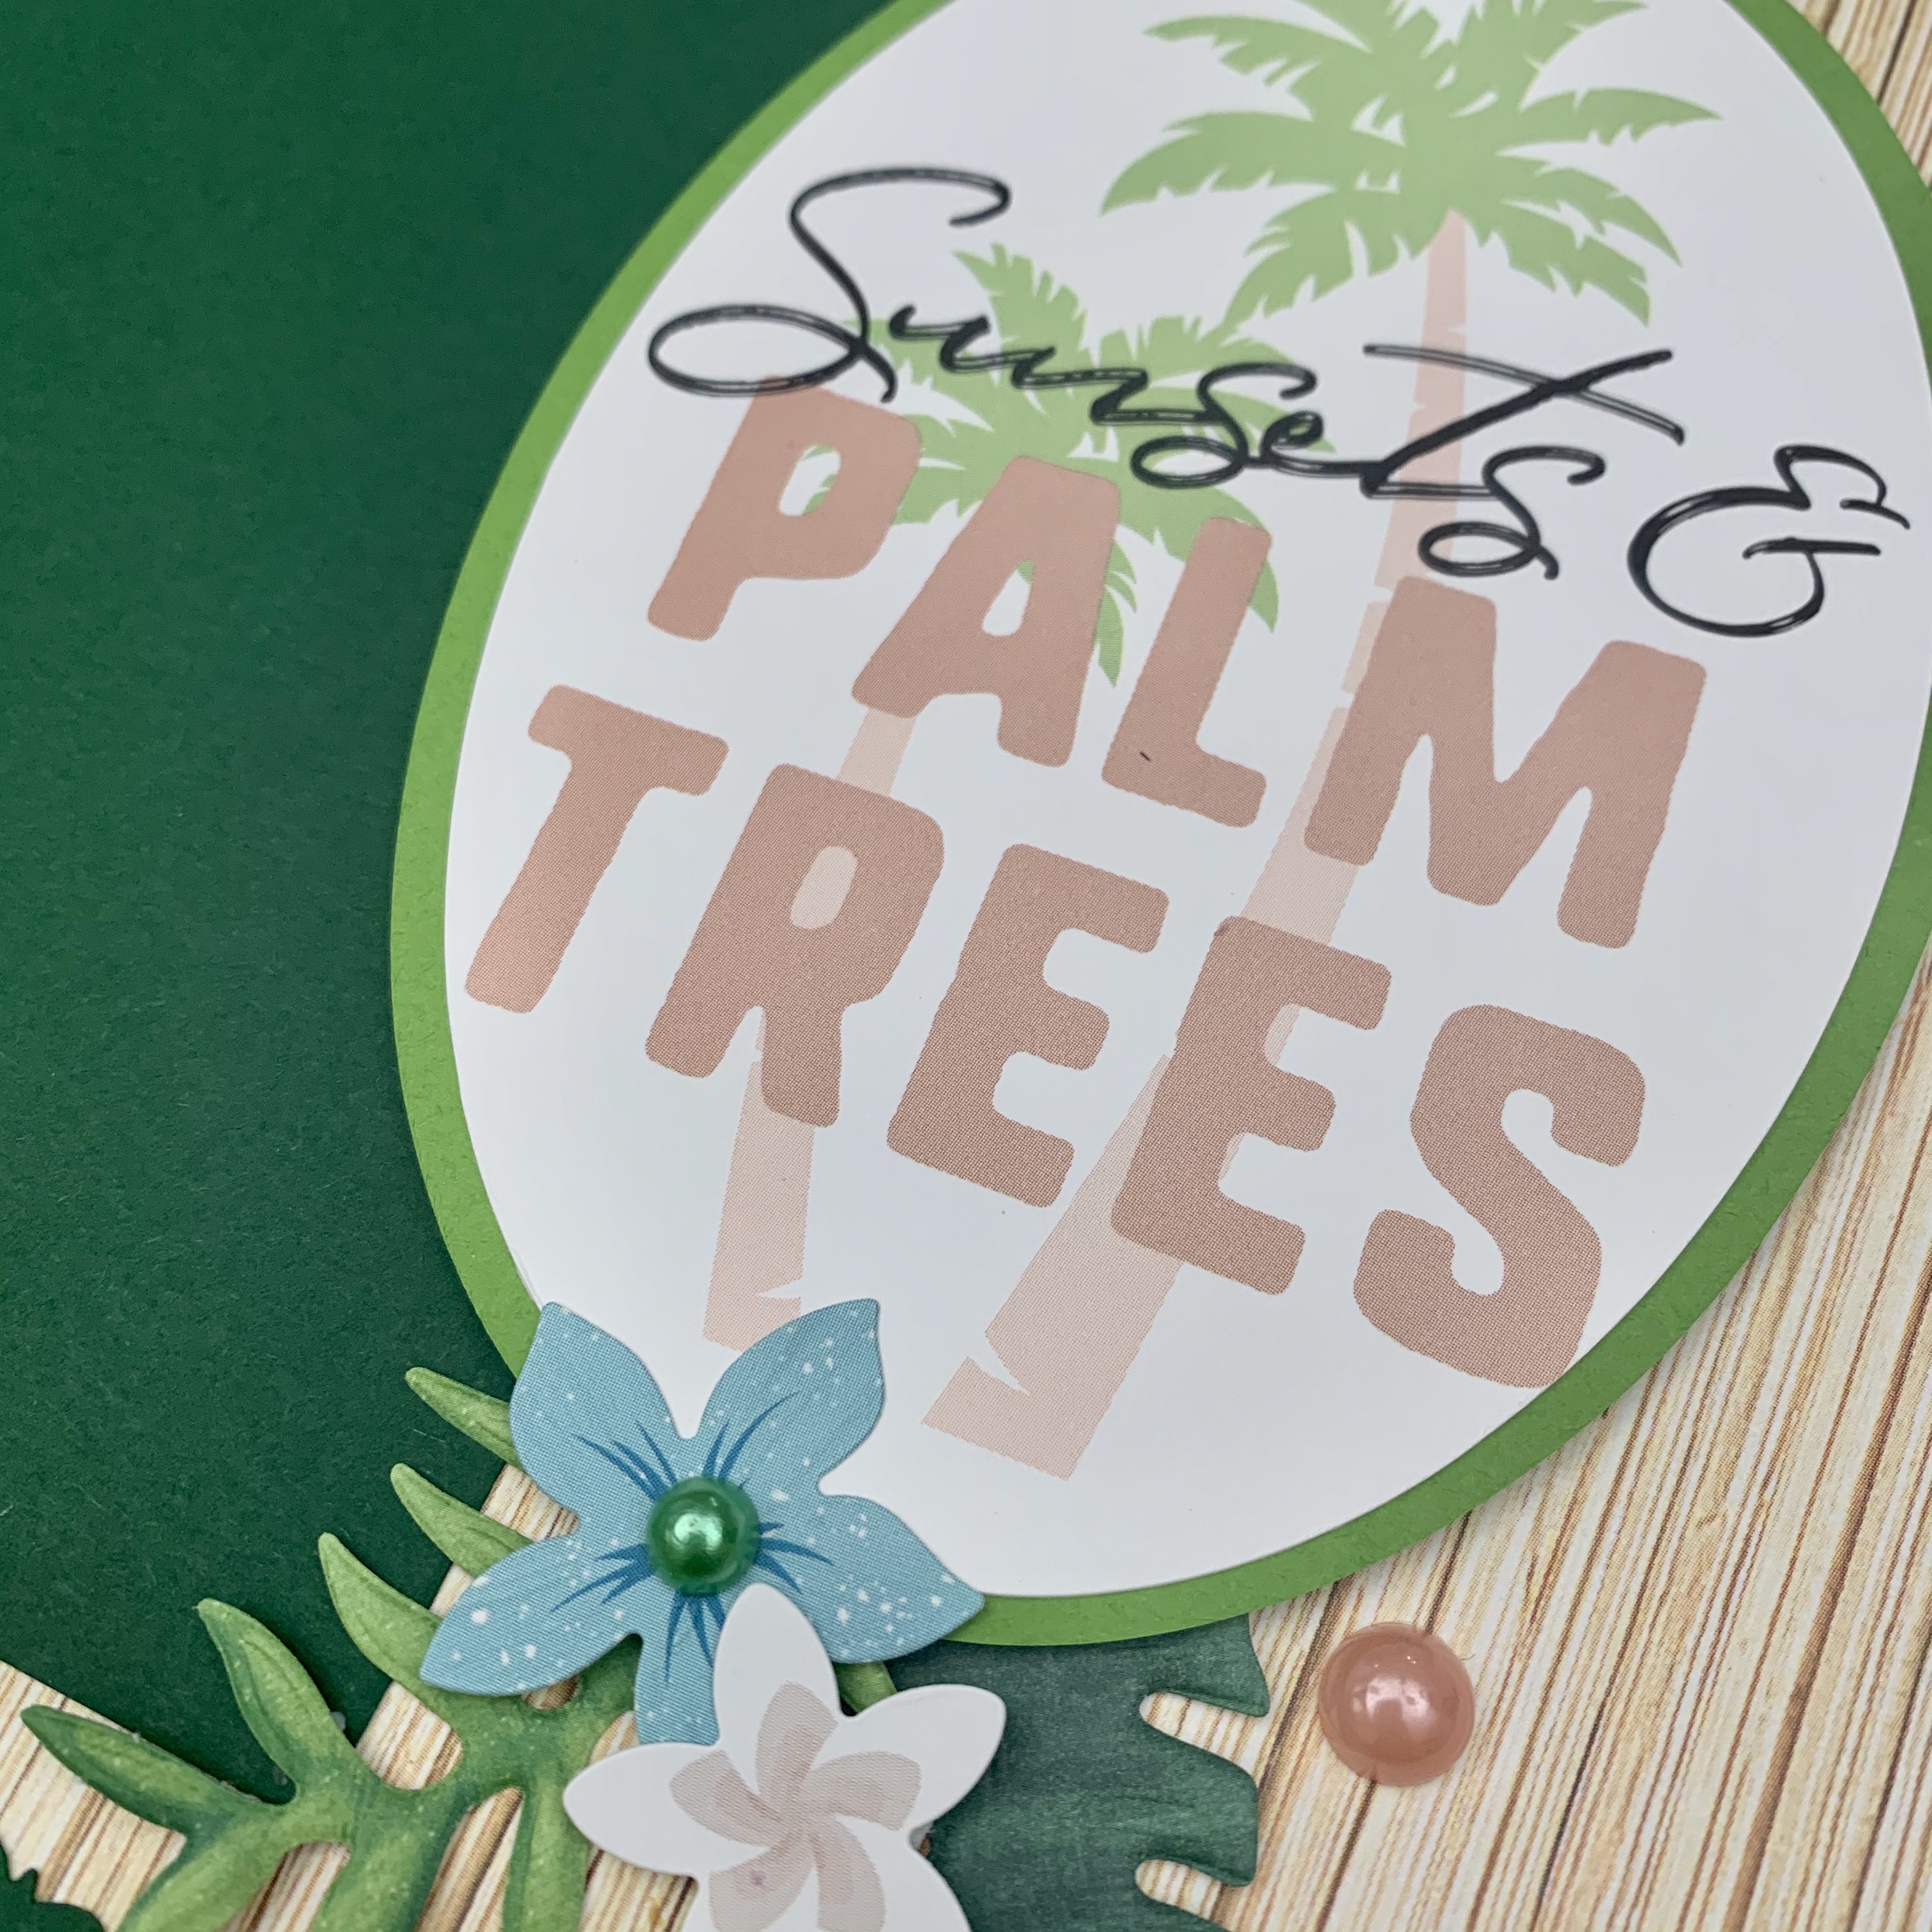
Step 3: Use the second smallest Oval Template from the Custom Cutting System with the Red Blade to cut out the “Sunsets & palm trees” sentiment from the Variety Mat Pack card to use as a title. Use the same template with the Green Blade to cut out an oval from Leaf Green Cardstock. Mount the oval title onto the green oval.
Step 4: Cut two photo mats in size desired from Dark Green Cardstock (two 4” x 6″ sizes shown on layout). Mat your photos with these or adhere the blank mats to the page above border, with one mat placed on a slight angle. Mount the layered title oval with Foam Squares and tuck leaves from the Embossed Embellishments pack underneath it at the top and bottom.
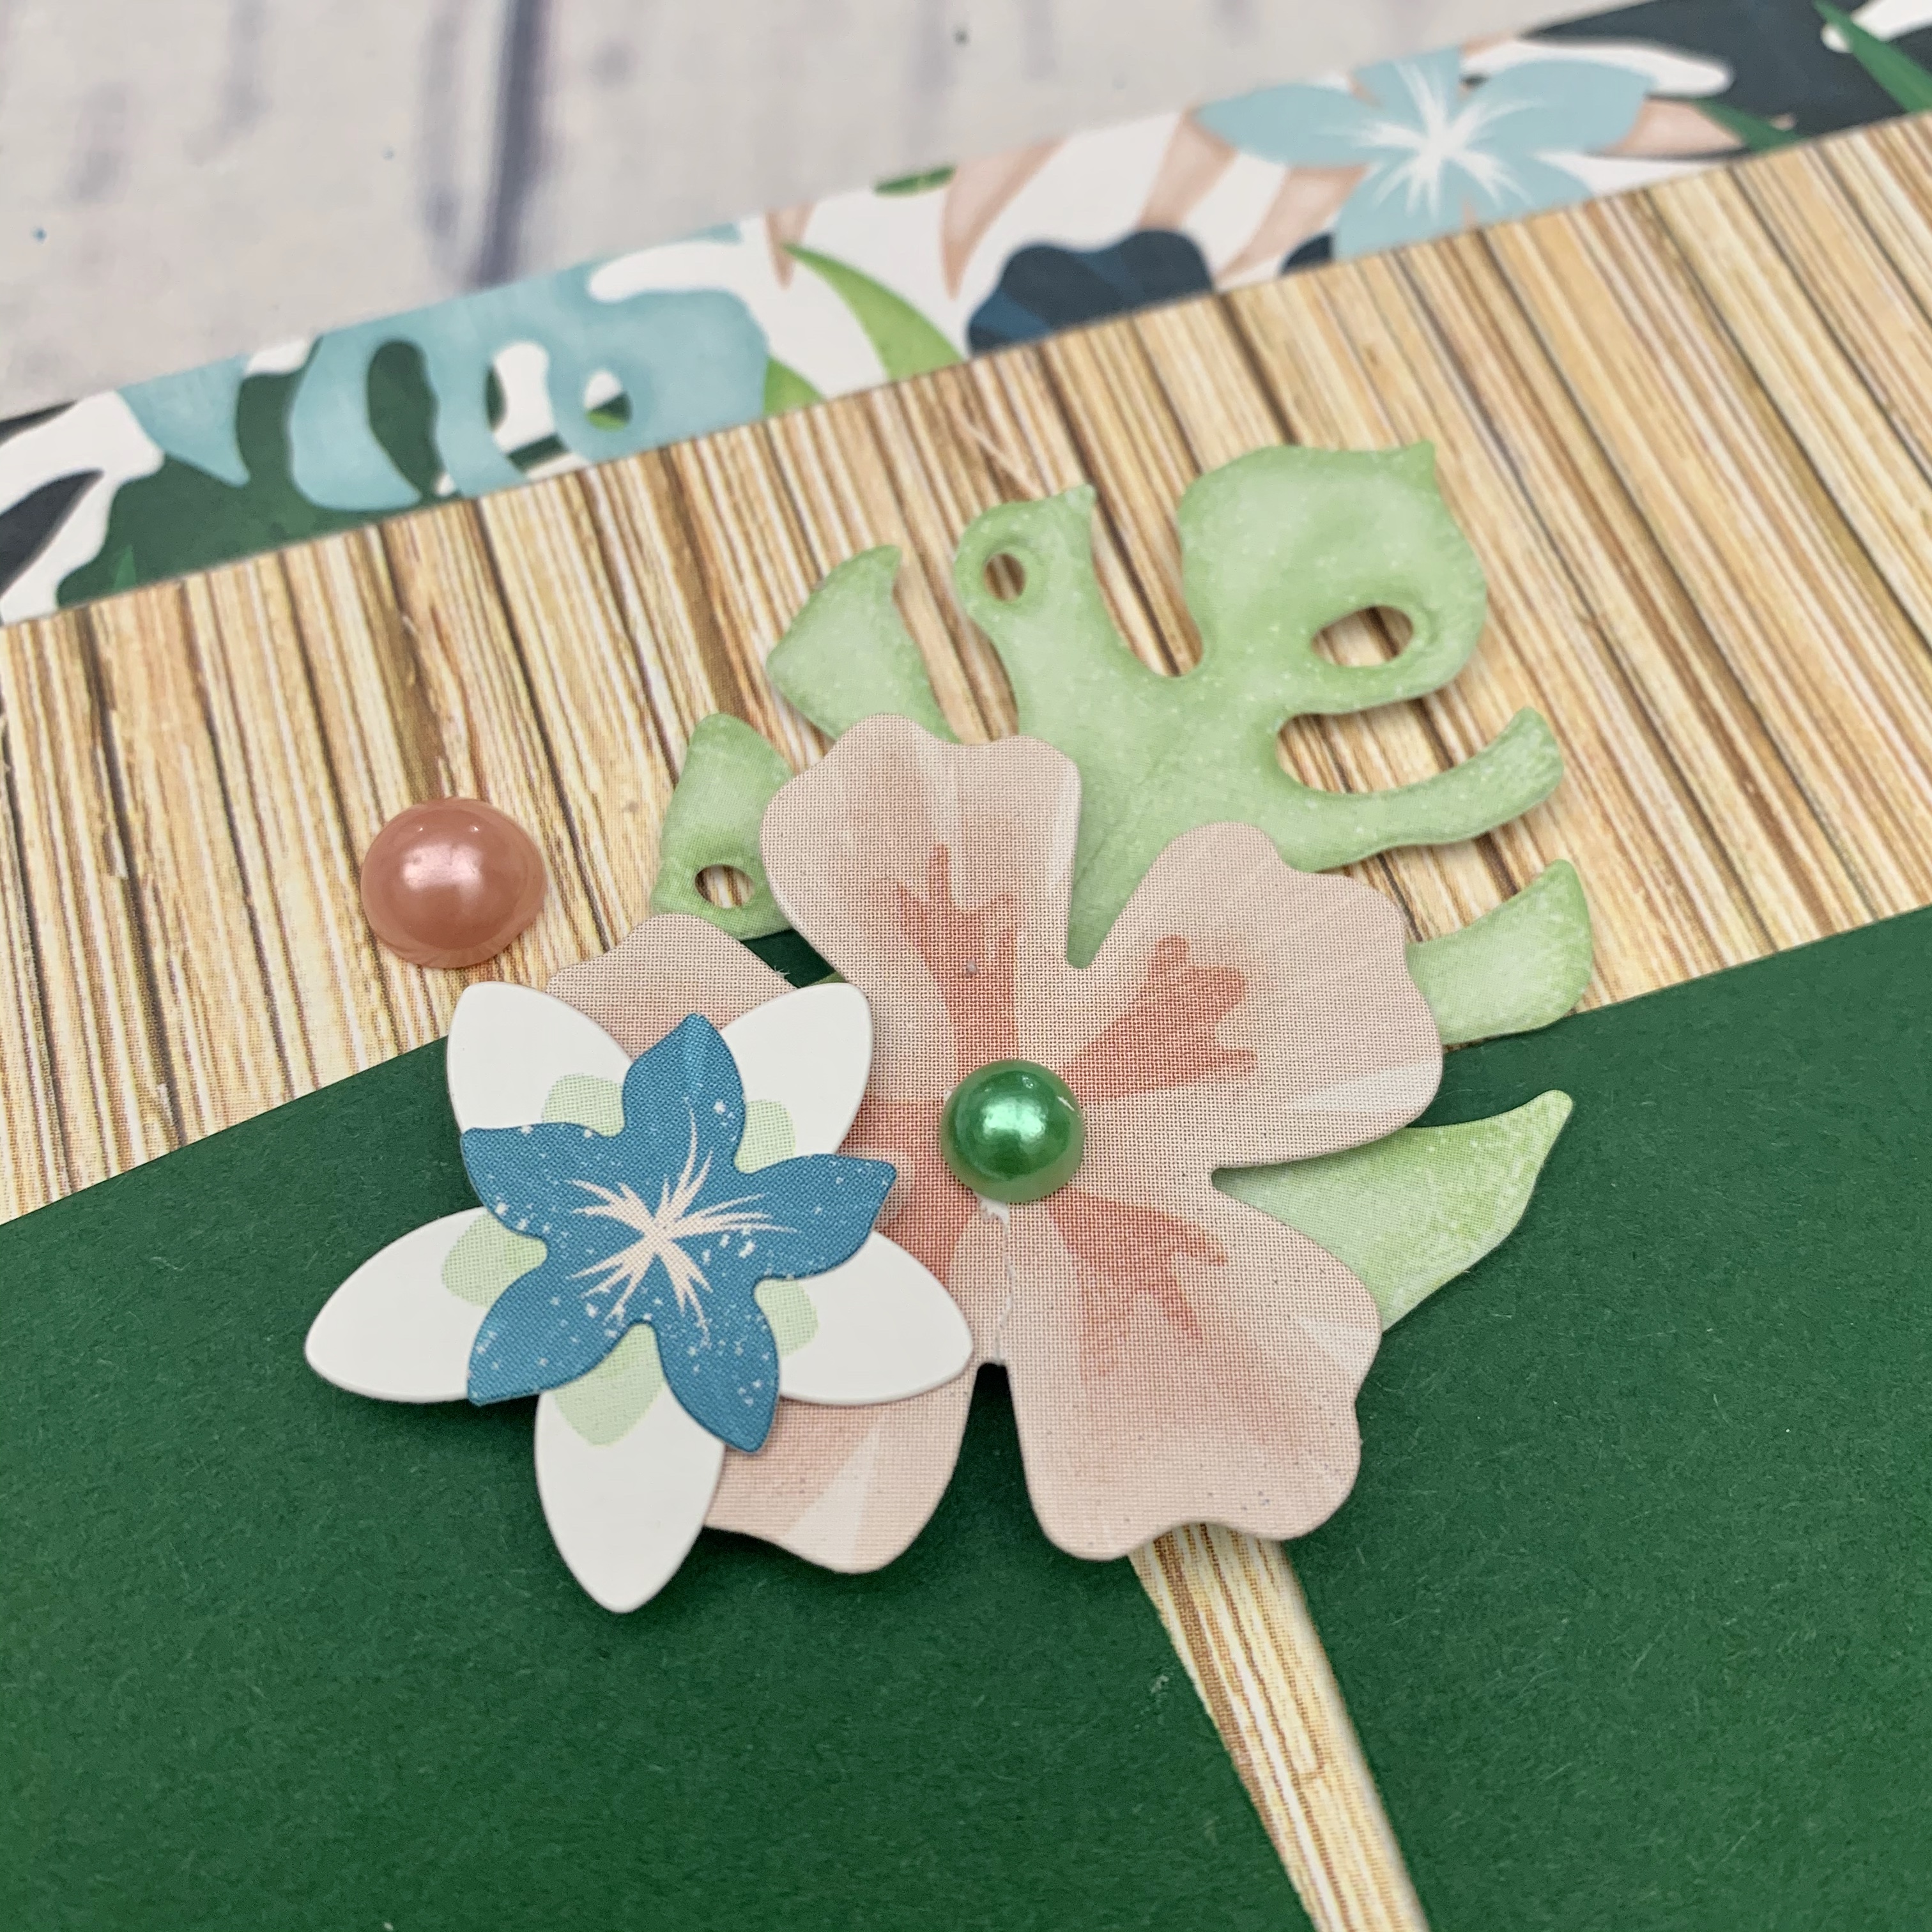
Step 5: Create a cluster at the bottom with flower stickers and gems. Create another smaller cluster at the “V” between the two photo mats with another embossed leaf, flower stickers and a gem.
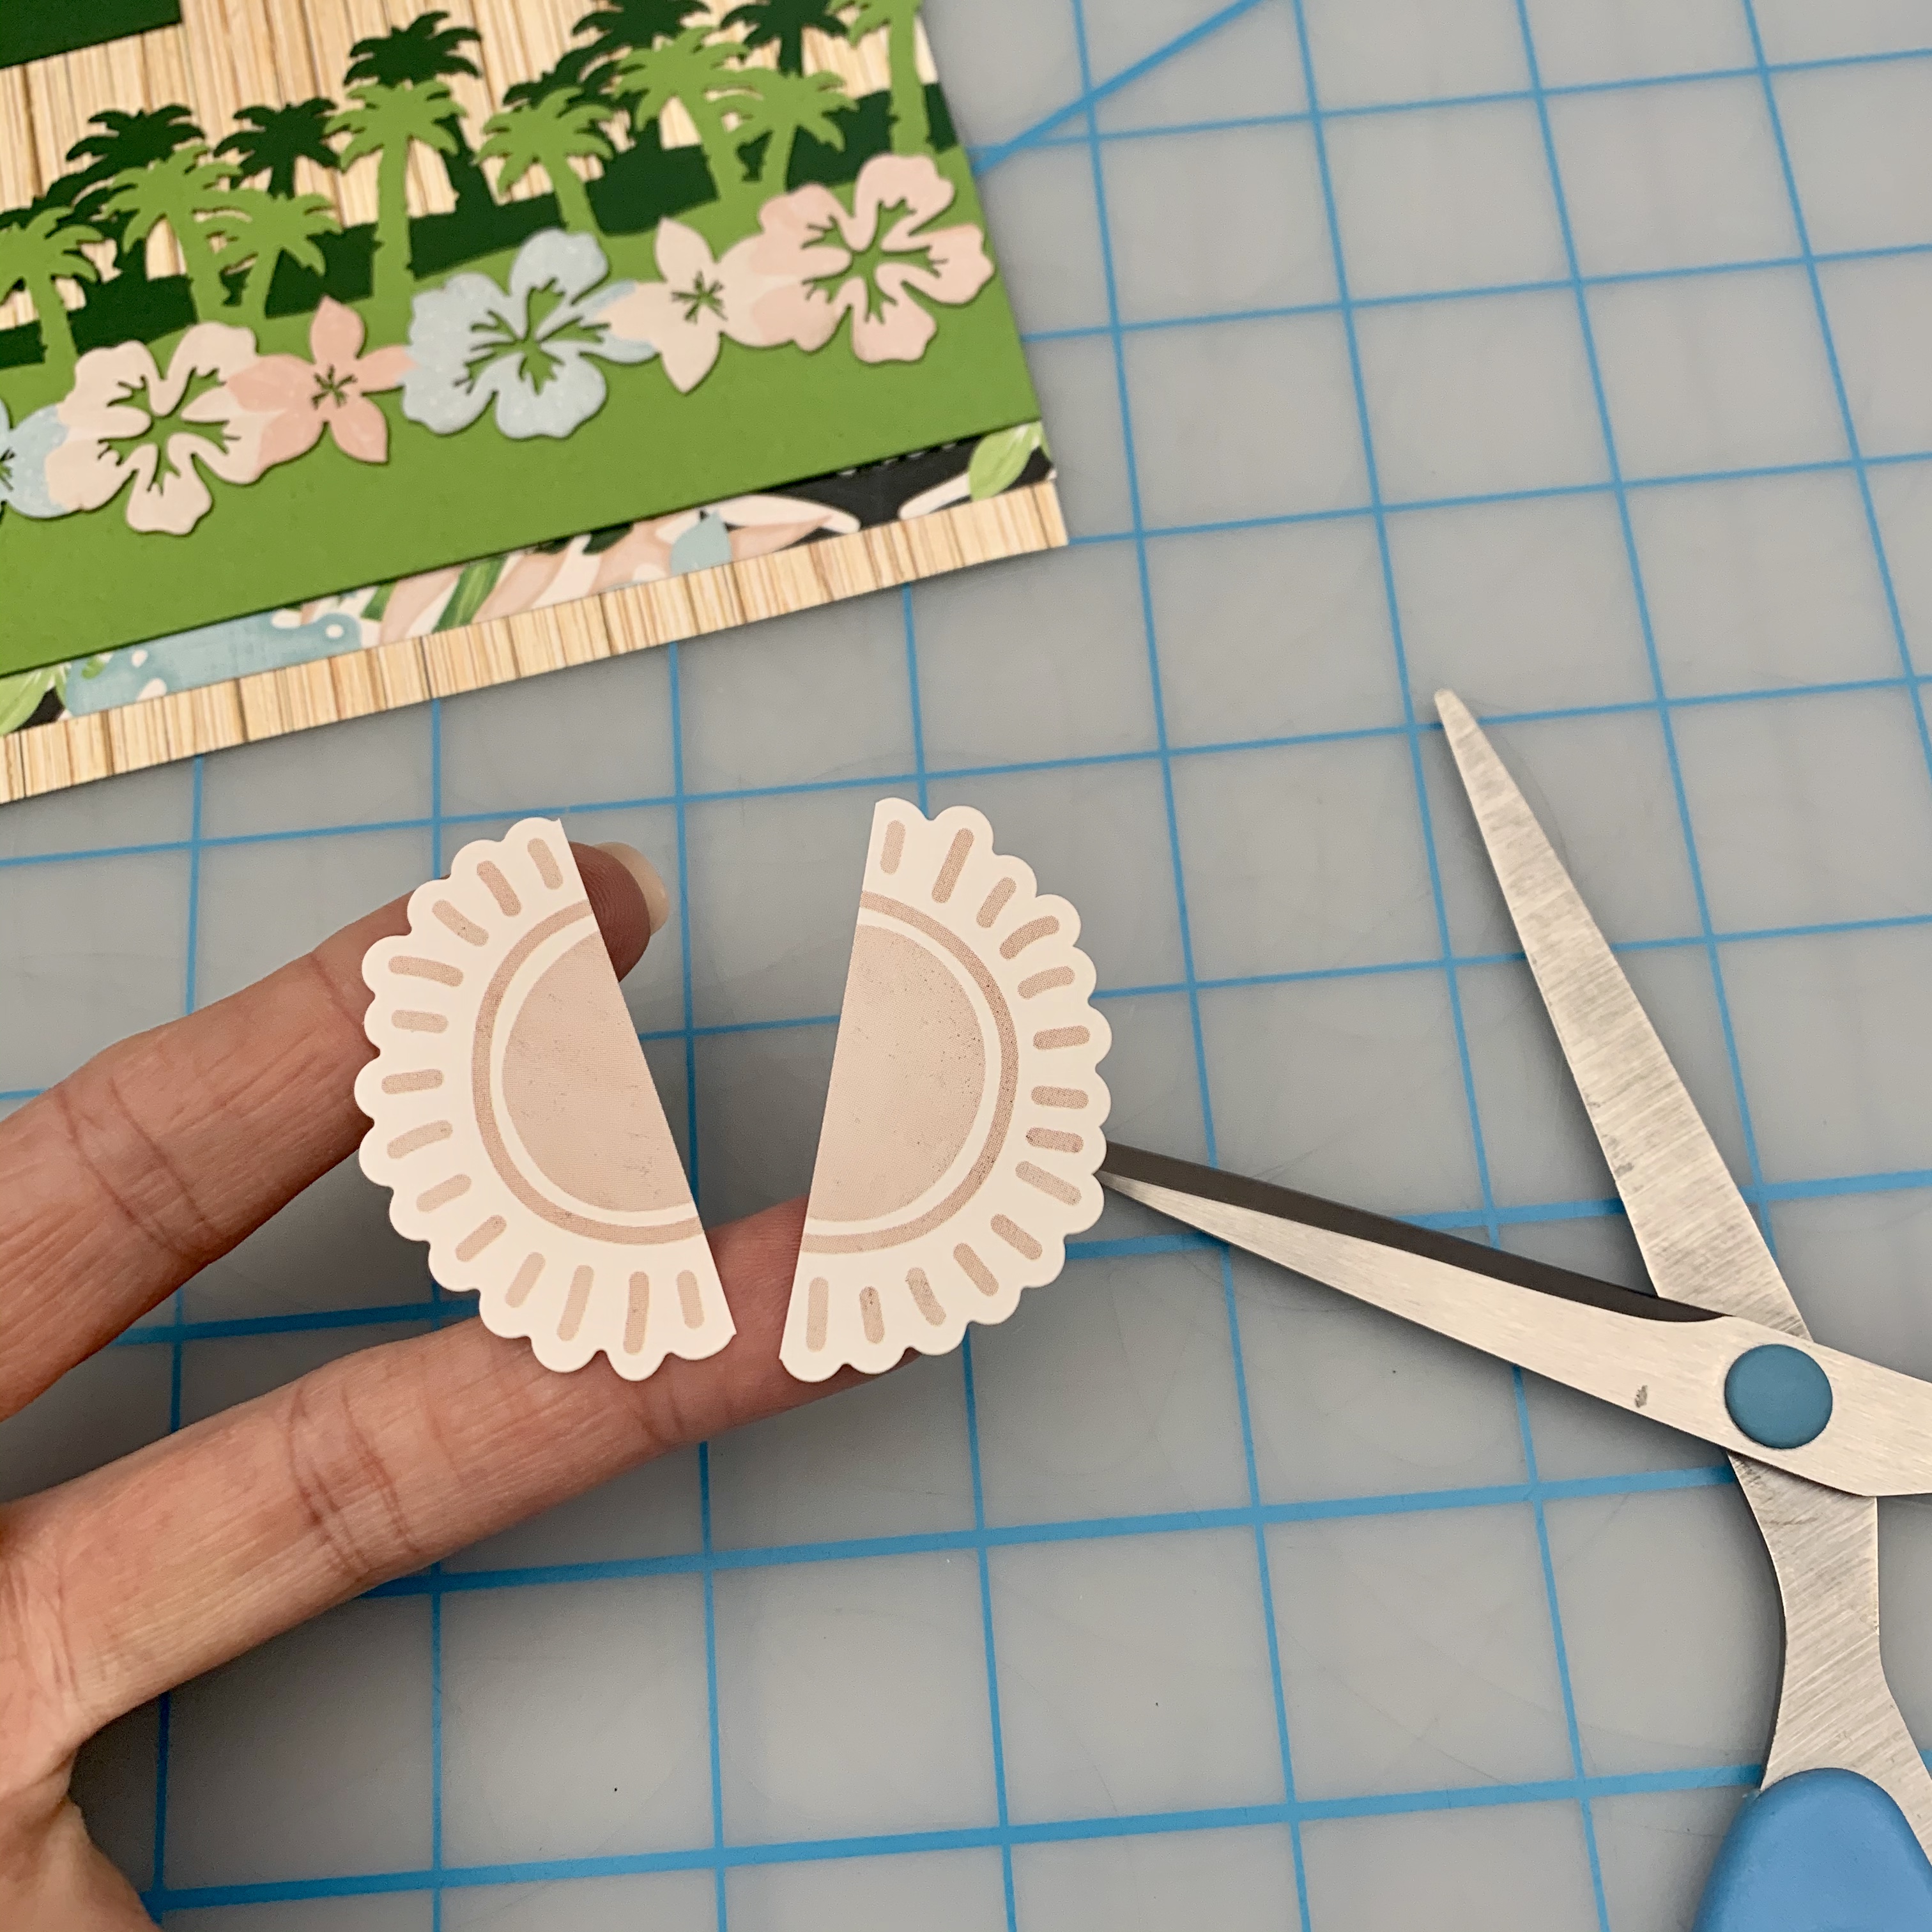
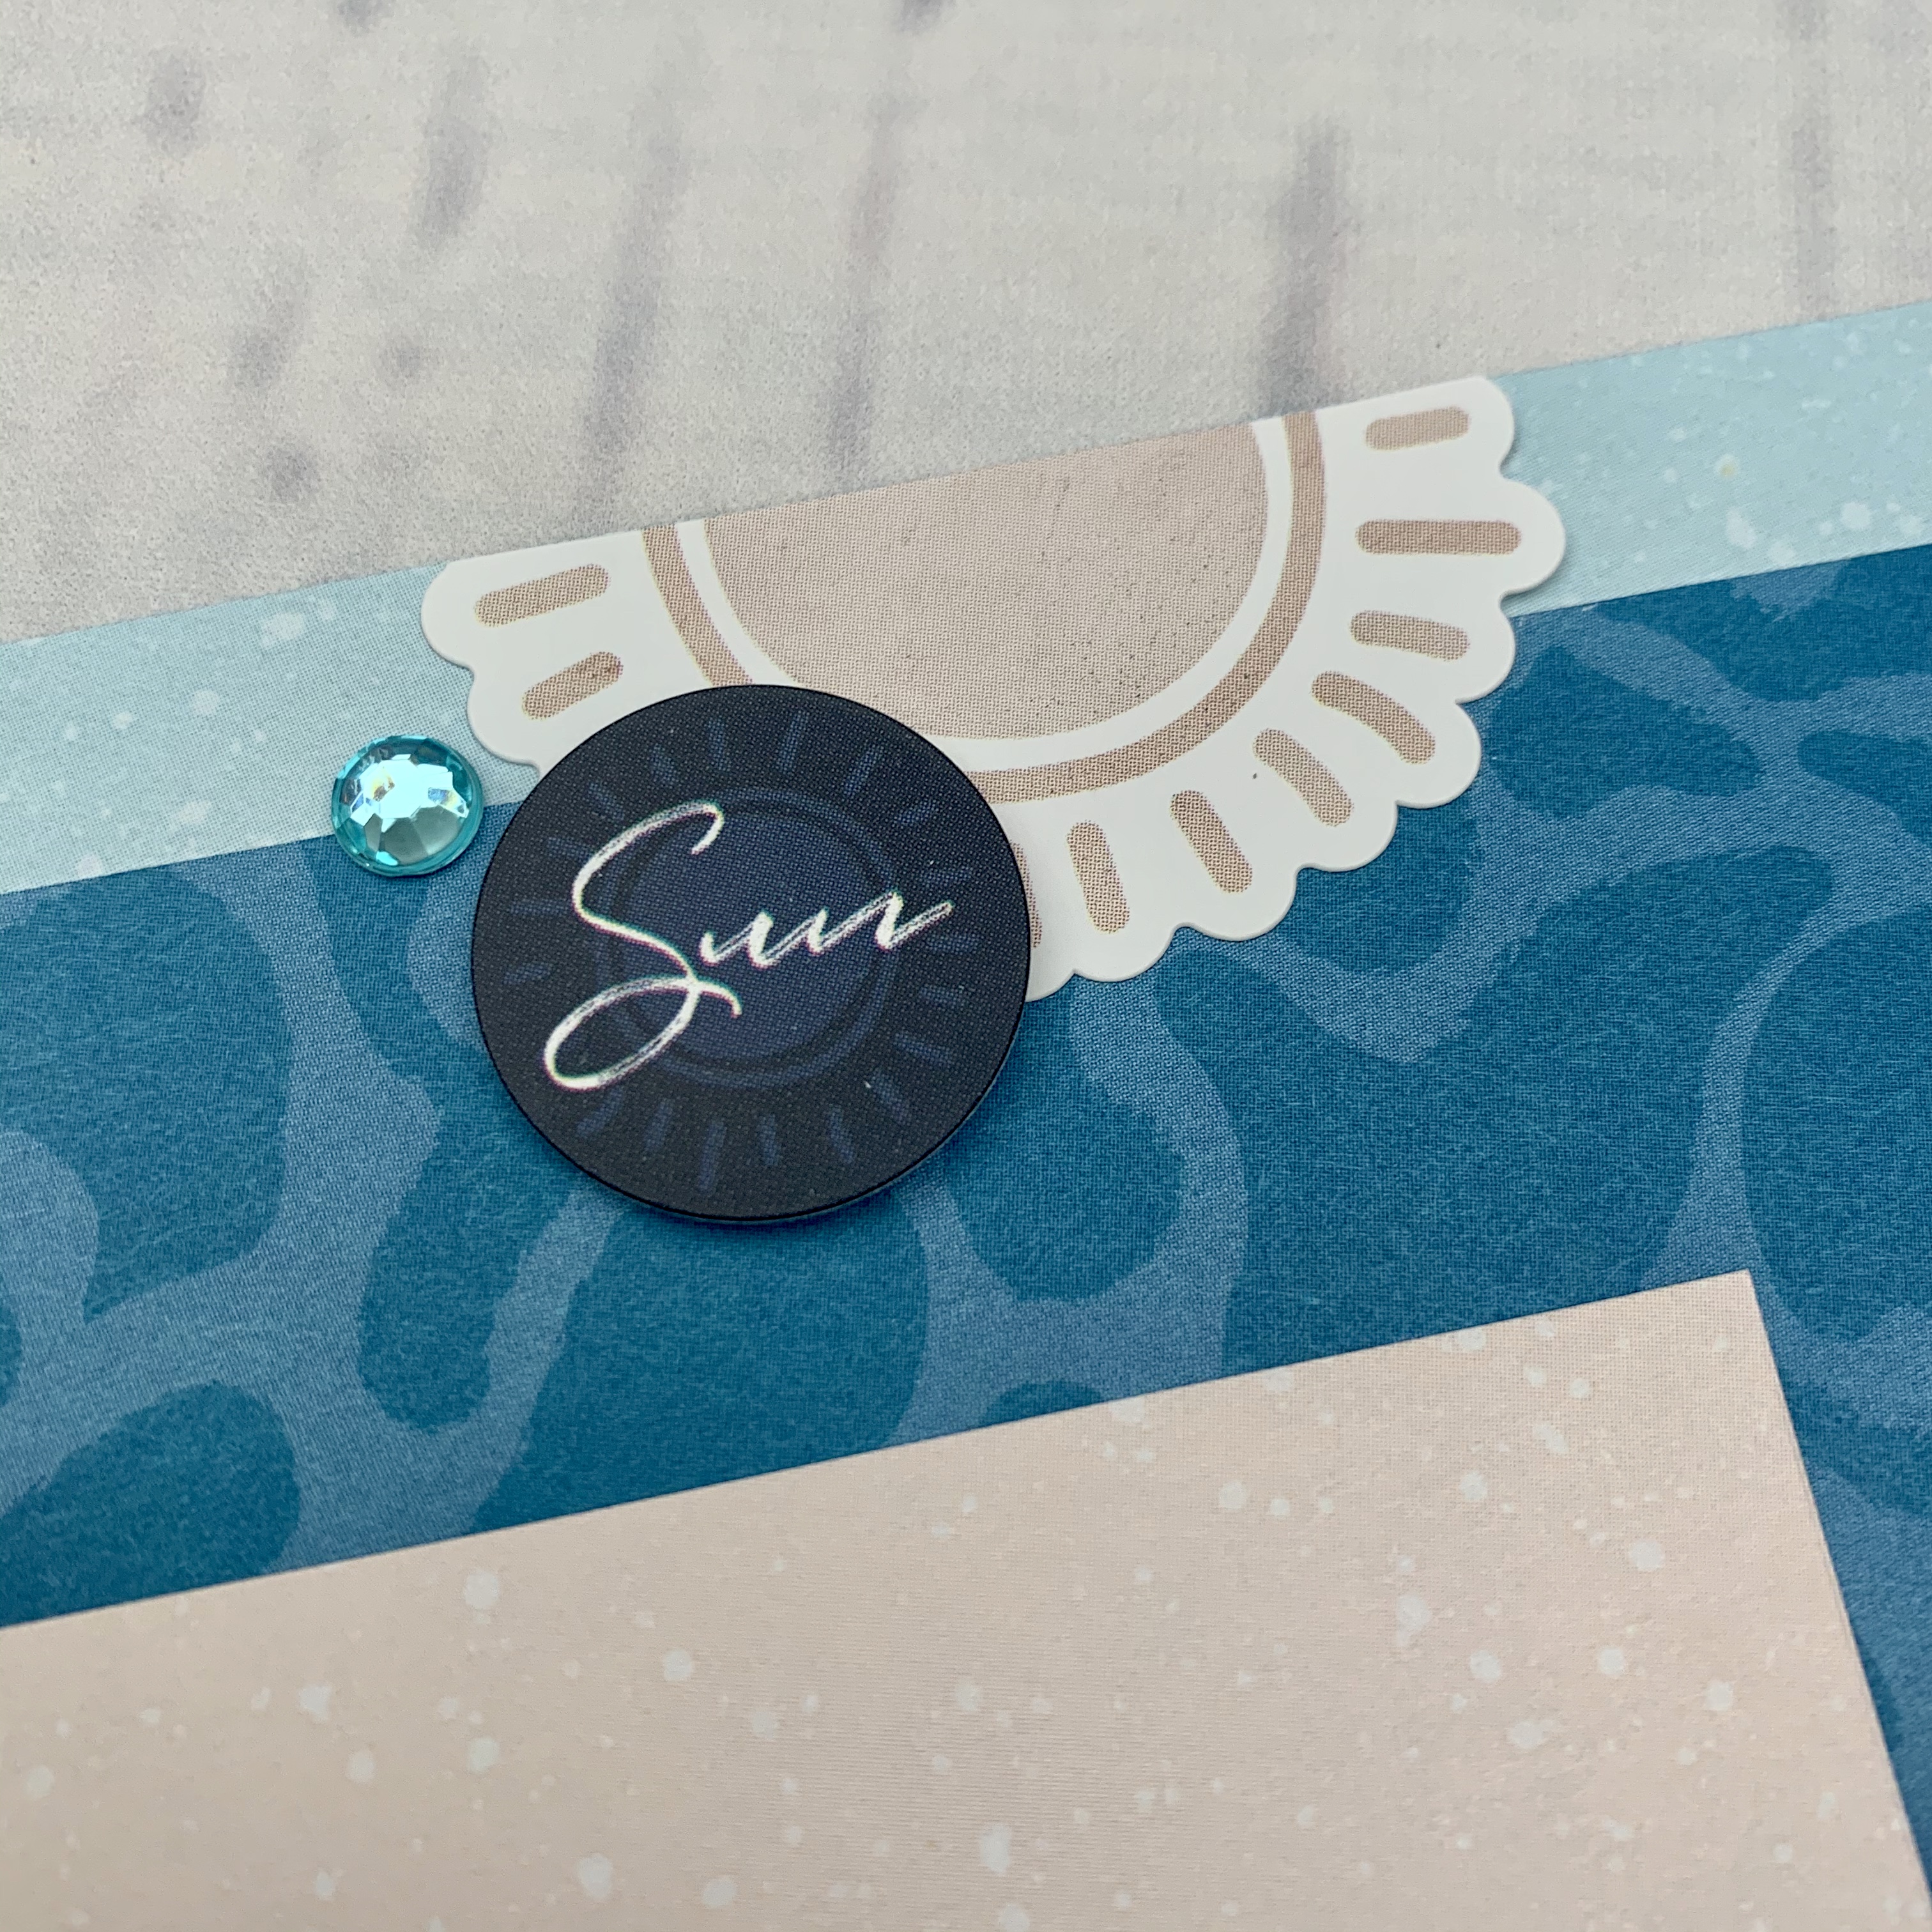
Step 6: Cut the blush sun sticker in half with All-Purpose Scissors. One piece will be used as the setting sun behind the palm trees on this layout. Save the second piece for the next layout. Tuck one half under the palm trees as shown, and then build an embellishment cluster in the same area with the “Live in the moment” sticker, smaller accent stickers and a gem to finish off the layout.
To make the layout with the Tidal Waves Border Punch you will need:
- Vitamin Sea Paper Pack or (Shop Canada | Shop Australia)
- Vitamin Sea Tone-on-Tone Paper Pack or (Shop Canada | Shop Australia)
- Vitamin Sea Stickers or (Shop Canada | Shop Australia)
- Promotion: Tidal Waves Border Punch or (Shop Canada | Shop Australia)
- 12-inch Trimmer or (Shop Canada | Shop Australia)
- Tape Runner or (Shop Canada | Shop Australia)
- Repositionable Tape Runner or (Shop Canada | Shop Australia)
- Foam Squares or (Shop Canada | Shop Australia)
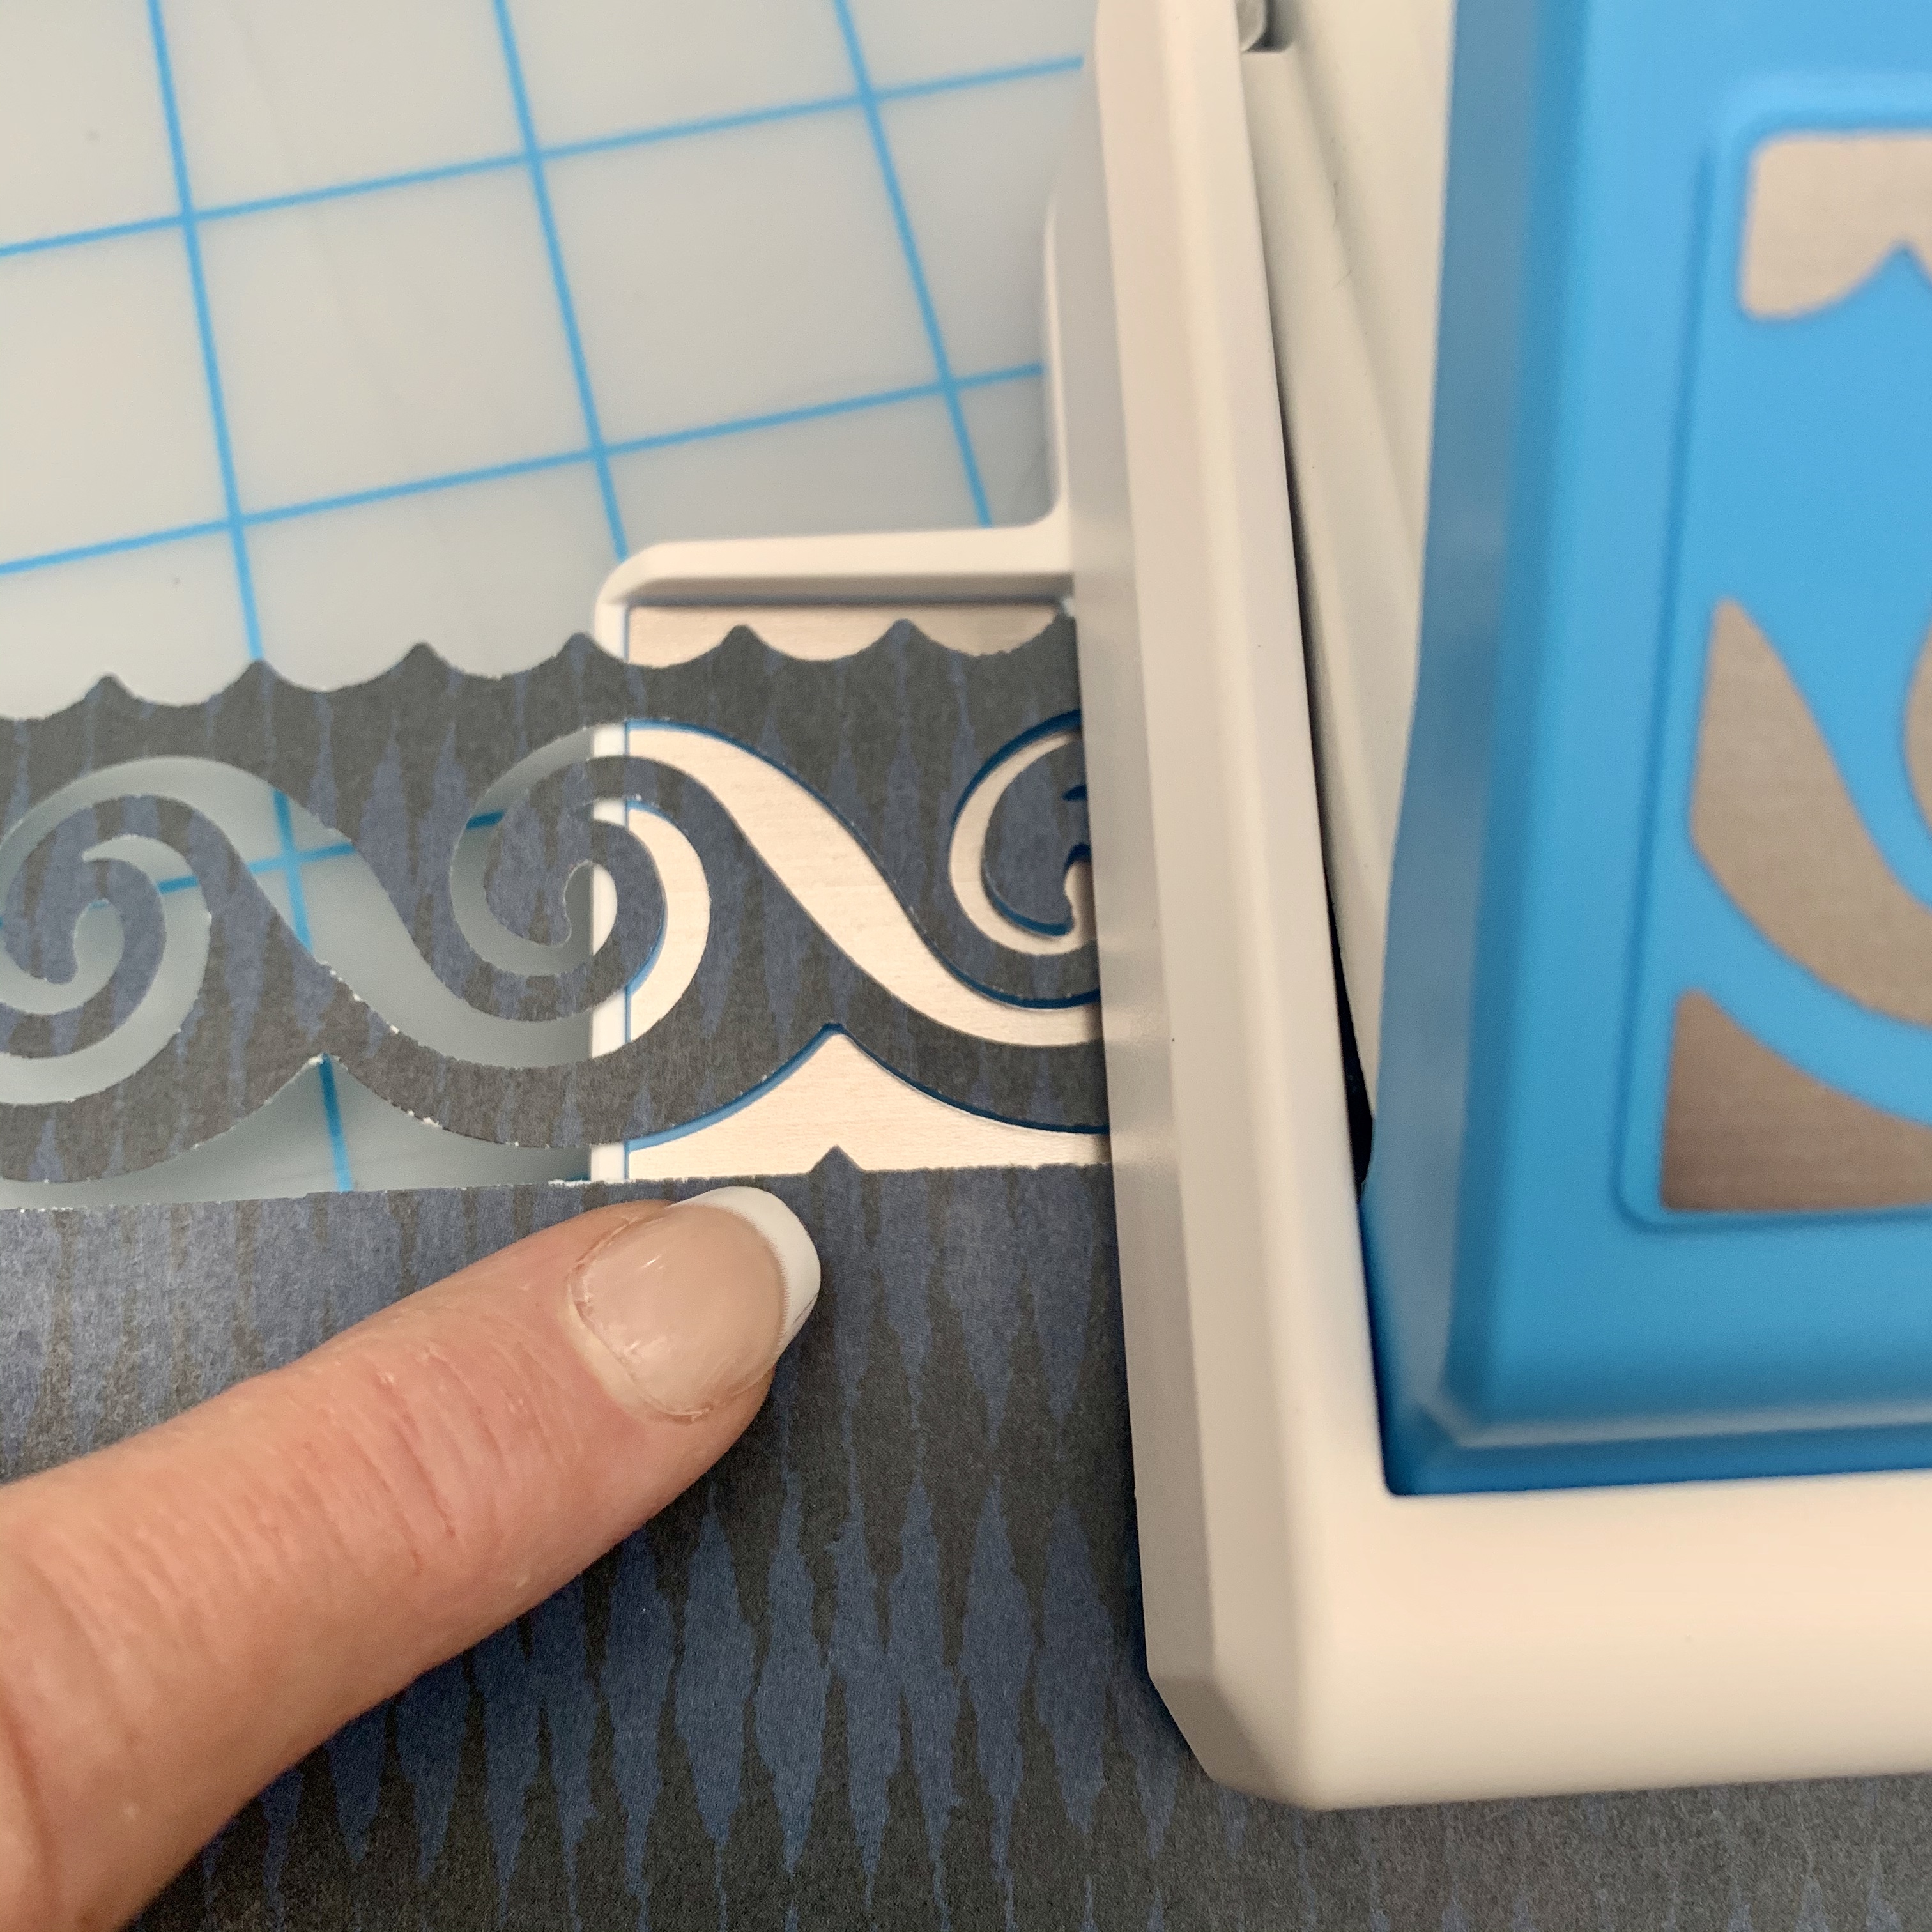
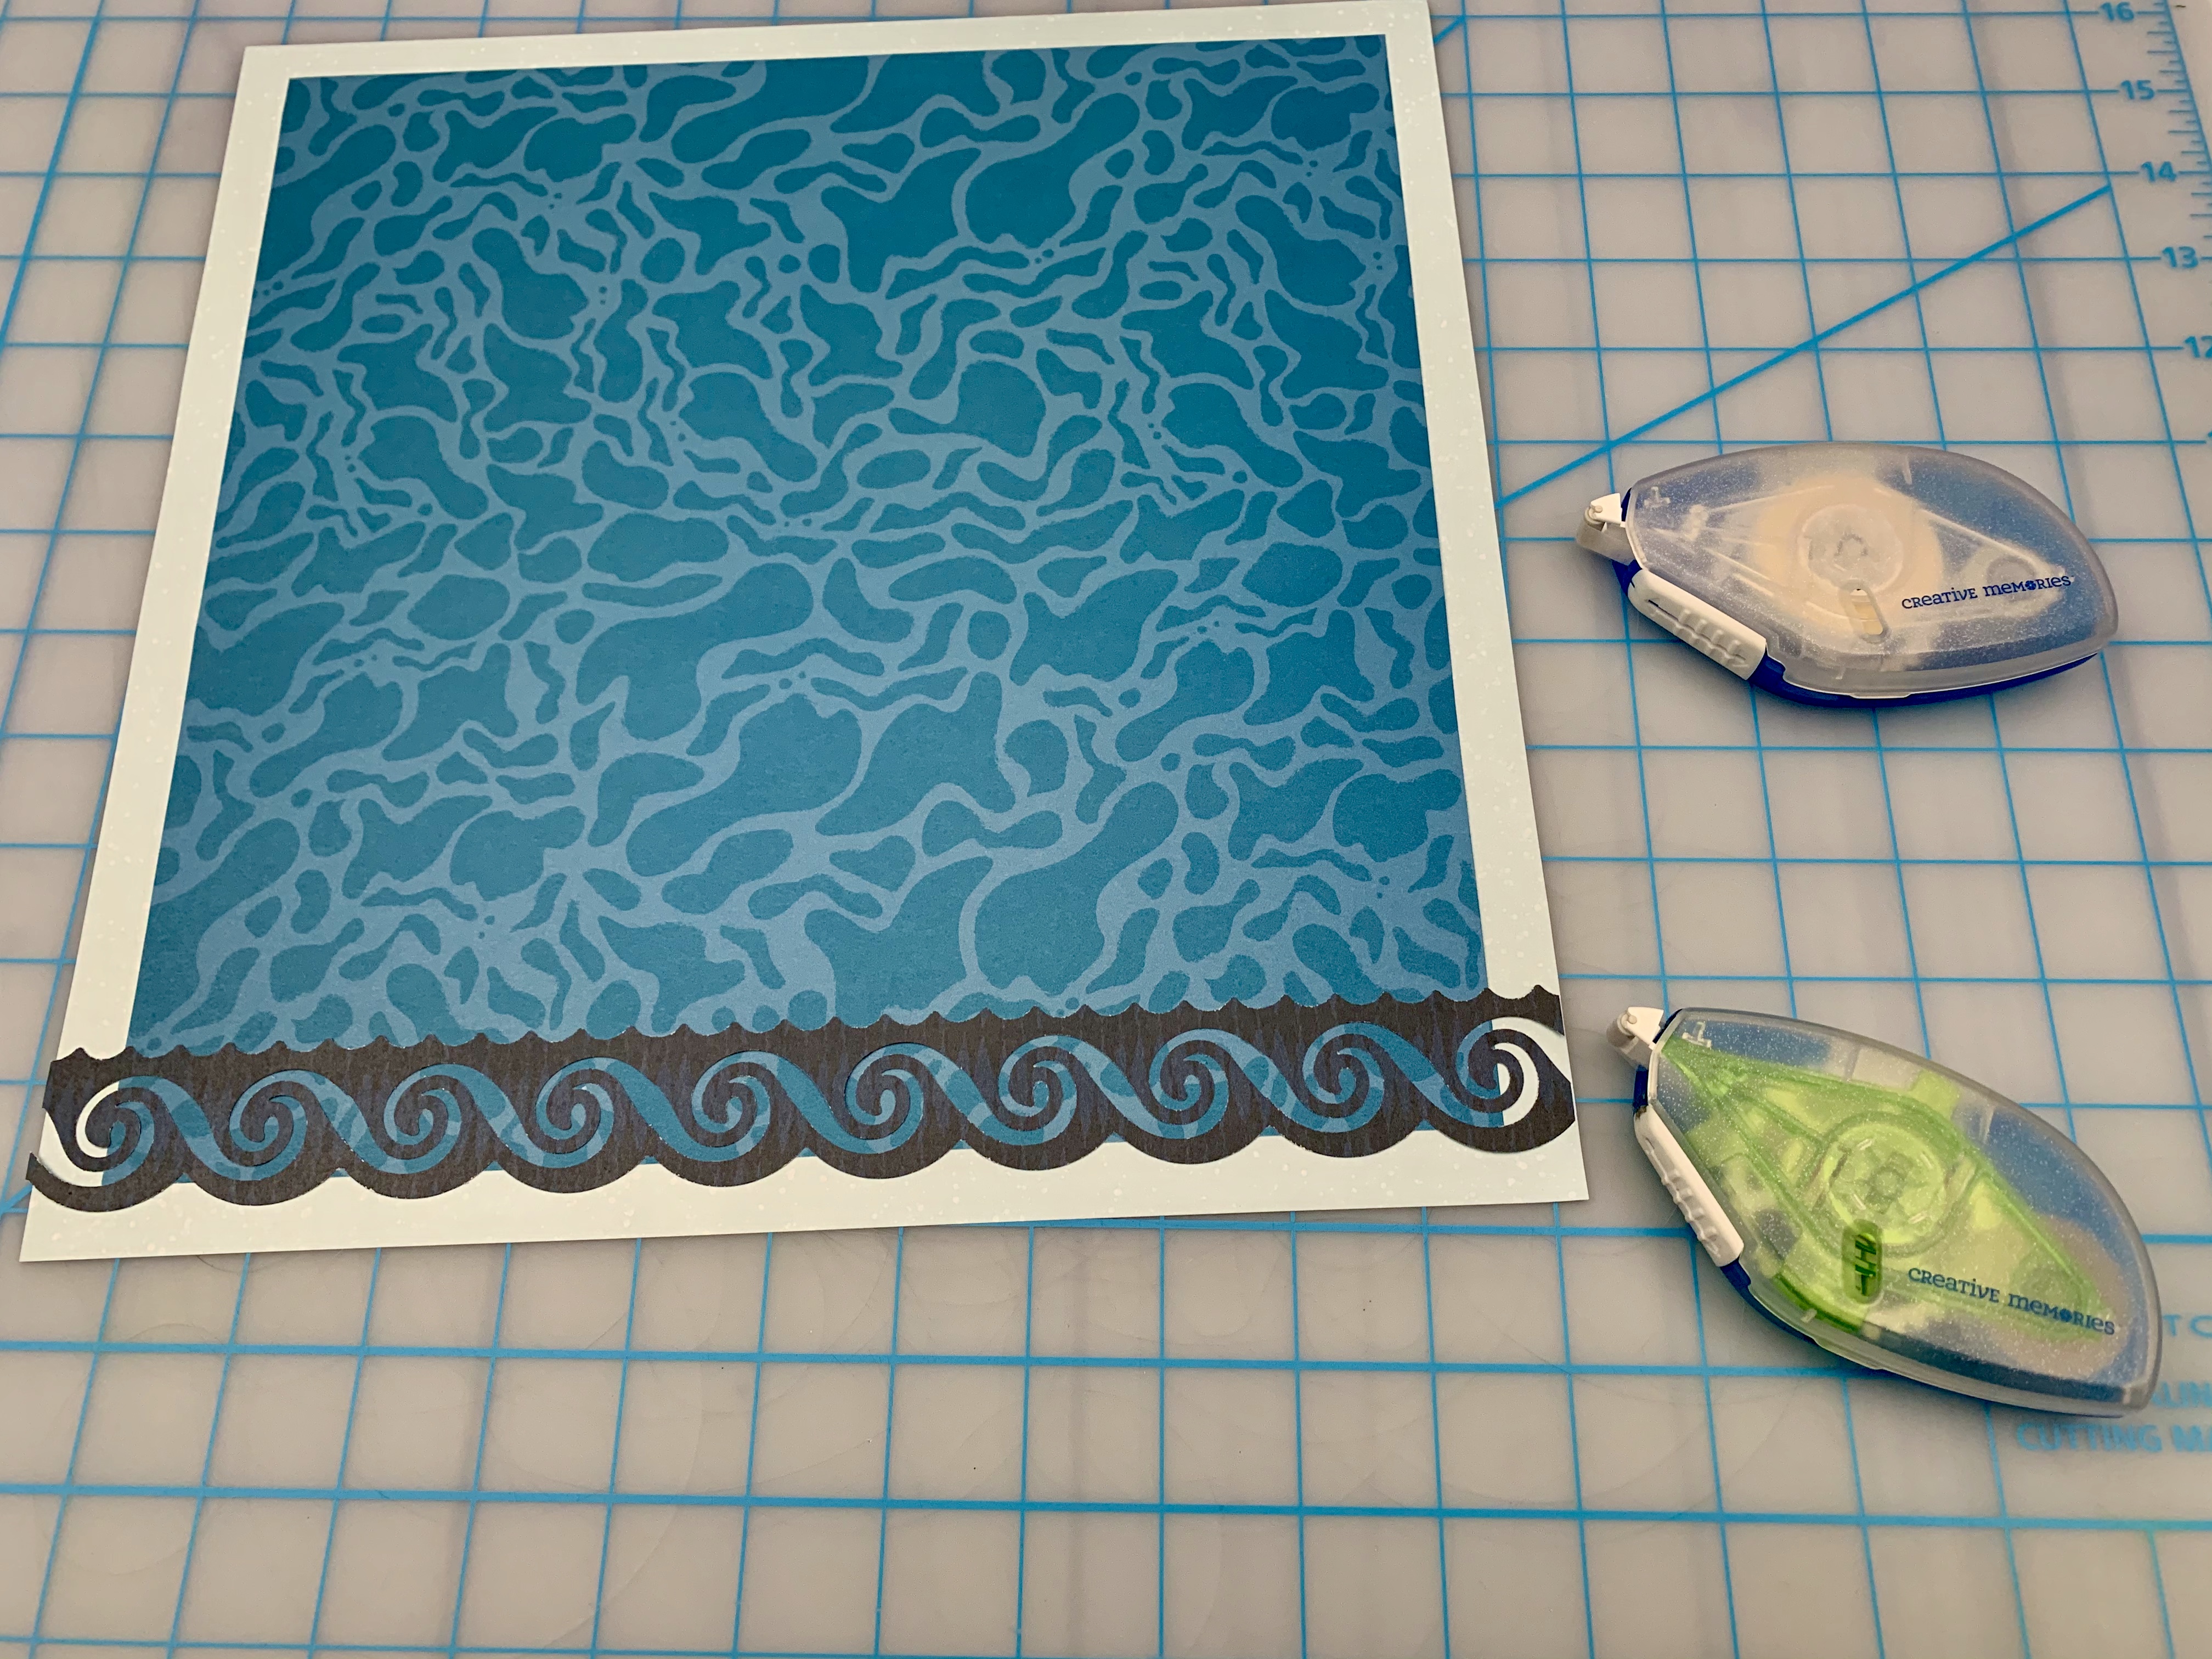
Step 1: When punching borders with the Tidal Waves Border Punch, insert paper or cardstock into the paper slot and line up the edge with one of the black lines on the front of the punch. Punch, then slide paper along the base plate and align the small triangle on the lower portion of the paper with the small triangle shape printed on the base plate. Punch one Tidal Waves border from the diamond stripes patterned paper.
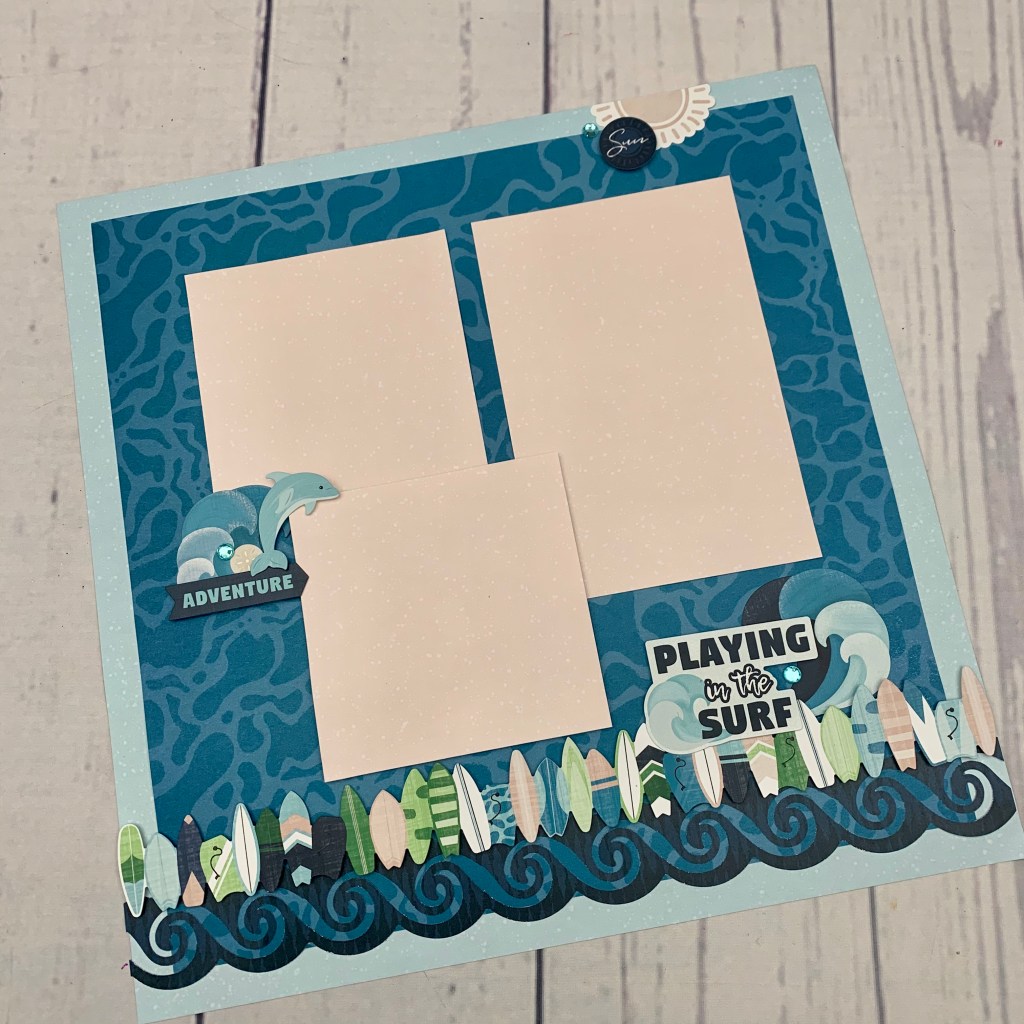
Step 2: Use the light blue splash patterned paper from the Vitamin Sea Tone-on-Tone Paper Pack as the base of this layout. Cut one piece of the abstract water patterned paper into an 11″ x 11″ square. Align the square onto the base page as shown and adhere with the Tape Runner. Use the Repositionable Tape Runner to adhere the tidal waves border along the bottom edge of the square, covering the seam and spanning the page.
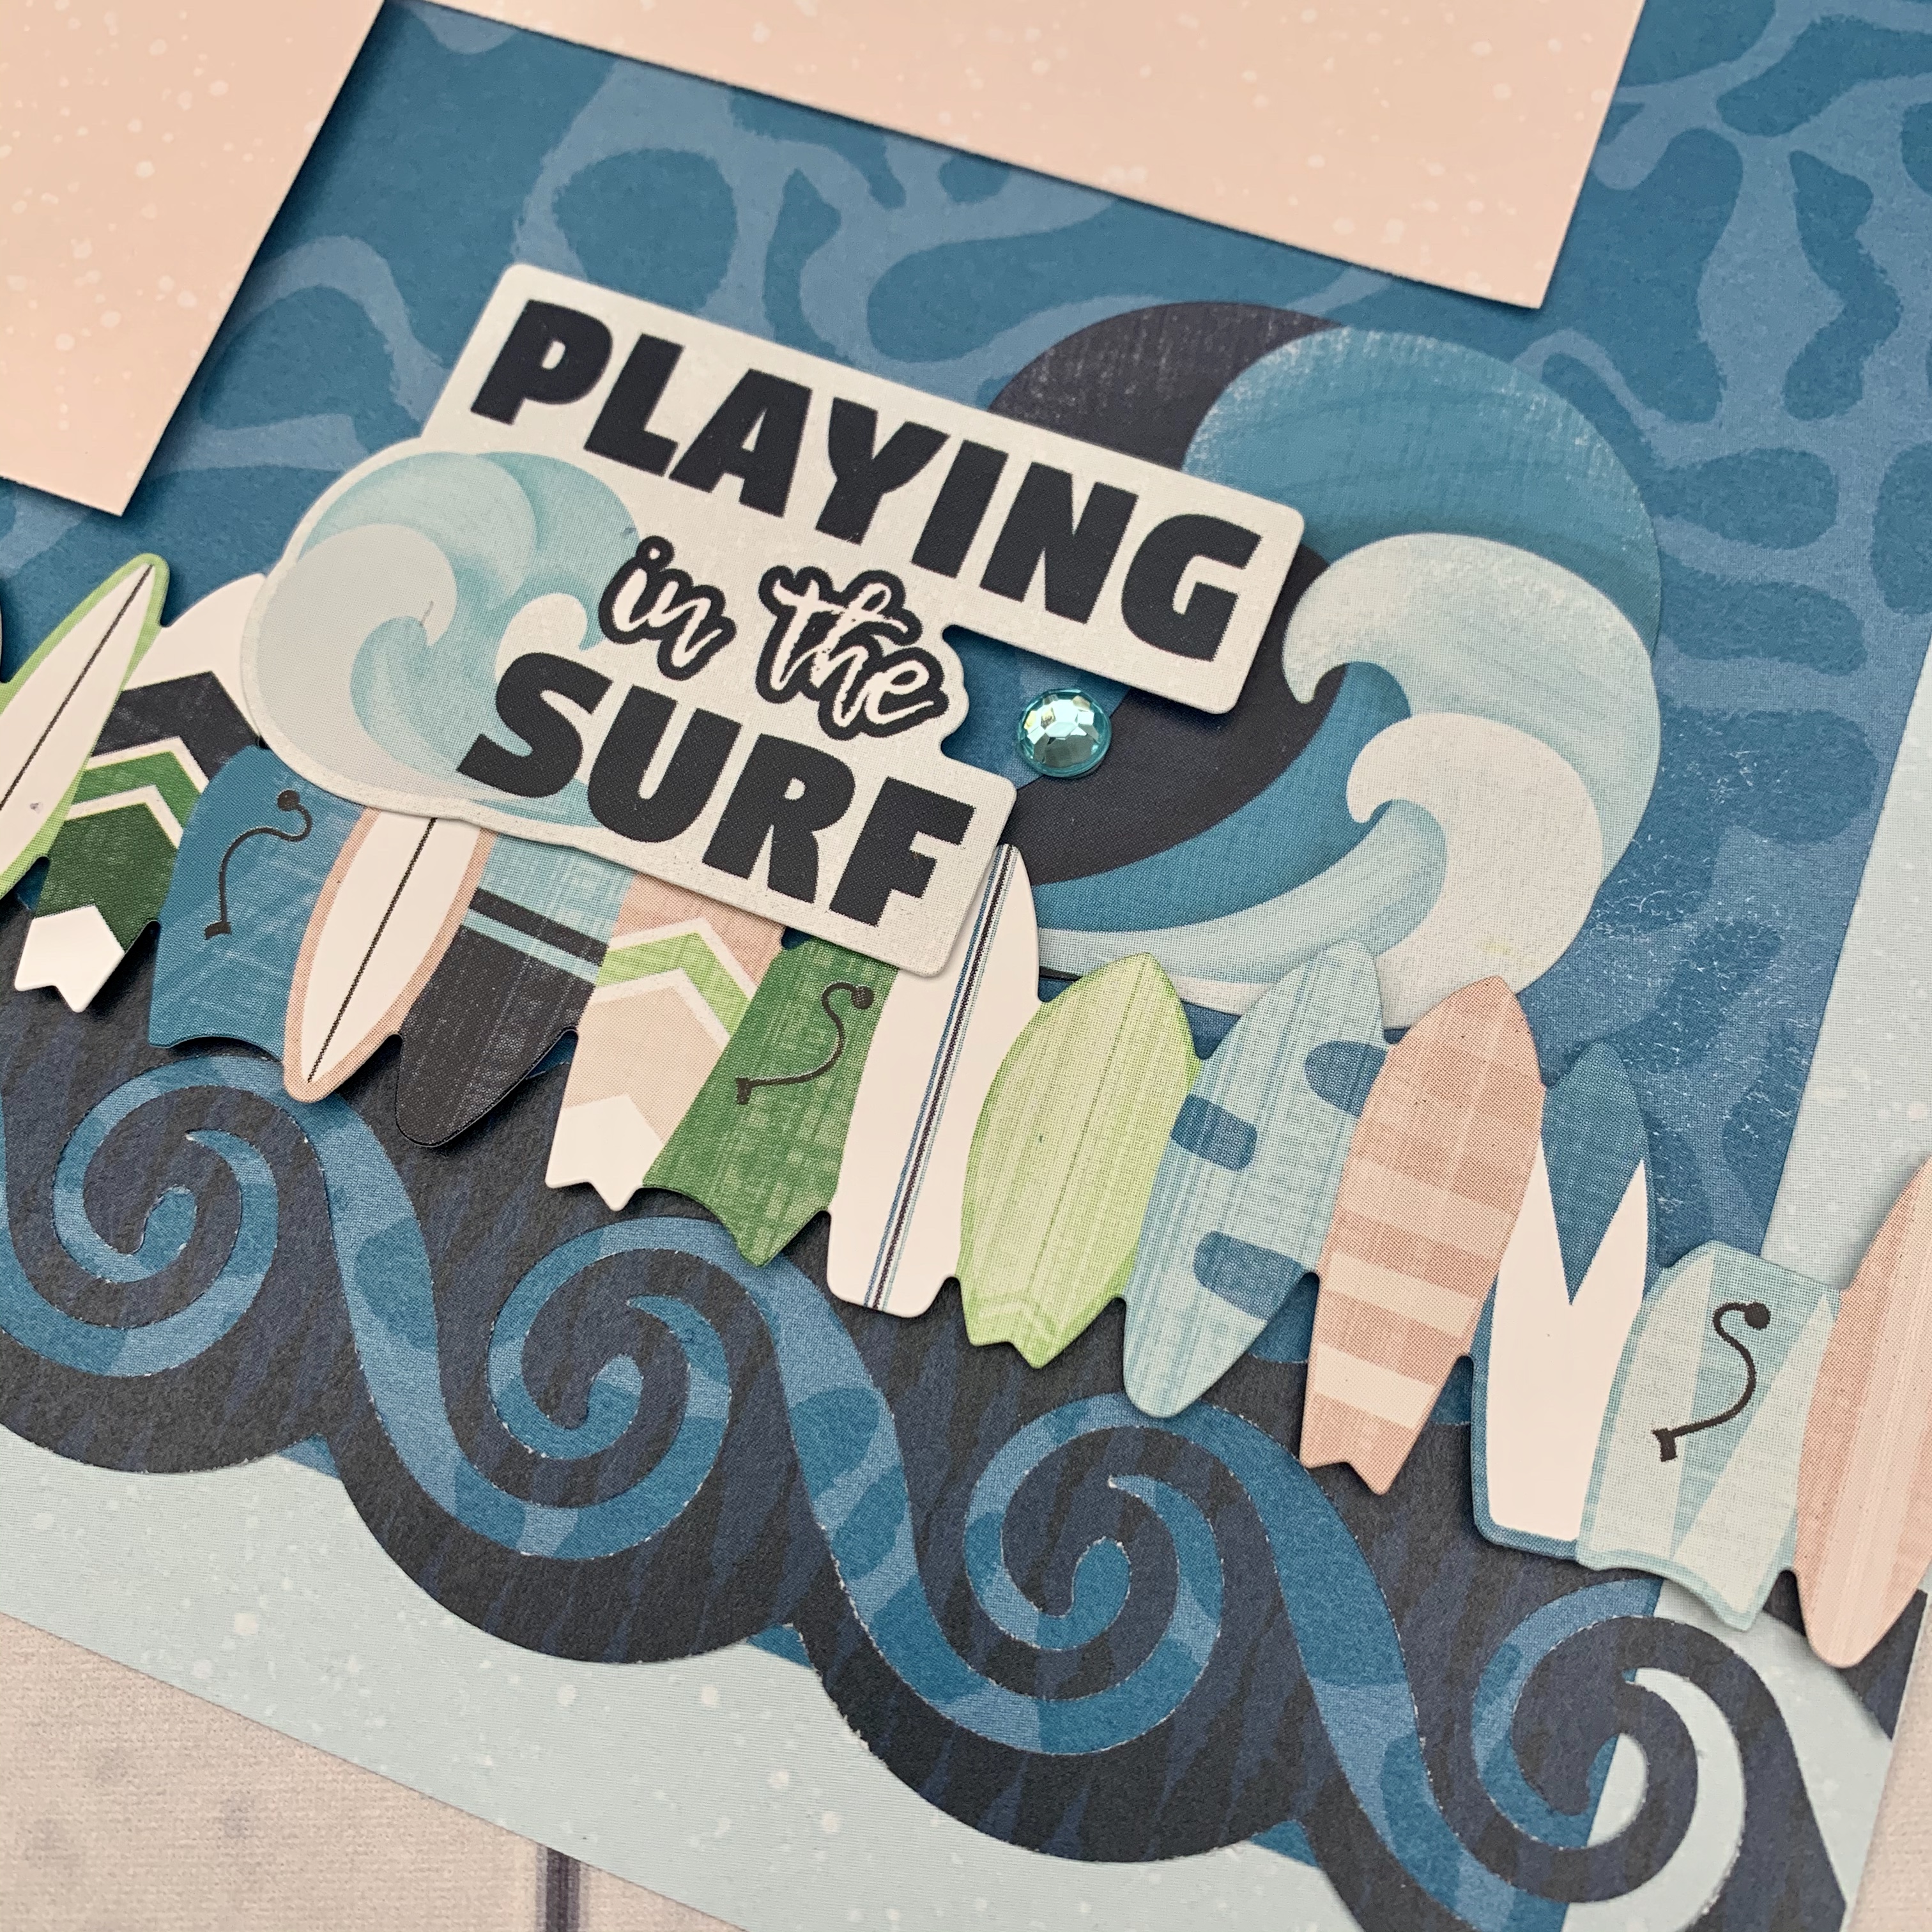
Step 3: Use Foam Squares to layer one of the surfboard border stickers on top of the tidal waves border. Tuck the larger waves sticker underneath the top edge of the surfboard stickers and add the “Playing in the surf” sticker as the title. Add a gem to finish the embellishment cluster.
Step 4: Cut three photo mats in size desired from the pink splash patterned paper from the Vitamin Sea Tone-on-Tone Paper Pack (two 4″ x 4″ and one 4″ x 6″ sizes shown on the layout). Mat your photos with these or adhere the blank mats to the page, with one mat overlapping the other two mats and mounted with Foam Squares for dimension and interest. Add the smaller waves sticker, the smaller jumping dolphin sticker, the “Adventure” sticker and a gem to create a second embellishment cluster as shown.

Step 5: Place the other half of the blush sun sticker from the previous layout along the top edge of the layout. Add the circular “Sun” sticker and a gem to finish off this small embellishment cluster and complete the layout.
I love both bundles so much that I know I’ll be stocking up even more on my scrapbook essentials like pages and protectors, adhesive and cardstock (which you can never have enough of, right?)! Did either of these tropical scrapbook layouts inspire you to take part in this promo? Which bundle will you pick — or do you need both, too? Let us know in the comments below!

Gorgeous designs!
LOVE, LOVE, LOVE these layouts. I am working on an album from Hawaii and these are perfect. Thank you for sharing these, Noreen!
Beautiful page layouts Noreen. Thanks so much for sharing!
Noreen, your layouts are awesome. Thanks for sharing!
Thank you for these awesome ideas Noreen!!
Love the layouts especially the palm trees. Our family has been on several tropical vacations so I will get a lot of use from palm tree punch as i have ordered it.
I love this!
Thank You Noreen, these are gorgeous!!!