October 7, 2020
Mix Up Your Mantle With These Christmas Scrapbook Borders
Do your pages need some yuletide cheer? Or perhaps they just need a fun Christmas border to add the festive finishing touch! Take a look at these Christmas scrapbook borders and start coming up with your own wintry wonders!

To create these borders, you will need:
- Christmas Spirit Paper Pack or (Shop Canada | Shop Australia)
- Christmas Spirit Laser Cut Borders or (Shop Canada | Shop Australia)
- Christmas Embellishments or (Shop Canada | Shop Australia)
- Christmas Spirit Stickers or (Shop Canada | Shop Australia)
- Crimson, Dark Green & Scarlet Solid Cardstocks or (Shop Canada | Shop Australia)
- Original Border Maker System with the Christmas Stockings Border Maker Cartridge or (Shop Canada | Shop Australia)
- Custom Cutting System with Oval Patterns or (Shop Canada | Shop Australia)
- 12-inch Trimmer with Straight & Deckle Blades or (Shop Canada | Shop Australia)
- Micro-Tip Scissors or (Shop Canada | Shop Australia)
- Tape Runner or (Shop Canada | Shop Australia)
- Foam Squares or (Shop Canada | Shop Australia)
- Pencil
Check out the Christmas Stockings Border Maker Cartridge in action in the video below!

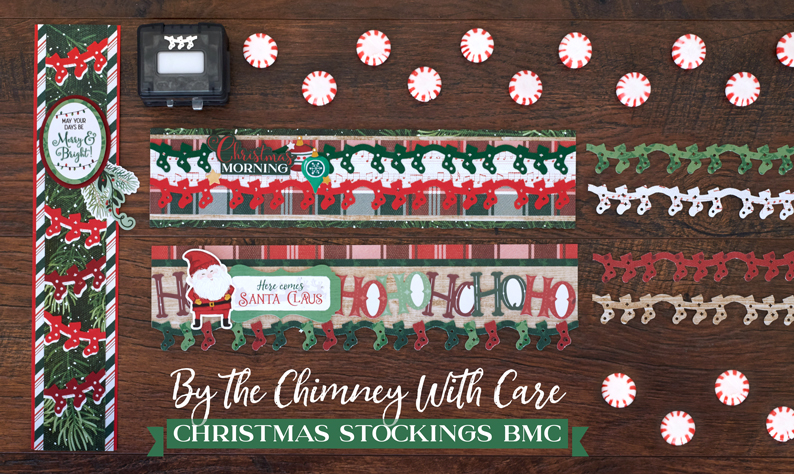
Merry & Bright Border

Step 1: Cut a 2-1/2″ x 12″ strip of Scarlet Cardstock for the base. Cut a 2-1/4″ x 12″ strip of candy stripe patterned paper and adhere on the base.
Step 2: Cut a 2″ x 12″ strip of evergreen tips patterned paper. Using the Christmas Stockings Border Maker Cartridge, punch a border with music note patterned paper and Crimson and Scarlet Cardstock. Apply Repositionable Tape Runner to the strips. Overlap either cardstock border sections over music notes border. Adhere sections to the strip at an angle as shown. Trim the excess. Adhere to the base.
Step 3: Using the inside of the second largest Custom Cutting System Oval Pattern, cut an oval with green patterned paper. Using the same pattern and the Red Blade, cut an oval with Crimson Cardstock. Mount the “May your days be merry & bright” sticker on the green oval and then on the crimson oval and adhere to the border as shown.
Step 4: Add evergreen tips stickers as shown.
Christmas Morning Border

Step 1: Using the 12-inch Trimmer with the Deckle Blade, cut a 12″ x 2-3/4″ strip of evergreen tips patterned paper for the base. With the 12-inch Trimmer with the Straight Blade, cut a 12″ x 2-3/8″ strip of wood grain patterned paper. Adhere to the base. Cut a 12″ x 2-1/8″ strip of plaid paper and adhere on top.
Step 2: Using the Christmas Stockings Border Maker Cartridge, punch a border with both Dark Green and Scarlet Cardstock. Place the borders on a piece of music notes patterned paper, about 1″ apart. Lightly trace outline of the scallops onto music note paper. Cut out with Micro-Tip Scissors. Adhere to the border and top with the stockings borders as shown.
Step 3: Adhere stickers as desired.
Here Comes Santa Claus Border

Step 1: Cut a 12″ x 2-1/2″ strip of plaid patterned paper for the base. Cut a 12″ x 2″ strip of dark green patterned paper and adhere to the base, even with the bottom edge. Cut a 12″ x 1-3/4″ strip of wood grain patterned paper and adhere on top, even with the bottom edge.
Step 2: Using the Christmas Stockings Border Maker Cartridge, punch a border with dark green, medium green and red patterned papers. Adhere the dark green stockings border to the bottom edge of the border. Using Micro-Tip Scissors, trim pieces of base papers that show beneath the scallops of the stockings border.
Step 3: Cut individual stockings from medium green and red borders. Adhere on top of the dark green border as shown.
Step 4: Cut apart the “Ho ho ho” laser cut border. Alternating hues, place sections on the border. Add stickers with Foam Squares.
Which one of these borders do you like the most? Comment below and let us know!

The border layouts are lively and a great pattern for me to follow. I will do some of them. Thank you for the ideas.
These borders absolutely put you in a holiday “Spirit for Christmas” mode. Very adorable.
Thanks so much, Krislyn, for the measurements and instructions for these creative borders! They will accent beautiful Christmas pages.
Just love the Merry and Bright. Kudos!
[…] Get instructions for this border (along with some more!) by reading this blog post! […]
On the “Merry & Bright” border, Step 3 of the instructions should include that the green patterned paper should be cut with the Green Blade. (I know it can get confusing with both greens! :~)
Lovely ideas. Thanks so much for sharing. I’m going to adapt them all into cards, since my customers seem to be mostly interested in cards rather than scrapbooking.
[…] #4 is a merry and bright delight! Check out this blog post to learn how you can make this […]
[…] Get comfy in your craft room and create this layered border following the step-by-step instructions in this blog post! […]