December 1, 2020
Find Silver Linings With These COVID-19 Scrapbook Borders

2020 has been full of trials and tribulations for many. Numerous school districts underwent new protocols and moved to hybrid or virtual learning. Wearing masks and being six-feet apart at grocery stores has become a part of the shopping routine. Small businesses felt the weight of being closed upon their shoulders. Family gatherings had to get smaller. Despite the ups and downs that this last year has brought and currently brings, it’s so important to find the silver linings in it all — and that’s exactly what blog contributor Krislyn Mattei did with these COVID-19 scrapbook border she beautifully made with the Love Each Other 2 Theme Pack.
Krislyn’s Inspiration
Documenting the challenging and changing world of 2020 is no small feat. I know many of us will be documenting how we’ve met the challenges of working and learning from home and keeping ourselves and others safe in public by wearing a mask and social distancing. I’m sure our pictures and stories will also reflect the many blessings we’ve also found during this time — more family time, outdoor activities and time spent relaxing.
Luckily, we have the perfect collection of materials to help us tell the stories! The Love Each Other 2 Theme Pack has vibrant paper designs and hues, as well as timely stickers that capture the themes of today’s world. I used it to create borders with matching journal boxes to pull together pages of this crazy time in our history.

To create these borders you’ll need:
- Love Each Other 2 Theme Pack or (Shop Canada | Shop Australia)
- Custom Cutting System with the Circle Patterns or (Shop Canada | Shop Australia)
- Original Border Maker System with Clouds Border Maker Cartridge or (Shop Canada | Shop Australia)
- Arch Border Frame, Train Tracks & Lace Trim Border Punches or (Shop Canada | Shop Australia)
- 12-inch Trimmer or (Shop Canada | Shop Australia)
- Micro-Tip Scissors or (Shop Canada | Shop Australia)
- 2-Way Corner Rounder or (Shop Canada | Shop Australia)
- Tape Runner or (Shop Canada | Shop Australia)
- Repositionable Tape Runner or (Shop Canada | Shop Australia)
- Foam Squares or (Shop Canada | Shop Australia)
Distance Learning Border

Step 1: To make the base, punch a border using the Lace Trim Border Punch with the Goldenrod SOlid Cardstock. Cut off the lace edge. Trim to measure 12″ x 3-3/8″ and punch the other side. Cut off the lace edge.
Step 2: Cut a 12″ x 1″ strip of each polka dot, blue grid and teal wave patterned papers. Round the top corners of each with the 2-Way Corner Rounder. Adhere to the base as shown.
Step 3: Punch a border using the Arch Border Frame Punch with Goldenrod Solid Cardstock. Trim off the arches and cut apart four arches. Adhere one just behind the tops of each of the three “folders” (setting one aside). Punch an arch shape from each blue grid (2), teal wave and polka dot patterned papers. Insert a punched out arch shape into each of the goldenrod “file tabs.”
Step 4: Add stickers as shown.
To make the journal box: Trim out the “Staying connected by:” and “Distance learning” boxes from the 16 boxes patterned paper. Layer and adhere together. Add the remaining “file tab” and stickers.
Silver Linings Border

Step 1: Using the Clouds Border Maker Cartridge, punch a border from teal wave patterned paper. Trim to measure 12″ x 2-1/4″ to create the base.
Step 2: Punch a border using the Clouds Border Maker Cartridge from blue grid paper. Trim to measure 12″ x 1″ and adhere to the base. Cut a 12″ x 3/4″ strip of polka dot patterned paper and adhere just under the blue grid piece.
Step 3: Using the inside of the smallest Custom Cutting System Circle Pattern, cut two circles of Goldenrod Solid Cardstock and three teal wave circles with the Blue Blade. Cut three circles of Goldenrod Solid Cardstock and two red circles (from the red heart box section) with the Green Blade. Cut three red and two teal wave circles with the Red Blade. Layer and adhere groups of three circle shapes. Cut each in half to make rainbows. Adhere to the border as shown.
Step 4: Cut a 3″ x 1/2″ piece of Goldenrod Solid Cardstock. Notch the ends. Adhere to the border and top with the rainbow and “Silver linings” stickers.
To make the journal box: Trim out the “Grateful for:” and rainbow boxes from the 16 boxes patterned paper. Layer and adhere together. Cut a 2-1/2″ x 1/2″ piece of both Goldenrod Solid Cardstock and teal wave patterned paper. Notch one end of each and adhere to the rainbow box. Add the “Thankful” sticker.
Mask Mandates Border
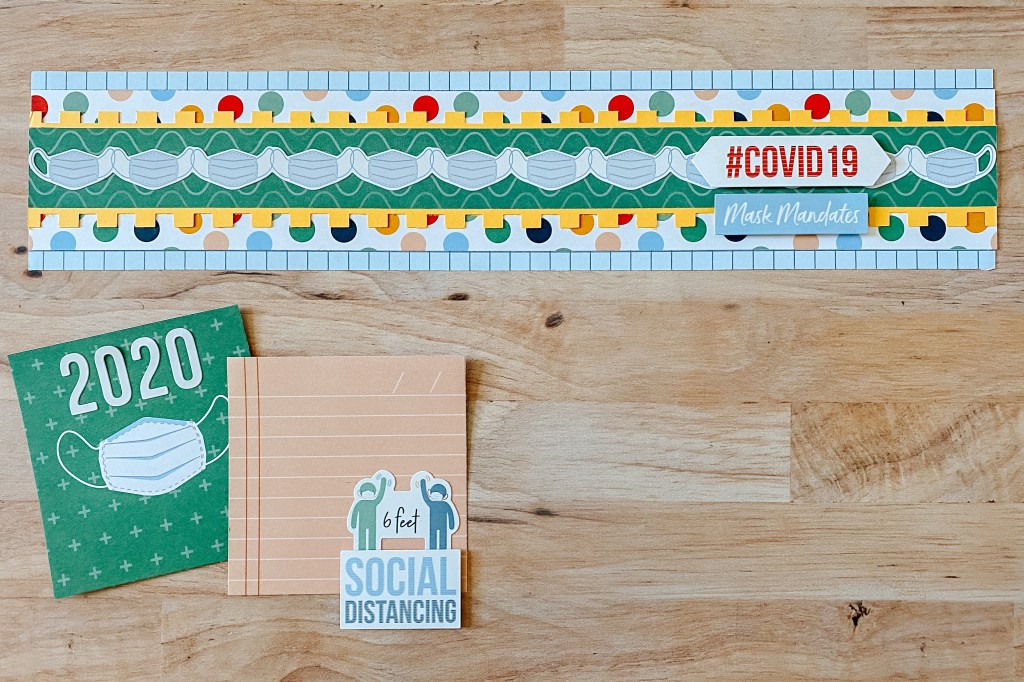
Step 1: Cut a 12″ x 2-1/2″ strip of blue grid patterned paper to create the base. Cut a 12″ x 2″ strip of polka dot patterned paper and adhere to the base.
Step 2: Punch a border using the Train Tracks Border Punch from Goldenrod Solid Cardstock. Adhere to the border. Cut a 12″ x 1″ strip of teal wave patterned paper and adhere on top as shown.
Step 3: Add the masks border sticker. Top with the “#COVID19″ and “Mask mandates” stickers with Foam Squares.
To make the journal box: Trim out the green mask and coral ruled boxes from the 16 boxes patterned paper. Layer and adhere together. Add the “2020”, “6 feet” and “Social distancing” stickers.
Will you be creating any of these COVID-19 scrapbook borders? What have you been doing to document the current pandemic? Let us know in the comments below!


Love all of these borders and journal boxes, Krislyn! So bright and cheerful, something we all need now. Thanks for sharing your creativity.
Thanks, Krislyn. I really like how the distance learning border shows how we juggle #allthethings!
[…] You can find the original blog post HERE. […]