May 6, 2021
Encircle Endearment With This Family Scrapbook Layout Idea

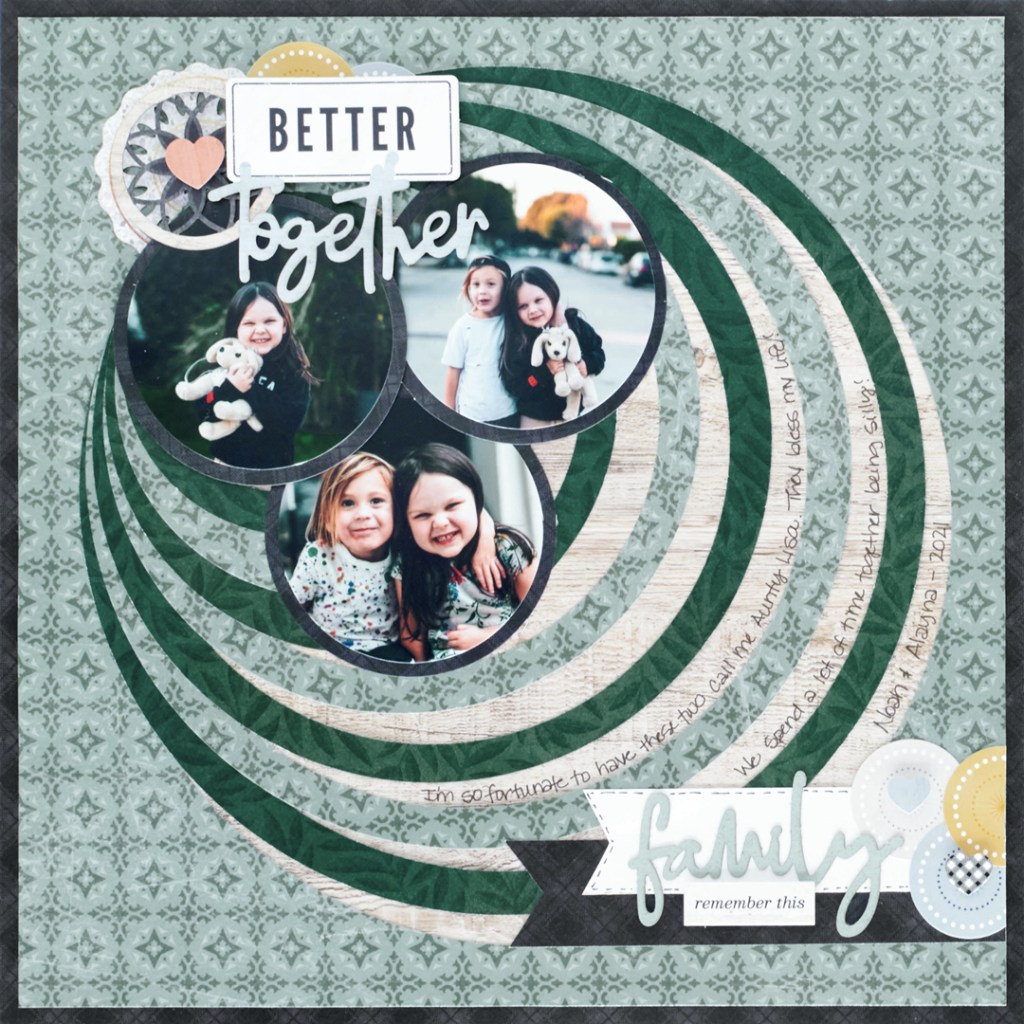
Circles — a rather simple shape, but one the oldest geometric symbols that commonly represents unity, infinity and timelessness, among others. And guess what? You can recreate those sentiments of wholeness over and over again with the new Circle Cutter! Plus, when you add the Homestead collection into the mix, like this family scrapbook layout idea, you can see how circles can really unify and pull together a layout! Circles = unity. Family = unity. (It totally makes sense!) Round up your supplies and creativity and let’s get started!
To create this layout you will need:
- Homestead Paper Pack or (Shop Canada | Shop Australia)
- Homestead Laser Cut Embellishments or (Shop Canada | Shop Australia)
- Homestead Stickers or (Shop Canada | Shop Australia)
- Circle Cutter or (Shop Canada | Shop Australia)
- 13×13 Custom Cutting System Mat or (Shop Canada | Shop Australia)
- 12-inch Trimmer or (Shop Canada | Shop Australia)
- All-Purpose Scissors or (Shop Canada | Shop Australia)
- Tape Runner or (Shop Canada | Shop Australia)
- Repositionable Tape Runner or (Shop Canada | Shop Australia)
- Foam Squares or (Shop Canada | Shop Australia)
- Black Dual-Tip Pen or (Shop Canada | Shop Australia)
Check out instructions on how to use the Circle Cutter in the video below!

Step 1: Use the black plaid paper as the base for the layout. Using the 12-inch Trimmer, cut out the middle from this piece of paper, leaving a 1-1/4″ frame. Set the middle aside to cut the photo mats from.

Step 2: Using the Circle Cutter and the teal tile paper, cut circles from the middle, using 3″, 4″, 5″, 6″, 7″, 8″ and 9″ on the dial. Set all the rings aside.
Step 3: Adhere the outside piece of the circle (teal tile paper) to a 12″ x 12″ piece of reclaimed wood paper. Cut this layered piece to measure 11-1/2″ x 11-1/2″. Adhere to the black plaid frame.
Step 4: Adhere rings to the layout, offsetting to the upper-left corner.
Step 5: Cut three photos using the Circle Cutter to measure 3”.

Step 6: From the middle black plaid piece of paper that you set aside previously, cut three photo mats using the Circle Cutter at 3.2.” Adhere photos to the mats, then adhere to the layout.
Step 7: Adhere stickers and embellishments, using Foam Squares on some for added dimension.
Step 8: Cut two pieces of paper to measure 5″ x 1-1/2″ and 6″ x 1-1/2″. Gently fold the ends, and cut at an angle to create a “V”. Adhere to the layout.
Step 9: Use a Black Dual-Tip Pen to journal as desired between the rings.
Do you enjoy the spherical stylings created by using the Circle Cutter? What do you like most about this family scrapbook layout idea? Give a holler in the comments!

The quote is a perfect tittle. T
he layout is lovely tilted!
And the journaling is circles is fun.
I couldn’t find the V.in this layout.
the v is the end to the little ribbons at the bottom right side