June 30, 2021
Say Yay to the USA With These Independence Day Scrapbook Projects

Freedom and fireworks — now that’s how you celebrate a birthday… America’s birthday, as a matter of fact! We’re a few days away from the Fourth of July, a celebration established all the way back to 1776. But after the hotdogs are grilled and consumed (150 million to be exact!), patriotic parades have been enjoyed, red-white-and-blue garb has been donned and fireworks have been oohed and aahed at, it’s time to get to work on those Independence Day scrapbook projects to remember them for years to come. Ready to give a “yay” to the USA? Then check out these Independence Day scrapbook borders and a DIY Independence Day card so you’re prepped for the festive activities!

To create these borders and card, you will need:
- United We Stand Paper Pack or (Shop Canada | Shop Australia)
- United We Stand Stickers or (Shop Canada | Shop Australia)
- Firecracker Shimmer Solid Cardstock or (Shop Canada | Shop Australia)
- Blank Card Kit or (Shop Canada | Shop Australia)
- 12-inch Trimmer with Straight & Scallop Blades or (Shop Canada | Shop Australia)
- Custom Cutting System with Circle Patterns or (Shop Canada | Shop Australia)
- Flag Banner Border Punch or (Shop Canada | Shop Australia)
- Micro-Tip Scissors or (Shop Canada | Shop Australia)
- Tape Runner or (Shop Canada | Shop Australia)
- Repositionable Tape Runner or (Shop Canada | Shop Australia)
- Foam Squares or (Shop Canada | Shop Australia)
Happy 4th of July with Eagle Border
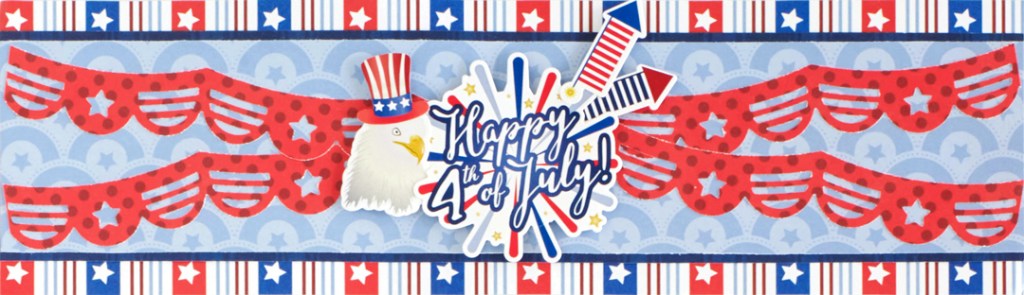
Step 1: Cut the stars and stripes paper to measure 12″ x 3-1/2″.
Step 2: Cut the navy plaid paper to measure 12″ x 2-3/4″.
Step 3: Cut the light blue buntings paper to measure 12″ x 2-1/2″.
Step 4: With the Flag Banner Border Punch, punch two borders from red dots paper.
Step 5: Assemble pieces as shown adding stickers with Foam Squares to the middle of the border.
Home of the Brave Border

Step 1: Cut the Firecracker Shimmer Solid Cardstock to measure 3-1/4″ x 12″.
Step 2: Cut the blue stars paper to measure 2-7/8″ x 12″.
Step 3: From the Firecracker Shimmer Solid Cardstock, cut four pieces that measure 2-5/8″ x 2-1/2″.
Step 4: From the light blue buntings and white star grid paper, cut two pieces from each that measure 2-1/8″ x 2″. Adhere pieces onto the red shimmer rectangles.
Step 5: From the Firecracker Shimmer Solid Cardstock, cut a piece that measures 2-1/2″ x 2-3/4″.
Step 6: Cut a 2-3/8″ x 2-5/8″ piece from white star grid paper, and adhere to the previous red shimmer piece.
Step 7: From the Firecracker Shimmer Solid Cardstock, punch a border with the Flag Banner Border Punch. Cut into four segments of three, and adhere to the light blue buntings and white star grid pieces.
Step 8: Add stickers with Foam Squares to the middle rectangle.
What a Blast Border

Step 1: From the navy plaid paper, cut a 12″ x 2-1/2″ strip.
Step 2: From three patterned papers, cut one strip that measures 12″ x 1/2″ and two strips that measure 12″ x 3/4″. Adhere to the navy plaid strip.
Step 3: From the blue stars paper, punch a border with the Flag Banner Border Punch and adhere to the bottom of the border as shown.
Step 4: With the largest Custom Cutting System Circle Pattern and Green Blade, cut the inside edge of the pattern from the red dots paper.
Step 5: With the medium Custom Cutting System Circle Pattern and Red Blade, cut inside edge of the pattern from blue stars paper. Adhere to the red dots circle. Add a sticker with Foam Squares.
Happy 4th of July Border
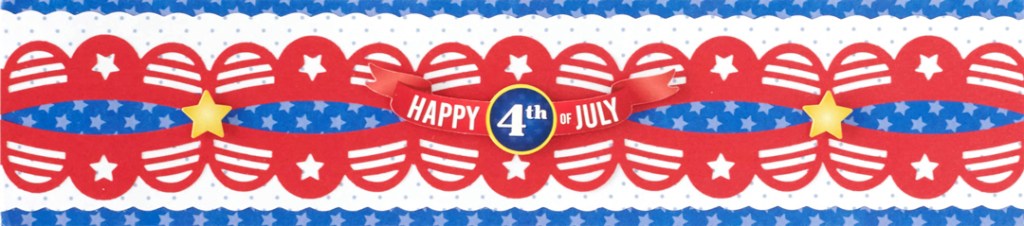
Step 1: From the blue stars paper, cut a 12″ x 2-3/4″ strip.
Step 2: From the white dots paper, cut two 12″ x 3/4″ strips using the 12-inch Trimmer with the Scallop Blade.
Step 3: From the Firecracker Shimmer Solid Cardstock, punch two borders with the Flag Banner Border Punch. Adhere the border pieces onto the two white dots strips.
Step 4: Adhere two banner/border pieces to the blue stars border, leaving a space in-between the pieces.
Step 5: Add stickers with Foam Squares.
Stars & Stripes Forever Card

Step 1: Cut a 5-1/2″ x 4-1/4″ piece of Firecracker Shimmer Solid Cardstock. Adhere to the front of a blank card.
Step 2: From the white dots paper, cut a 5-1/4″ x 4″ piece, and adhere to the front of the card.
Step 3: From the blue stars paper, punch a border with the Flag Banner Border Punch. Cut the border apart into segments of three.

Step 4: With the Micro-Tip Scissors, cut apart the ribbon sticker and place around the eagle’s neck from the “Stars & stripes forever” sticker.
Step 5: Adhere banner pieces as shown. Adhere the sticker piece to the middle of the card with Foam Squares.
What are your plans for the Fourth of July? And which of these Independence Day scrapbook projects bring on the best red-white-and-blue cheer? Give a festive shout-out in the comments below!

These are absolutely Wonderful! Can’t wait to show my Pride in America! Thank you
[…] Say Yay to the USA With These Independence Day Scrapbook Projects — Creative Memories Blog […]
What great borders. Thank you for the inspiration