March 22, 2022
Explore And Adore These Travel Scrapbook Ideas Featuring Hexagon Scrapbook Designs
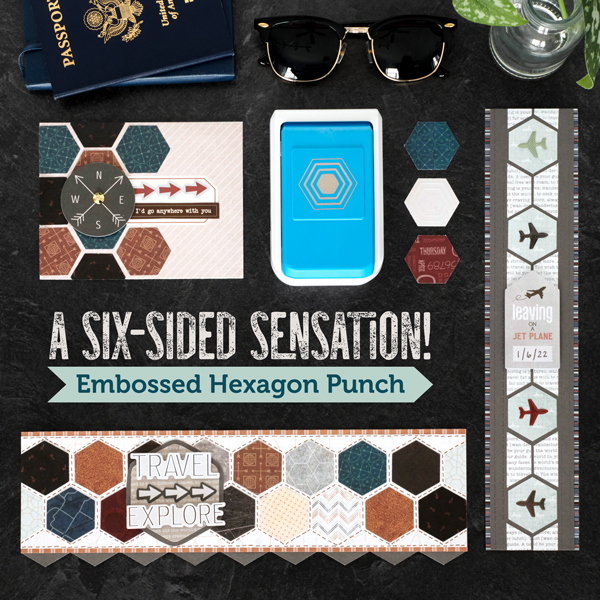
Hexagons are simple six-sided figures, but when you pair it with scrapbooking, you get endless punching opportunities and project perfections! From every day moments to travel adventures (and anything you can dream of!) this punch can add just the right amount of geometric greatness. Check it our with these travel scrapbook projects featuring hexagon scrapbook designs!

To create these borders and card, you will need:
- Wanderlust Paper Pack or (Shop Canada | Shop Australia)
- Wanderlust Tone-on-Tone Paper Pack or (Shop Canada | Shop Australia)
- Wanderlust Stickers or (Shop Canada | Shop Australia)
- Wanderlust Embellishments or (Shop Canada | Shop Australia)
- Wanderlust Variety Mat Pack or (Shop Canada | Shop Australia)
- Charcoal Solid Cardstock or (Shop Canada | Shop Australia)
- Blank Card Kit or (Shop Canada | Shop Australia)
- 12-inch Trimmer with Straight & Perforating Blades or (Shop Canada | Shop Australia)
- Embossed Hexagon Punch or (Shop Canada | Shop Australia)
- Custom Cutting System with Gemstone Patterns or (Shop Canada | Shop Australia)
- Tape Runner or (Shop Canada | Shop Australia)
- Repositionable Tape Runner Refill or (Shop Canada | Shop Australia)
- Foam Squares or (Shop Canada | Shop Australia)
- Brown Dual-Tip Pen or (Shop Canada | Shop Australia)
Take a closer look at the Embossed Hexagon Punch the video below!

Travel Explore Border
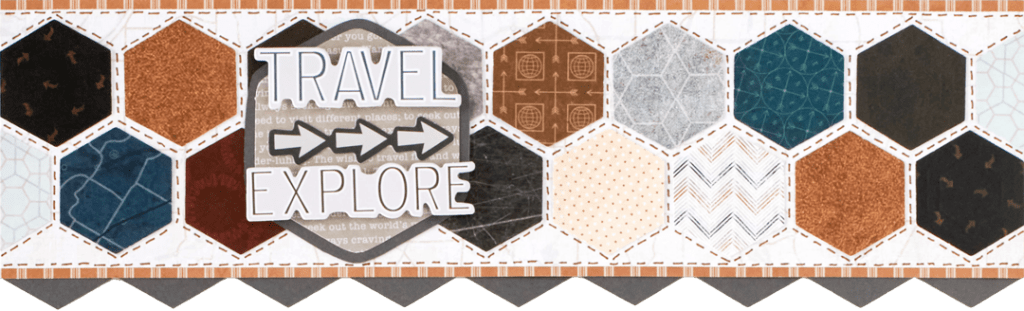
Step 1: Cut stripes tonal paper to 3-1/4″ x 12″.
Step 2: Cut the road map designer paper to 3″ x 12″ and adhere the previous strip.
Step 3: Use the Embossed Hexagon Punch to punch 17 hexagons from various papers. Cut one hexagon in half.
Step 4: Arrange and adhere the hexagons to the border as shown, leaving a small space in-between each. Use a Brown Dual-Tip Pen to add faux stitch lines around the hexagons and the edges of the road map paper strip.
Step 5: Use the inside edge of the hexagon Custom Cutting System Gemstone Cutting Patterns and the Red Blade from Charcoal Solid Cardstock. Use the Green Blade on the inside edge to cut a hexagon from “Wanderlust” definition tonal paper. Layer and adhere the pieces to the border as shown.
Step 6: Use the Embossed Hexagon Punch to punch nine hexagons from Charcoal Solid Cardstock. Adhere behind the border so that pointed edges show.
Step 7: Add embellishments adhering some with Foam Squares.
Jet Plane Border
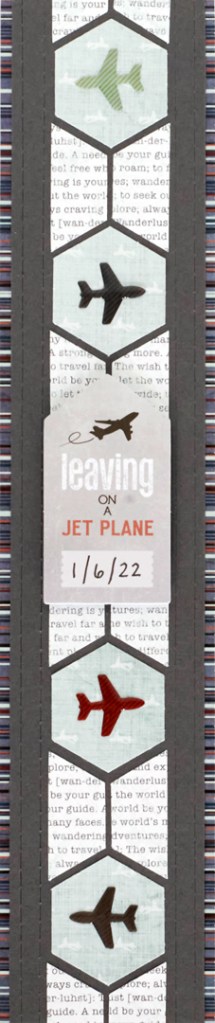
Step 1: Cut the stripe designer paper to measure 2-1/2″ x 12″ for the base of the border
Step 2: Cut Charcoal Solid Cardstock to measure 2-1/4″ x 12″.
Step 3: Use the 12-inch Trimmer with the Perforating Blade to add perforating lines at 1/8″ and 3/8″ from each the left and right edges of the strip. Adhere the strip to the lined strip.
Step 4: Use the Embossed Hexagon Punch to punch five hexagons from designer paper of choice. Cut four hexagons in half from a pointed edge to a pointed edge, and cut one hexagon into quarters.
Step 5: Use the Embossed Hexagon Punch to punch five hexagons from light planes tonal paper.
Step 6: Arrange and adhere the hexagons and hexagon pieces to the border as shown leaving a small space in between each.
Step 7: Add the “leaving on a jet plane” embellishment with Foam Squares to the middle of the border.
Step 8: Add the airplane enamel stickers to each hexagon as shown.
Anywhere With You Card
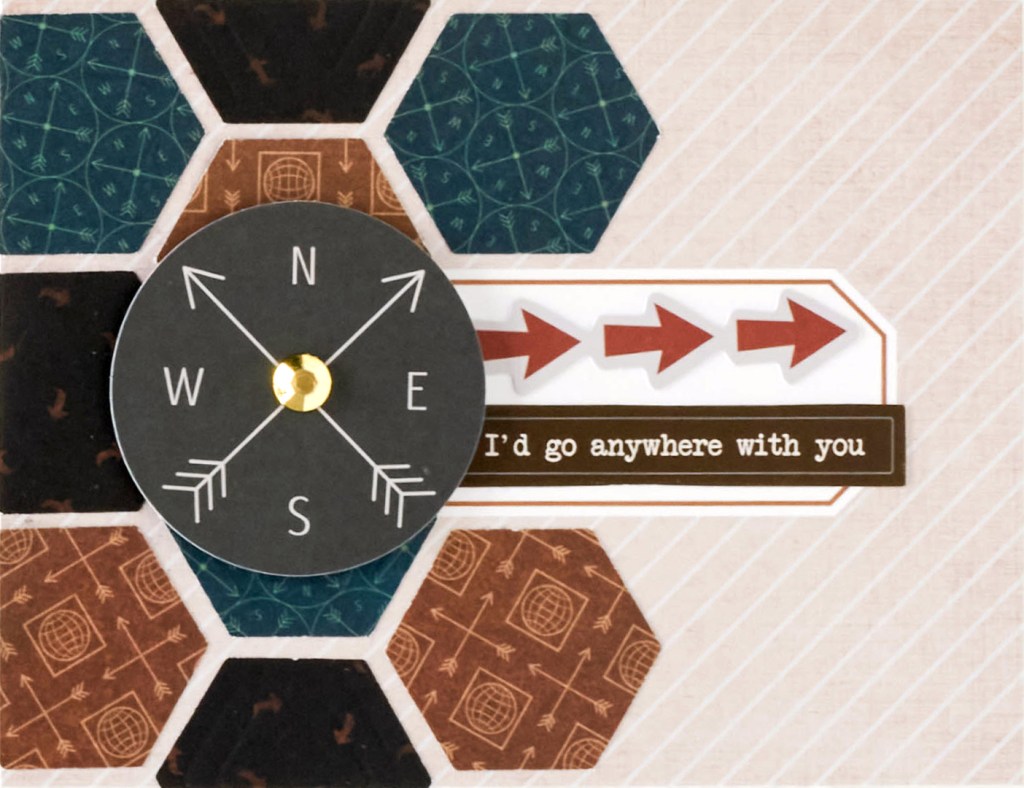
Step 1: Cut a variety mat to 5-1/2″ x 4-1/4″ and adhere to a blank card.
Step 2: Use the Embossed Hexagon Punch to punch nine hexagons from three different papers.
Step 3: Arrange, trim and adhere the hexagons to the card as shown.
Step 4: Add embellishments, a gemstone and a sticker as shown.
What are your thoughts on these travel scrapbook ideas? Are you loving the hexagon scrapbook look of the Embossed Hexagon Punch? Share everything with us!

This is inspiring me … there are lots of layouts this could work with. I have to admit I don’t use the hexagon shape hardly at all. Will try it now – Thank you!
The clock card is amazing! I can’t wait to try it. Thank you ? for the inspiration.