October 7, 2022
Plant Festive Florals With These Christmas Scrapbook Borders and DIY Card
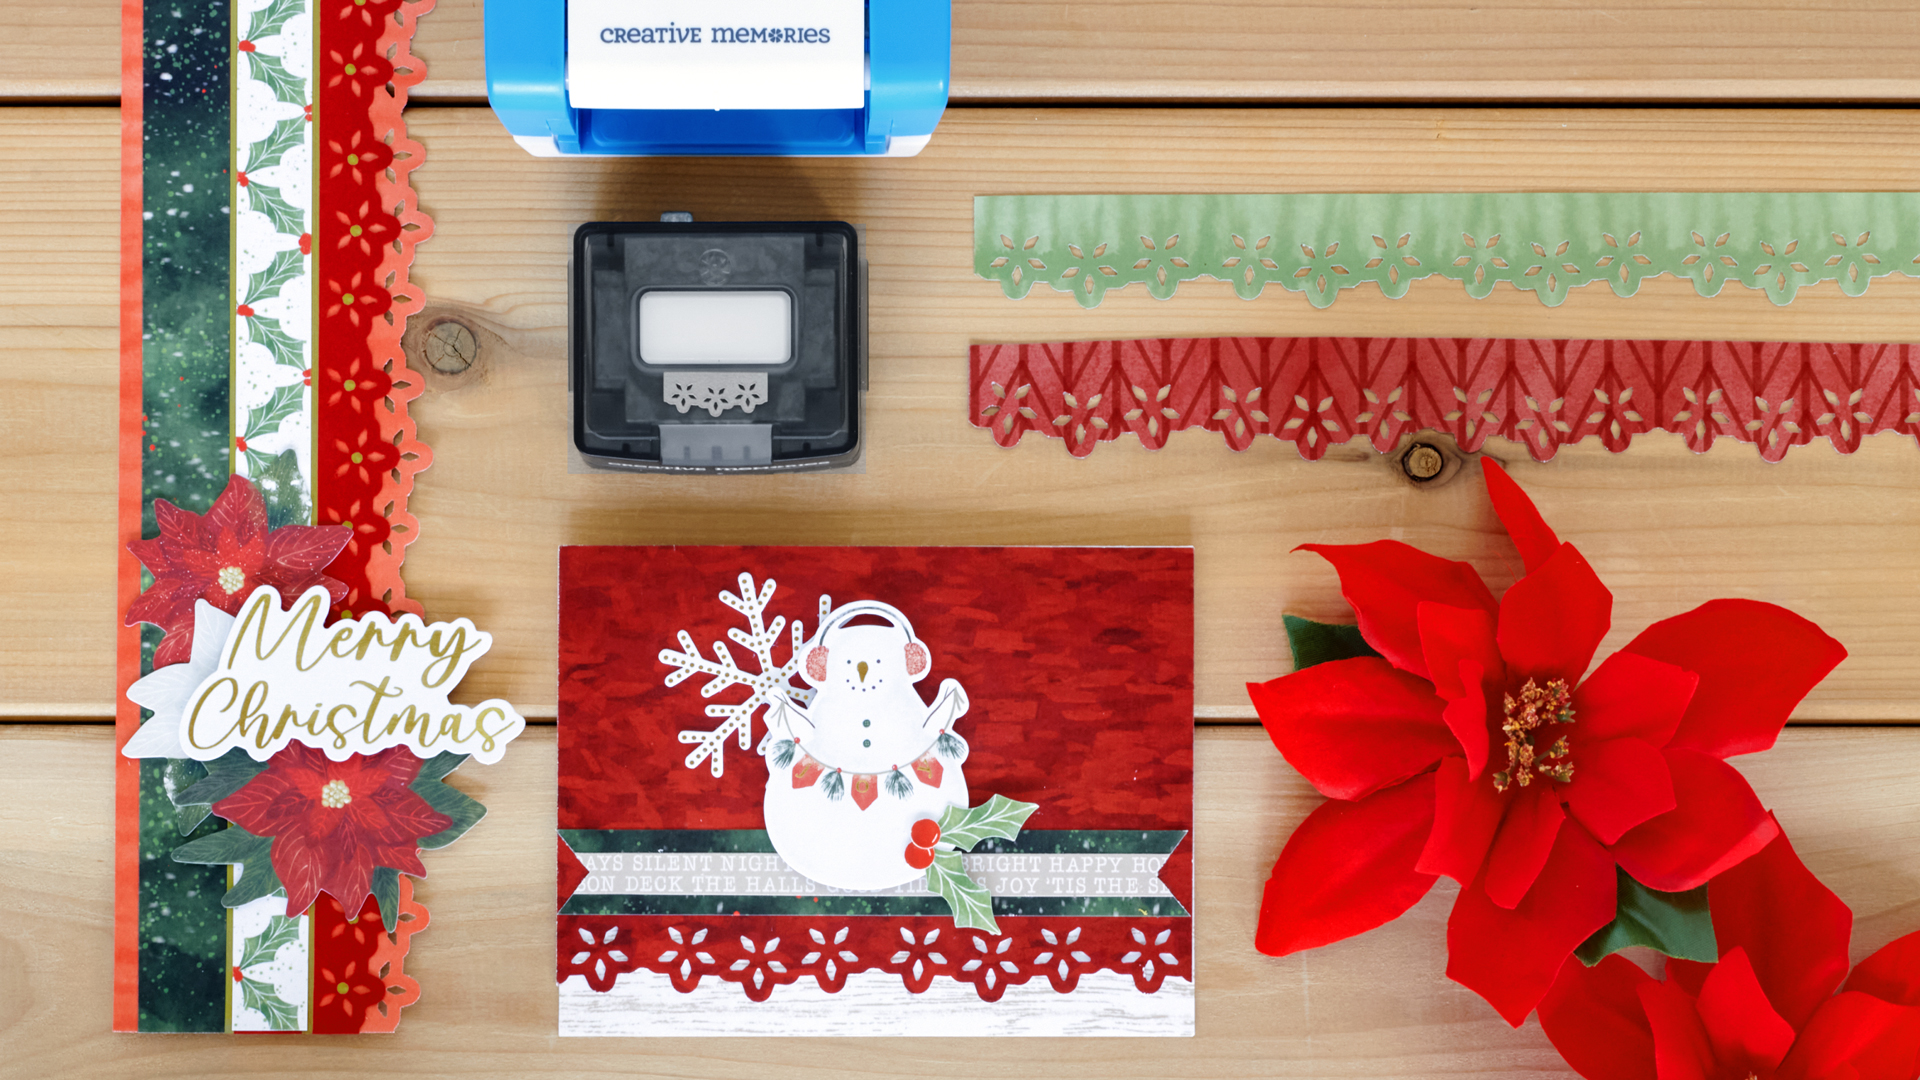
Many homes are decorated during Christmastime — glinting lights, tall pine trees accented with tinsel and ornaments, full wreaths adorning front doors, garlands on stairwells and the “Flower of the Holy Night,” poinsettias! Poinsettias (which are actually indigenous to Mexico!) manage to bring warmth and yuletide spirit in every space it festively flourishes within thanks to its eye-catching hues, from pure white to creamy yellow, pink and marbled shades, and of course, the iconic and traditional bright red. If you’re ready to plant some Christmas cheer this year, then take a look at these Christmas scrapbook borders and DIY card featuring the Poinsettia Edge Border Maker Cartridge.

To create these borders and card, you will need:
- Seasonal Sightings Paper Pack or (Shop Canada | Shop Australia)
- Seasonal Sightings Tone-on-Tone Paper Pack or (Shop Canada | Shop Australia)
- Seasonal Sightings Laser Cut Borders or (Shop Canada | Shop Australia)
- Seasonal Sightings Foiled Embellishments or (Shop Canada | Shop Australia)
- Seasonal Sightings Stickers or (Shop Canada | Shop Australia)
- White, Cranberry & Canary Solid Cardstocks or (Shop Canada | Shop Australia)
- Original Border Maker System with Poinsettia Edge Border Maker Cartridge or (Shop Canada | Shop Australia)
- 12-inch Trimmer with Straight, Wave & Scoring Blades or (Shop Canada | Shop Australia)
- Micro-Tip Scissors or (Shop Canada | Shop Australia)
- Tape Runner or (Shop Canada | Shop Australia)
- Repositionable Tape Runner or (Shop Canada | Shop Australia)
- Foam Squares or (Shop Canada | Shop Australia)
- Gold Metallic Dual-Tip Pen or (Shop Canada | Shop Australia)
- CM Zero-Centering Ruler or (Shop Canada | Shop Australia)

Wonderful Time Border

Step 1: Cut a 12″ x 3-1/4″ strip of holly green dotted lines designer paper for the base. Using the 12-inch Trimmer and the Wave Blade, cut a 12″ x 2-3/4″ strip of Canary Solid Cardstock and adhere on the base.
Step 2: Cut a 12″ x 2-1/2″ strip of cardinal red wash tonal paper and adhere on the border. Cut two 2″ x 2-1/2″ pieces of light green wash tonal paper and one 2″ x 2-1/2″ piece of darker green wash tonal paper. Adhere on the border as shown.
Step 3: Cut a 12″ x 2-3/8″ strip of White Solid Cardstock. Using the Poinsettia Edge Border Maker Cartridge, punch both long sides of the strip. (Tip: Adhere sticky notes along the opposite edge from the one you’re punching to widen the strip so it holds beneath the magnetic arm of the Border Maker holder.) Mount on the border.
Step 4: Adhere the red poinsettias laser-cut border on top. Add stickers.
Merry Christmas Border

Step 1: Using the Poinsettia Edge Border Maker Cartridge, punch a border with cardinal red wash tonal paper. Trim to 2-3/4″ x 12″ for the base. Cut a 3/4″ x 12″ strip of speckled dark green wash designer paper and adhere near the left edge of the border as shown.
Step 2: Using the Poinsettia Edge Border Maker Cartridge, punch another border with Cranberry Solid Cardstock. Trim to 1-1/2″ x 12″ and adhere on the base as shown. Using a ruler and the bold tip of the Gold Metallic Dual-Tip Pen, draw a line down the straight edge of the cranberry piece. Adhere on the border next to the green strip.
Step 3: Cut a 5/8″ x 12″ strip of holly tiles designer paper. Adhere next to the gold line. Using a ruler, draw another gold line on the other side of the holly strip with the Metallic Gold Dual-Tip Pen. Still using the bold tip, dot the middles of the cranberry poinsettias.
Step 4: Adhere red poinsettia embellishments. Top with a “Merry Christmas” embellishment using Foam Squares for added dimension.
Snowman Card

Step 1: Create the card base. Cut an 8-1/2″ x 5-1/2″ piece of White Solid Cardstock. Using the 12-inch Trimmer and the Scoring Blade, score along the long edge at 4-1/4″ and fold in half. Cut a 5-1/2″ x 4-1/4″ piece of festive dark red tonal paper and adhere on the front of the card.
Step 2: Using the Poinsettia Edge Border Maker Cartridge, punch the bottom front of the card, making sure to align the card in the Border Maker holder.
Step 3: Cut a 5-1/2″ x 3/4″ strip of speckled dark green wash designer paper. Cut a 5-1/2″ x 3/8″ strip of tan seasonal sayings designer paper and mount on top. Using scissors, cut a V-shape notch from both ends. Adhere on the border as shown.
Step 4: Add embellishments and stickers, popping some up with Foam Squares for added dimension.
Step 5: Cut a 5-1/2″ x 4-1/4″ piece of light woodgrain designer paper and adhere on the inside of the card.
What do you think of these Christmas scrapbook borders and DIY card? Do you decorate your home with freshly festive poinsettias?

Very cute, love the green and red squares under the first border elements.
Hi Krislyn Mattei,
What a fantastic post. This post is full of information. Can’t wait to start utilisation of this resource you share over here. Amazing post…thanks for sharing..