October 19, 2022
Ornament Your Memories With This Christmas Scrapbook Layout

The Christmas tree — a staple in many homes for families to hang ornaments, tinsel and lights from the festive firs, but did you know…
- The first decorated Christmas was in Riga, Latvia, in 1510.
- The first printed reference to Christmas trees appeared in Germany in 1531.
- Using small candles to light a Christmas tree dates back to mid-17th century.
- Every year since 1947, a tree has been given from Nordmarka, outside of Oslo, to Trafalgar Square in England. The gift is an expression of good will and gratitude for Great Britain’s help to Norway during World War II.
No matter the symbolism, a Christmas tree is a big part in many homes! And it can be part of your home (or album!) with this Christmas scrapbook layout!

To create this layout you will need:
- Seasonal Sightings Paper Pack or (Shop Canada | Shop Australia)
- Seasonal Sightings Tone-on-Tone Paper Pack or (Shop Canada | Shop Australia)
- Seasonal Sightings Stickers or (Shop Canada | Shop Australia)
- Spargo Lined Designer Paper Pack or (Shop Canada | Shop Australia)
- Dark Green Solid Cardstock or (Shop Canada | Shop Australia)
- 12-inch Trimmer or (Shop Canada | Shop Australia)
- Tape Runner or (Shop Canada | Shop Australia)
- Repositionable Tape Runner or (Shop Canada | Shop Australia)
- Foam Squares or (Shop Canada | Shop Australia)
- Brown Dual-Tip Pen or (Shop Canada | Shop Australia)
- Pencil and eraser

Step 1: Use a piece of Dark Green Solid Cardstock as the base of the layout.
Step 2: Cut a piece of the tan chevron tonal paper to measure 11-1/2″ x 11-1/2″. Adhere to the layout.
Step 3: Cut two pieces of dark red tonal paper to measure 3-3/4″ x 3-3/4″. Adhere to opposite corners of the tan paper, leaving 1/8″ around the edges. Photo sizes will be (2) 3-1/2″ x 3-1/2″.
Step 4: Cut two pieces of light green tonal paper to measure 2-1/2″ x 3-3/4″. Adhere to the opposite corners of the tan paper, leaving 1/8″ around the edges. Photo sizes will be (2) 2-1/4″ x 3-1/2″.
Step 5: Cut two pieces of dark green tonal paper to measure 4-3/4″ x 3-3/4″. Adhere between the previous two pieces on the top and bottom. Photo sizes will be (2) 4-1/2″ x 3-1/2″.
Step 6: Cut a piece of cardinal red wash paper to measure 11-1/2″ x 3-1/2″.
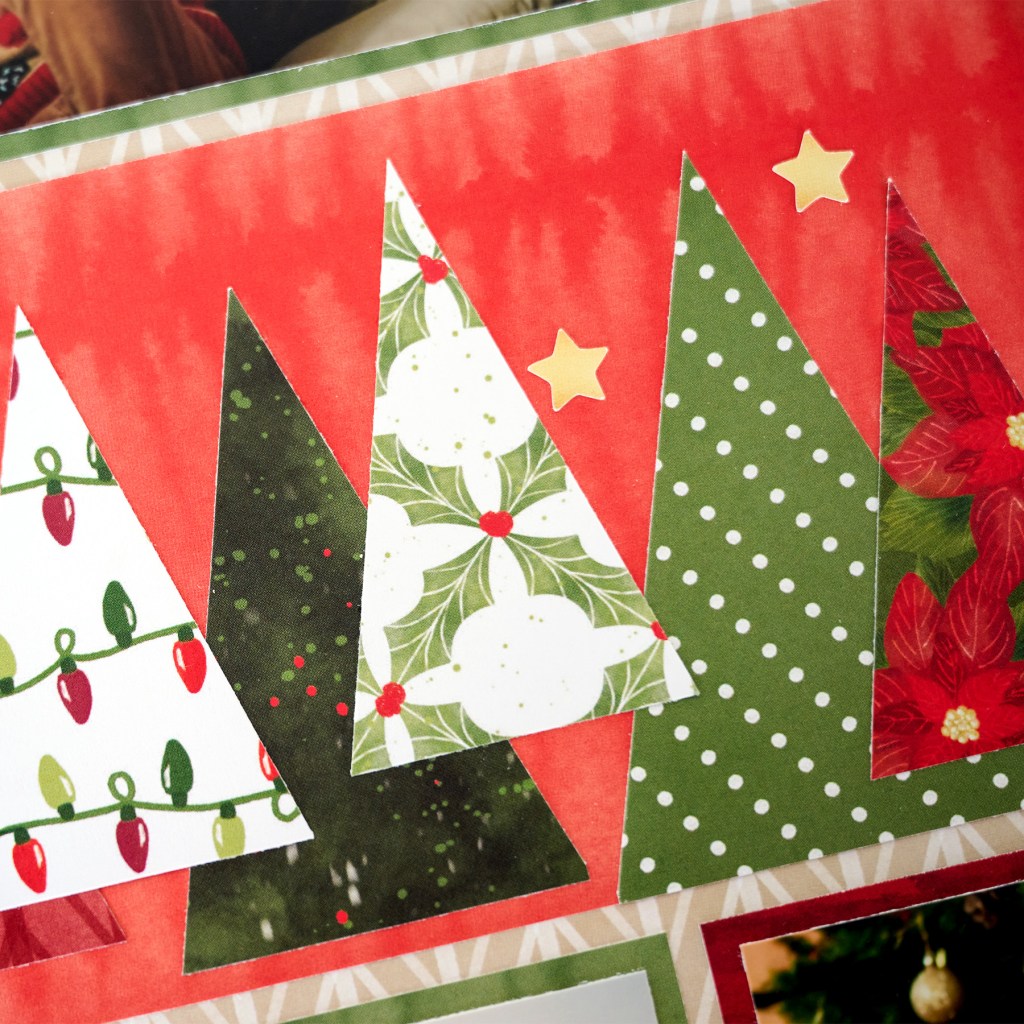
Step 7: Cut a variety of papers into rectangles (2″ x 3″, 1-1/2″ x 2-1/2″ and 1-3/4″ x 2-3/4″). Mark with a pencil at one end in the rectangle in the middle (1″, 3/4″ and 7/8″). Cut from the pencil marking to the outer corners to create the triangles. Adhere to the cardinal red paper at varying heights and overlapping. Cut excess from the sides with a scissors. Adhere the whole cardinal red piece with the trees to the layout.
Step 8: Adhere stickers to the layout, using Foam Squares on some for added dimension.
Step 9: Journal as desired.
What memories would you mat on this Christmas scrapbook layout? Do you have traditions you do every year with your family?

It would be nice to include a project template with this.
What a great way to use busier printed paper. I also like how you can fit several photos on the page because I tend to take a lot of pictures at Christmas time.
Agree with all above – love the busy paper trees, the idea of a template (even though it’s fairly easy to see in your photos) and the story about Norway ?? – our daughter in law is from Norway! ???
Beautiful layout! Love it!
I don’t have the leaf border punch or the acorn punch so I recreated the card using an individual leaf punch and handmade acorns, same beautiful card. For the page same: I punched trees from different papers, worked great. That’s why I subscribe to the blog, I get great ideas, even if I don’t have the tools. Thanks so much.
these would make a great card especially slimline