December 21, 2022
Easy Piecey: Border Recipe For Tonal Scrapbook Borders
Whether it’s grandma’s famous lemon meringue pie or an uncle’s award-winning chili, the instructions set in recipes are to help you put forth a divine product (and to feel proud about it after seeing the outcome!). While we may not be making dishes, blog contributor Krislyn Mattei is serving up a border recipe that is oh-so delectable and pleasing… time and time again! A base of creativity, a dash of innovativeness, sprinkles of fun — it’s all here and more with this border recipe for tonal scrapbook borders! Enjoy!
Krislyn’s Inspiration
Sometimes, it’s just too hard to choose which papers to use. I love them all, so I want to use as many as I can! The Totally Tonal Fall, Winter and Christmas Papers are just beautiful! The plaids and textures add so much to the Golden Harvest, Polar Lights and Seasonal Sightings collections.
Here I’ve created a border recipe pairing one of the Totally Tonal paper packs with its coordinating full collection using a familiar paper piecing method… with a twist! I used the Home Sweet Home Border Maker Cartridge on all three variations because it’s such a warm and versatile border shape. Then I employed the 12-inch Decorative Trimmer to add some fun curves to an otherwise linear design. The best part is that this recipe creates two borders, so you’ll be able to place one on each side of a two-page spread.

To create these borders, you’ll need:
- Totally Tonal Fall, Winter & Christmas Paper Packs or (Shop Canada | Shop Australia)
- Golden Harvest Paper, Tone-on-Tone Paper & Laser Cut Foiled Embellishments or (Shop Canada | Shop Australia)
- Polar Lights Paper, Embellishments & Stickers or (Shop Canada | Shop Australia)
- Seasonal Sightings Tone-on-Tone Paper & Foiled Embellishments or (Shop Canada | Shop Australia)
- White Solid Cardstock or (Shop Canada | Shop Australia)
- Original Border Maker System with Home Sweet Home Border Maker Cartridge or (Shop Canada | Shop Australia)
- 12-inch Decorative Trimmer or (Shop Canada | Shop Australia)
- 12-inch Trimmer or (Shop Canada | Shop Australia)
- Repositionable Tape Runner or (Shop Canada | Shop Australia)
- Foam Squares or (Shop Canada | Shop Australia)
To complete a layout, you’ll need:
- Golden Harvest, Polar Lights or Seasonal Sightings Fast2Fab™ Refill Pages or (Shop Canada | Shop Australia)

Step 1: Cut a 12″ x 3-1/4″ strip of paper for the base. Cut a 12″ x 2-3/4″ strip with White Solid Cardstock and adhere on the base. Cut a 12″ x 2-1/2″ strip with a neutral paper and mount on top. Repeat to create two identical borders.
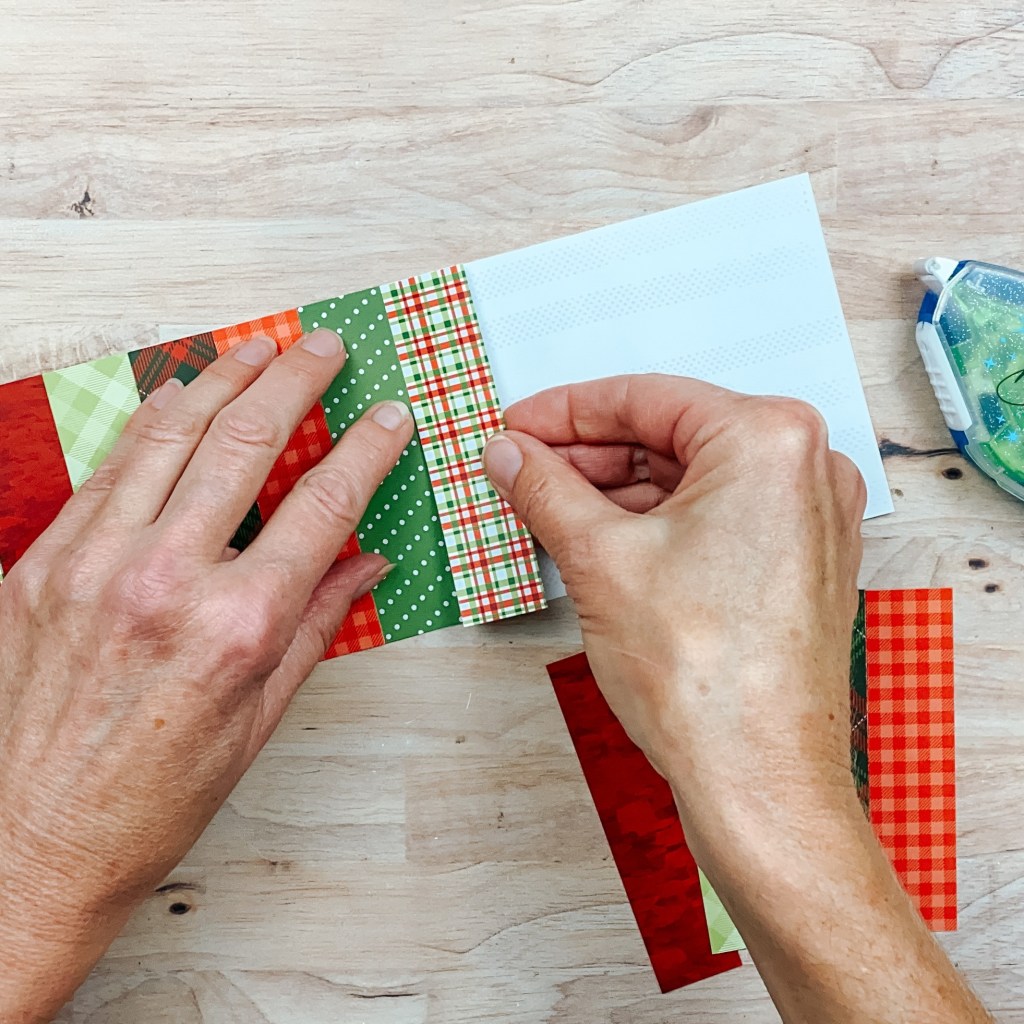
Step 2: Cut a 12″ x 4″ piece with cardstock (any shade… it will be covered up). Apply Repositionable Tape Runner in several long swipes across the whole piece. Cut (12) 1″ x 4″ strips with several different papers. (I used six papers, twice each.) Adhere them side by side on the cardstock, completely covering it.
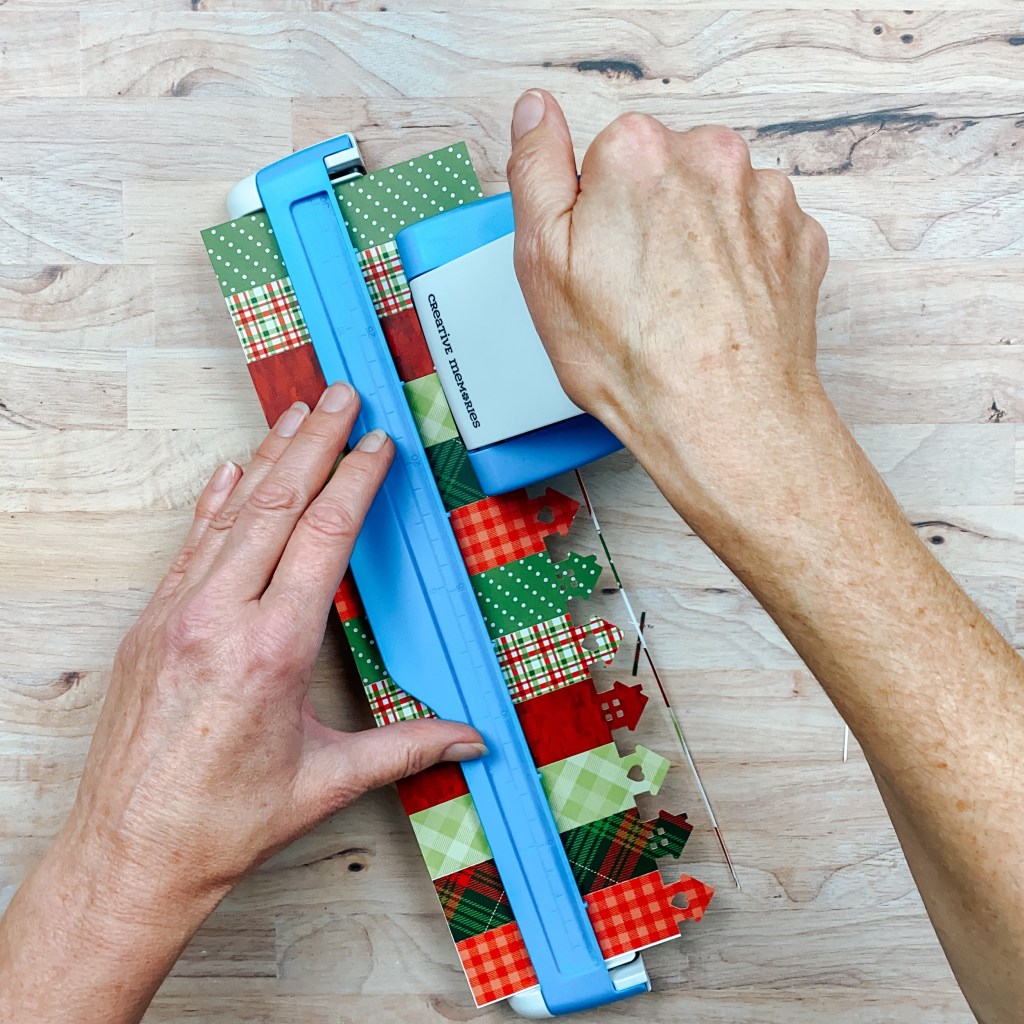

Step 3: Using the Home Sweet Home Border Maker Cartridge, punch both long sides of the border.

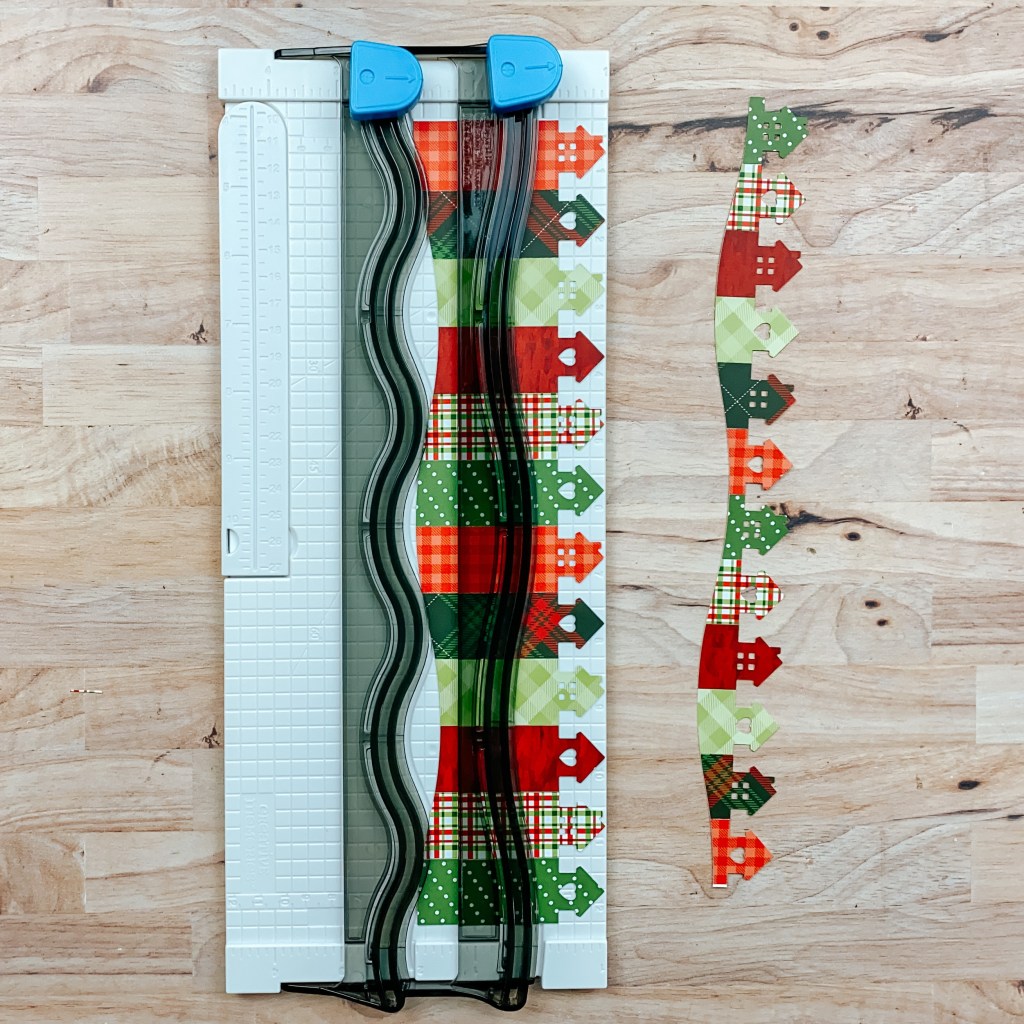

Step 4: Align the border as shown in the 12-inch Decorative Trimmer. Cut both sides with the swell edge. Set aside the two cut pieces. Place the remaining piece in the 12-inch Trimmer and cut in half lengthwise.
Step 5: Adhere the border strips as shown on each of the border bases.
Step 6: Add stickers and embellishments, popping some up with Foam Squares for added dimension.


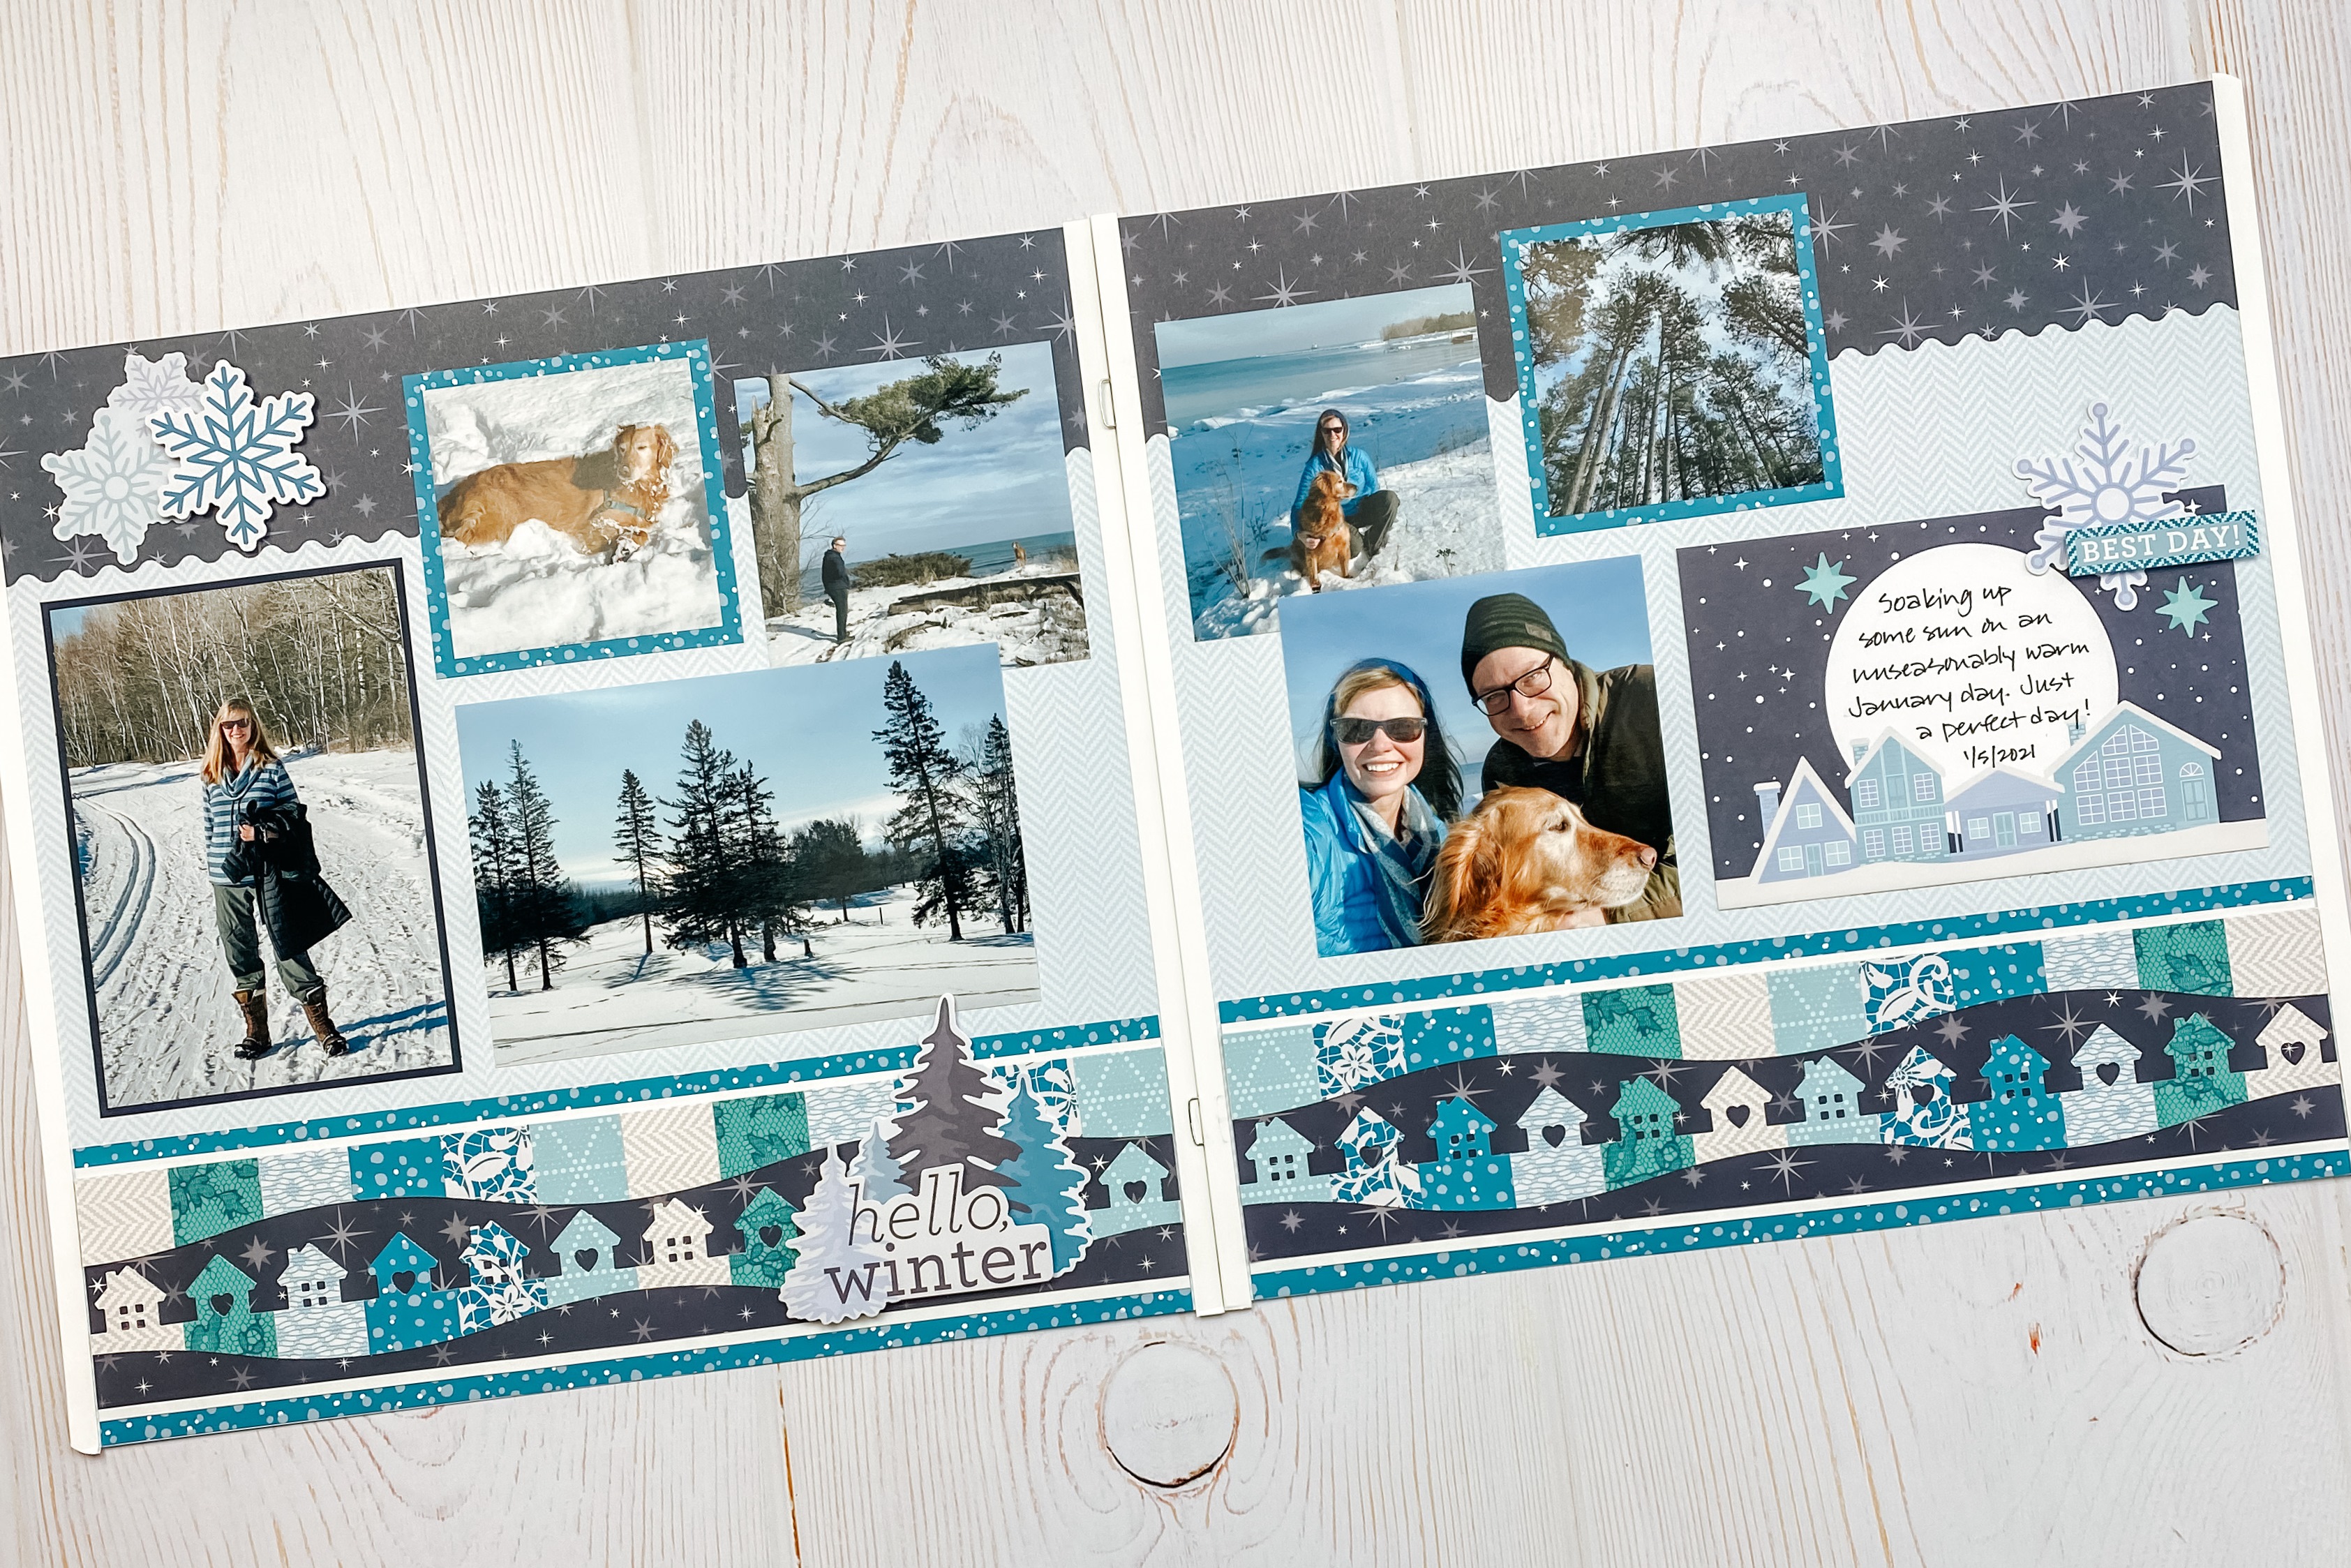
My favorite way to use borders in my scrapbooking is to personalize Fast2Fab™ pages! I love how the winter borders dress up my Polar Lights Fast2Fab™ layout. Because the borders do all the heavy lifting, I’m able to keep the rest of the layout simple and focus on my photos. In fact, I often create several borders in advance. Then when it’s time to create layouts, I simply arrange my photos on the Fast2Fab™ pages, choose from my pre-made borders and quickly complete a clean, eye-catching layout.

Will you be testing out this border recipe? What do you think of the tonal scrapbook borders from Krislyn? Share with us and others below!

I love this technique! I’ll be making these soon.
Great idea!
Love, Love, Love this cute idea!! And to think I thought I didn’t need this Home Sweet Home Border Maker Cartridge!!
Love this. Definitely want to give it a try in the future. Thanks for sharing.
Absolutely love this!
I can’t wait to try it.
So clever!
I am excited to try this. Thank you.
I love this BMC and this will be great for Christmas and winter.
I bet you could try this with some of the other border makers.
Love this idea for a card, too. It could be a “From our house to yours” card!! Or in more neutral tones, it could be used for a “Welcome to your new home” card. Thanks for the great idea!!
Such a great idea!
I love this trimmer! Makes really cute embellishments for scrapbooking and even display boards!
love love love this border idea! I will use 12 inch strips across a card stock to cut several borders!!
Thank you so much for sharing your ideas with us. It is very helpful for me and I think that it would be useful for others also. I got a piece of nice information from VGR Official too, so I thought I should share it with everyone using this product. I was searching for something so I got beautiful ideas from VGR Official too that is also providing beautiful knowledge where a person can increase their knowledge if anyone wants to get more ideas then they can visit there.