February 27, 2023
February Completed Album Challenge PLUS A Spring Scrapbook Layout

Another month is almost gone, which means the Completed Album Challenge must be ON! Yes indeed, the February Completed Album Challenge is going on now in the Virtual Crop Facebook Group! Want a little more spring in your step? Well, you’re in luck — today also marks the launch of the newest Painted Garden collection, filled to the beautiful brim with juicy strawberries and blackberries, hummingbirds, sunshine bursts, fresh florals and horticulture and more.
If you completed an album this month (does not need to be from start to finish in February, just completed in February), make a short video flipping through each of the pages in your newly completed album. Then, post your video in the Virtual Crop Facebook Group with the hashtag #CompletedFeb2023 for the chance to win!
Here’s an example of what your Completed Album Challenge video could look like!
For ALL the details on the Completed Album Challenge, check out this blog post.
To create this layout you will need:
- Painted Garden Paper Pack or (Shop Canada | Shop Australia)
- Painted Garden Tone-on-Tone Paper Pack or (Shop Canada | Shop Australia)
- Painted Garden Variety Mat Pack or (Shop Canada | Shop Australia)
- Painted Garden Embellishments or (Shop Canada | Shop Australia)
- Painted Garden Stickers or (Shop Canada | Shop Australia)
- 12-inch Trimmer or (Shop Canada | Shop Australia)
- Tape Runner or (Shop Canada | Shop Australia)
- Repositionable Tape Runner or (Shop Canada | Shop Australia)
- Foam Squares or (Shop Canada | Shop Australia)
- Black Dual-Tip Pen or (Shop Canada | Shop Australia)

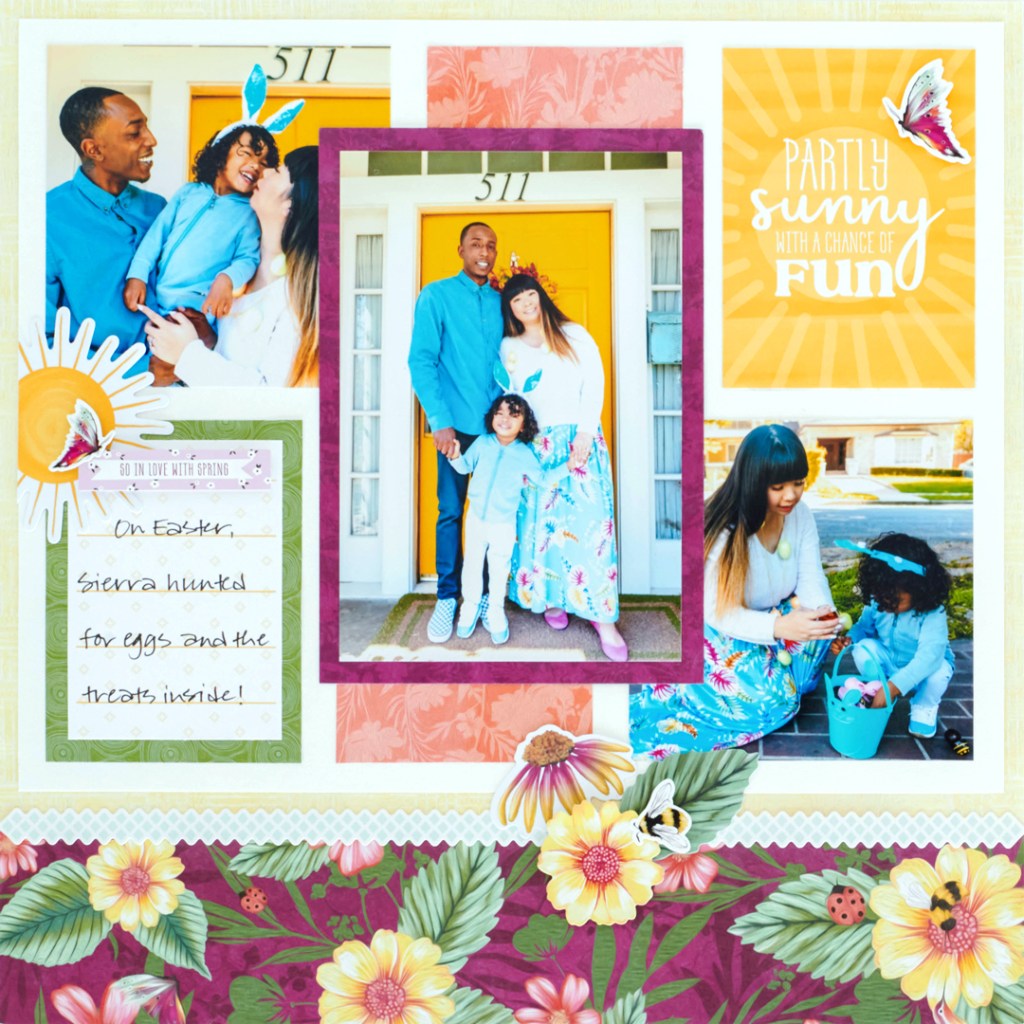
Step 1: Use a piece of golden yellow blanket fabric tonal paper as the base for this layout. Cut a piece of White Solid Cardstock to 11-1/2″ x 9″ and adhere on the layout, about 1/4″ from the top edge.
Step 2: Cut a 12″ x 3″ strip with bold leaves and florals designer paper and adhere on the bottom of the layout. Place a lattice border sticker on the top edge.
Step 3: Cut the “Partly sunny with a chance of fun” variety mat in half and place the title piece on the upper-right side of the layout. Trim the remaining piece to 2-1/2″ x 3-1/2″. Cut a 3″ x 4″ piece with olive circular woodgrain designer paper and adhere the journal box on top. Mount both on the lower-left side of the layout. Cut two 3″ x 1″ strips with coral tonal flowers and leaves designer paper and adhere as shown.
Step 4: Crop two photos to 4″ x 4″ and adhere to the top-left and lower-right sides of the layout. Mount a 4″ x 6″ photo on a 4-1/2″ x 6-1/2″ violet mat and adhere to the middle of the layout.
Step 5: Adhere embellishments and stickers, popping some up with Foam Squares for added dimension.
Step 6: Journal as desired.
Who’s ready to take on the February Completed Album Challenge? Will you be making this fresh-as-a-daisy spring scrapbook layout to finish out your next album? Have fun, post your video and best of luck to all!
P.S. Are YOU a member of the Virtual Crop Facebook Group? It’s your go-to place for MONTHLY Virtual Crops, MONTHLY Completed Album Challenges, WEEKLY LIVE STREAMING of Fast & Fun Projects with Noreen, LIVE QUARTERLY Secret Box Openings with project tutorials and so much more! We hope you’ll join our community of more than 30,000 fellow memory-keeping enthusiasts — you’ll feel right at home!

Whatever the season – winter to spring – what great layouts and photos!! Thanks for sharing the completed Winter album – great tip that can always add journaling/words to the pages after you get them designed, printed, and delivered. That probably was obvious to others but I needed a reminder! This means we can add details that family/friends comment about as they flip thru the album as they look through it. Guess we should always keep a journaling pen handy? Can’t wait for the Painted Garden collection to show up at my home, just in time for the early flowers like forsythia and daffodills that this year will probably bloom early.