May 3, 2024
Create CAP-tivating Mushroom Borders

It’s just about time — National Scrapbook Day is tomorrow, May 4! In celebration and to help you add an extra touch of creativity to your spreads, here are instructions for three borders created by Product Development Creative Manager Noreen Smith! Use them in your NSD layouts, spring-themed spreads or anything that needs a bit more cuteness.
If you would like to attend an Advisor-held event (virtual, in-person or hybrid), you can connect with an Advisor near you using our handy Event search on the website: US | CA | AU
To create these borders you will need:
- NSD 2024 Project Recipe™ Kit or (Shop Canada | Shop Australia)
- Forest Mushrooms Border Punch or (Shop Canada | Shop Australia)
- 12-inch Trimmer with Straight & Scallop Blades or (Shop Canada | Shop Australia)
- Custom Cutting System with Circle Patterns or (Shop Canada | Shop Australia)
- Tape Runner or (Shop Canada | Shop Australia)
- Repositionable Tape Runner or (Shop Canada | Shop Australia)
- Foam Squares Variety Pack or (Shop Canada | Shop Australia)

Having Lots Of Fun Border

Step 1: Use the 12-inch Trimmer and the Straight Blade to cut a 12? x 2-1/2? strip from white ferns paper. Cut two 1-1/2? squares from green woodgrain paper and two 1-1/2? squares from tangerine gingham paper. Adhere the squares to the top edge of the white ferns strip, leaving a 1-1/2? square of white ferns paper showing in between. Using the 12-inch Trimmer and the Scallop Blade, trim the top and bottom edge of the white ferns strip to create a decorative edge.
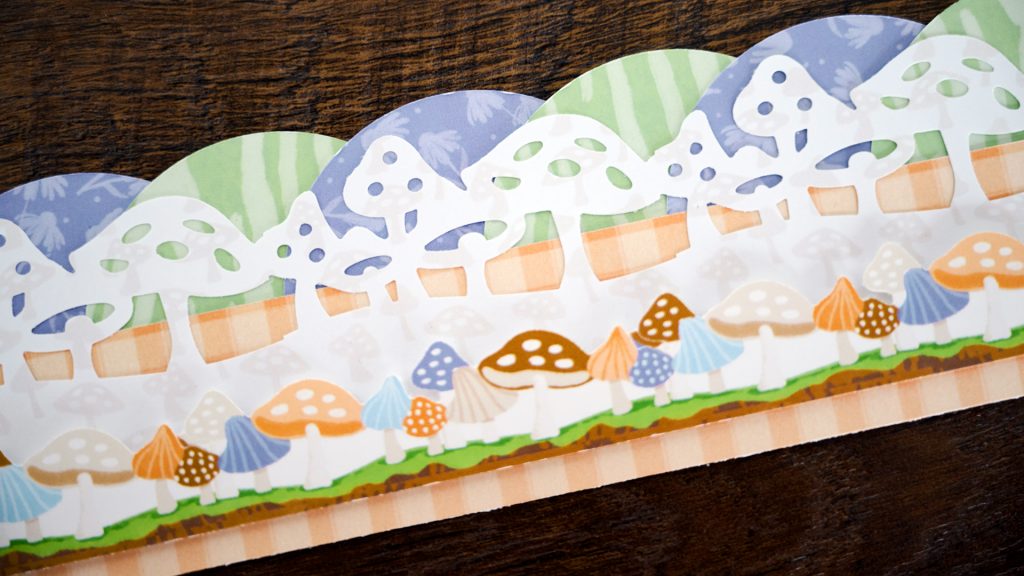
Step 2: Use the Forest Mushrooms Border Punch to punch a border from the blue coneflowers paper. Use the 12-inch Trimmer with the Scallop Blade to trim the border to 2? in height. Adhere punched border on top of white ferns strip using Repositionable Tape Runner on the punched mushroom shapes, and Tape Runner on the solid edge of the border.
Step 3: Use the 12-inch Trimmer with the Scallop Blade to cut a 12? x 3? strip from floral paper. Adhere the white ferns strip on top with the Tape Runner. Embellish as shown or desired.
Off The Beaten Path Border

Step 1: Using the inside edge of the medium Custom Cutting System Circle Pattern and the Red Blade, cut five 2-1/2? from blue coneflower paper and four 2-1/2? circles from the green woodgrain paper. Arrange the circles so they overlap each other evenly, alternating papers. TIP: Use a dab of Repositionable Tape Runner adhesive to keep the circles together.
Step 2: Use the 12-inch Trimmer to cut a 12? x 1-1/2? strip from tangerine gingham paper. Adhere on top of the row of circles with Tape Runner. (Total border height will be approximately 2-1/2?.)
Step 3: Use the Forest Mushrooms Border Punch to punch a border from the beige mushrooms paper. Use the 12-inch Trimmer to trim the border to 2? in height, then adhere on top of the tangerine gingham strip using Repositionable Tape Runner adhesive on the punched mushroom shapes, and Tape Runner on the solid edge of the border.
Step 4: Adhere one of the mushrooms border stickers across the lower edge of the punched mushroom border with Foam Squares to add dimension. Embellish as shown or desired.
Out And About Border
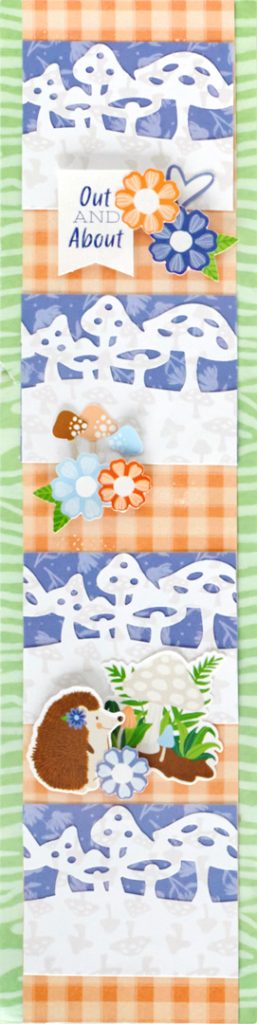
Step 1: Use the Forest Mushrooms Border Punch to punch a border from the beige mushroom paper. Use the 12-inch Trimmer to cut border to 2? in height.
Step 2: Use 12-inch Trimmer to cut a strip of blue coneflower paper to 12? x 2?. Adhere beige mushroom border on top. Trim border into four 2-1/2? x 2? sections. Discard remaining piece.
Step 3: Cut a 2-1/2? x 12? strip of tangerine gingham paper. Mount one mushroom border section 1/2? down from the top edge of the tangerine gingham strip. Leave 1? then adhere the second mushroom border section. Leave 1? then adhere the third mushroom border section. Leave 1? and adhere the fourth and final mushroom border section. There should be 1/2? of the tangerine gingham paper visible at the bottom of the strip.
Step 4: Cut a 3? x 12? strip of the green woodgrain paper. Align in the middle and adhere the tangerine gingham strip on top. Embellish with stickers as shown or desired.
How will you be spending NSD? How many of these mushroom borders did you try making?
P.S. Are YOU a member of the Virtual Crop Facebook Group? It’s your go-to place for MONTHLY Virtual Crops, MONTHLY Completed Album Challenges, WEEKLY LIVE STREAMING of Fast & Fun Projects with Noreen, LIVE QUARTERLY Secret Box Openings with project tutorials and so much more! We hope you’ll join our community of more than 39,000 fellow memory-keeping enthusiasts — you’ll feel right at home!

ISO a comfortable camper border punch. Mine dropped on the floor and the bottom guide flew off and now I’m unable to put it back together. A piece that holds it closed apparently snapped during the fall.
Anyone’s help appreciated I’m desperate.
Christine
Crispydebl1@gmail.com