November 4, 2024
Making This Layout Is Snow Much Fun!

Winter is quickly approaching — and it’s bringing snowfall, sledding and plenty of time for scrapbooking! Record your winter memories easily with this snow-inspired layout created with the Flurry of Fun collection! By using the Custom Cutting System with Circle Patterns, you can make an adorable snow pal, perfect for all cold weather spreads!
To create this layout you will need:
- Flurry of Fun Designer Paper Pack or (Shop Canada | Shop Australia)
- Flurry of Fun Variety Mat Pack or (Shop Canada | Shop Australia)
- Flurry of Fun Sledding Embellishments or (Shop Canada | Shop Australia)
- Flurry of Fun Stickers or (Shop Canada | Shop Australia)
- Bright White, Baby Blue, Cranberry, Black, Pumpkin and Hot Fudge Cardstock Solid Cardstock or (Shop Canada | Shop Australia)
- Original Border Maker System with Mittens & Flurries Cartridge or (Shop Canada | Shop Australia)
- Snow Pals Border Punch or (Shop Canada | Shop Australia)
- Custom Cutting System with Circle Patterns or (Shop Canada | Shop Australia)
- 12-inch Trimmer or (Shop Canada | Shop Australia)
- Photo Trimmer or (Shop Canada | Shop Australia)
- Micro-Tip Scissors or (Shop Canada | Shop Australia)
- Tape Runner or (Shop Canada | Shop Australia)
- Repositionable Tape Runner or (Shop Canada | Shop Australia)
- Precision Point Adhesive Pen or (Shop Canada | Shop Australia)
- Foam Squares Variety Pack or (Shop Canada | Shop Australia)
- Black Dual-Tip Pen or (Shop Canada | Shop Australia)

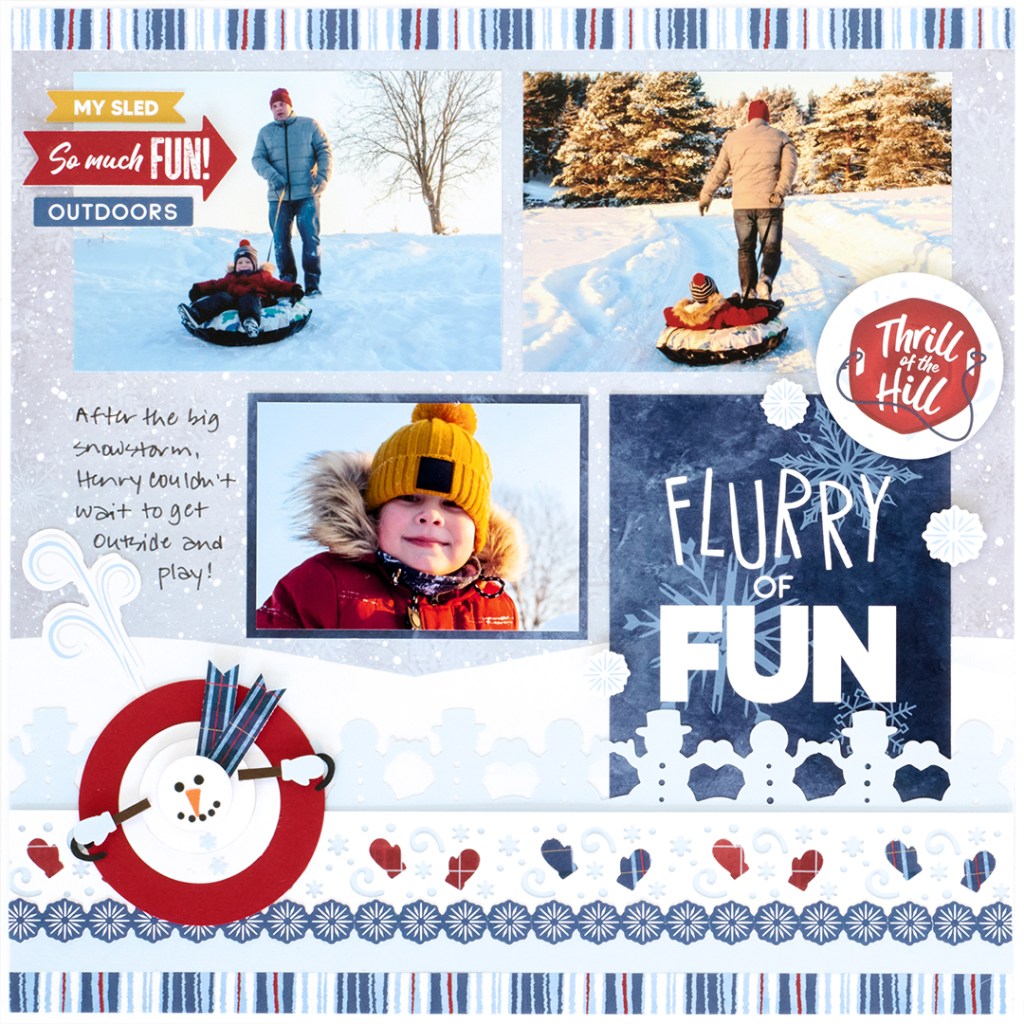
Step 1: Use a sheet of bright white cardstock as the base for this layout. (Tip: You may wish to remove the center square of cardstock to save for another use.) Cut a sheet of snowy scene paper to 11-3/4” x 11-3/4” and adhere on the base. Cut 1-1/4” from the top of a sheet of snowy scene paper and adhere on the base, 1/8” from the top edge.
Step 2: Cut two 12” x 1/2″ strips with stripes paper and adhere 1/8” from the top and bottom edges of the base. Using the Snow Pals Border Punch, punch a border with baby blue cardstock. Trim to 11-3/4” x 3” and adhere just above the stripes strip at the bottom of the layout.
Step 3: Using the Mittens & Flurries Cartridge, punch a border with bright white cardstock. Trim to 11-3/4” x 1-3/8” and adhere on the baby blue piece as shown. Punch borders with red plaid and blue plaid papers and adhere just the mittens on the white border, alternating colors. Place a snowflake border sticker, trimmed to 11-3/4”, along the seam.
Step 4: Make the sledding snowman. Using the inside of the large circle pattern and the blue blade, cut a circle with cranberry cardstock for the sled. Punch “handles” using the Mittens & Flurries Cartridge and black cardstock. Using the inside of the medium circle pattern and the blue blade, cut a circle with bright white cardstock. Cut a second circle using the inside of the small pattern and the red blade. Cut a third circle using the inside of the small pattern and the blue blade. If desired, smudge a bit of black pen around the edges to create a shadow. Adhere on the sled, using foam squares between the “snowballs” to create dimension. Cut “twig arms” with hot fudge cardstock, a “carrot nose” with pumpkin cardstock and “coal eyes and mouth” with leftover black cardstock circles punched with the Mittens & Flurries Cartridge. Punch mittens with baby blue cardstock. Adhere all small pieces using precision point adhesive. Cut two 1-1/4” x 3/8” strips with blue plaid paper. Cut a V in one end of each. Adhere the “scarf” as shown using foam squares.
Step 5: Tuck the “Flurry of Fun” variety mat behind the snowmen, trimming the top as needed. Crop two photos to 5” x 3-1/2” and adhere on the top of the layout. Cut a 4” x 2-7/8” piece with ice blue paper. Crop a photo to 3-3/4” x 2-5/8” and adhere on top. Mount on the layout as shown.
Step 6: Adhere stickers and embellishments, popping some up with foam squares for dimension.
Step 7: Journal as desired.
Did you customize your snow pal?!
P.S. Are YOU a member of the Virtual Crop Facebook Group? It’s your go-to place for MONTHLY Virtual Crops, MONTHLY Completed Album Challenges, QUARTERLY Secret Box Openings with project tutorials and so much more! We hope you’ll join our community of more than 40,000 fellow memory-keeping enthusiasts — you’ll feel right at home!
