November 25, 2024
November Completed Album Challenge PLUS A holiday-inspired Scrapbook Layout

There’s a chill in the air, and sometimes that’s the only excuse you need to stay in and scrapbook! Show off your hard work during the November Completed Album Challenge starting tonight in the Virtual Crop Facebook Group. Need some inspiration to get those final few pages done? Check out this holiday-inspired scrapbook layout below — and it’s appropriate no matter the weather!
If you completed an album this month (does not need to be from start to finish in November, just completed in November), make a short video flipping through each of the pages in your newly completed album. Then, post your video in the Virtual Crop Facebook Group with the hashtag #CompletedNovember2024 for the chance to win!
Here’s an example of what your Completed Album Challenge video could look like!
For ALL the details on the Completed Album Challenge, check out this blog post.
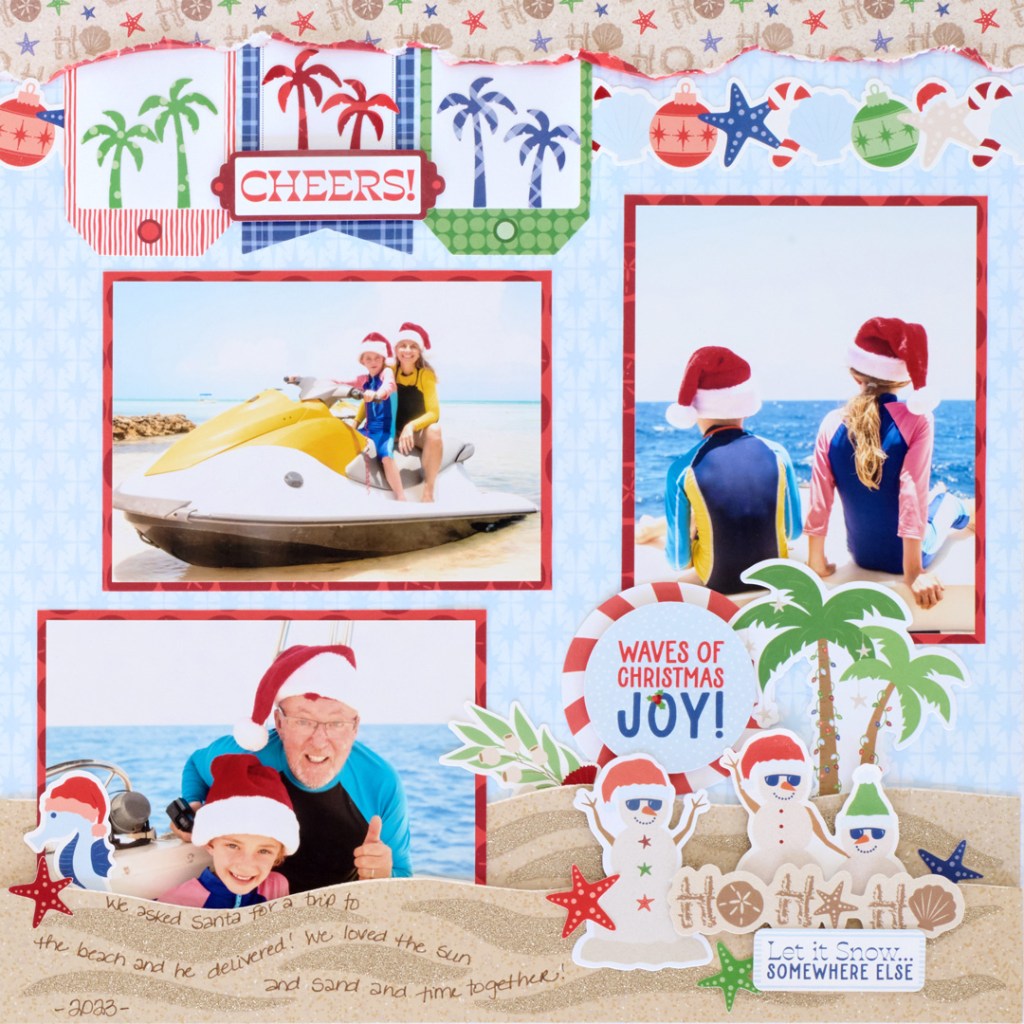
To create this layout you will need:
- Christmas on the Coast Designer Paper
- Christmas on the Coast Stickers
- Christmas on the Coast Embellishments
- Christmas on the Coast Border Embellishments
- Double Palm Trees Punch
- 12-inch Trimmer or (Shop Canada | Shop Australia)
- Foam Squares Variety Pack or (Shop Canada | Shop Australia)
- Foam Tape or (Shop Canada | Shop Australia)
- Tape Runner or (Shop Canada | Shop Australia)
- Repositionable Tape Runner or (Shop Canada | Shop Australia)
- Brown Dual-Tip Pen or (Shop Canada | Shop Australia)

Step 1: Use the stars paper as the base of the layout.
Step 2: Layer the two beach borders along the bottom of the layout, using Foam Tape behind the one on bottom edge of the layout.
Step 3: Adhere the tag embellishments along the top edge of the layout.
Step 4: Tear a piece of ho ho ho! paper to measure 12” x 1-1/2” roughly, then curl back the bottom edges to see the color from the back side of the paper. Adhere along the top edge of the layout.
Step 5: Using the Double Palm Trees Punch, punch from dand dollars, plaid and tiny dots papers. Adhere to the tag embellishments.
Step 6: Cut three photo mats from sand dollars paper to measure (1) 4-1/4” x 5-1/4” and (2) 5-1/4” x 3-3/4”.
Step 7: Adhere photos to the mats that measure (1) 4” x 5” and (2) 5” x 3-1/2”. Adhere to the layout.
Step 8: Adhere stickers and embellishments to the layout using Foam Squares on some for added dimension.
Step 9: Journal using a Brown Dual Tip Pen along the waves of the border.
Are you close to completing an album this month? Remember to share a short video of you flipping through your completed album in the Virtual Crop Facebook Group (with the hashtag #CompletedNovember2024) for a chance to win — good luck!
P.S. Are YOU a member of the Virtual Crop Facebook Group? It’s your go-to place for MONTHLY Virtual Crops, MONTHLY Completed Album Challenges, QUARTERLY Secret Box Openings with project tutorials and so much more! We hope you’ll join our community of more than 40,000 fellow memory-keeping enthusiasts — you’ll feel right at home!

Love this! And I have a December Cruise coming up. This will be perfect for that album!
I can’t do that just right now. We are trying to buy a home with 4 bedrooms. We have found 2 house that we really like. It is a triple wide and out of this world. The guy turned his garage into a man’s cave. With hard wood floors and it we’ll become my craft room with a TV so my husband can spend some time with me. Plus the kitchen is so big and it overlooks the town. I-well start after we get moved in.