November 27, 2024
Add Some Glitz to Your Holiday Layouts
It’s almost December and Christmas lights are aglow! Add some of that shine and sparkle to your layouts exemplified in the holiday-layout below! Using the Christmas Charm collection and Whie and Green Shimmer Brush Pens, you can add a bit of extra glitter to your scrapbooks, cards and more. Keep reading to learn how.
To create this layout you will need:
- Christmas Charm Paper Pack or (Shop Canada | Shop Australia)
- Christmas Charm Embellishments or (Shop Canada | Shop Australia)
- Christmas Charm Stickers or (Shop Canada | Shop Australia)
- Bright White, Cranberry & Dark Green Solid Cardstock or (Shop Canada | Shop Australia)
- 12-inch Trimmer or (Shop Canada | Shop Australia)
- White and Green Glitter Brush Pens
- Tape Runner or (Shop Canada | Shop Australia)
- Repositionable Tape Runner or (Shop Canada | Shop Australia)
- Foam Squares Variety Pack or (Shop Canada | Shop Australia)

Step 1: Use Bright White Solid Cardstock for the base of the layout.
Step 2: Cut a piece from ornamental stripes paper to measure 7-3/4” x 1”. Adhere along the top edge of the cardstock.
Step 3: Cut a piece of red tonal stars paper to measure 5” x ½”. Adhere along the bottom edge of the previous strip.
Step 4: Cut a piece of multi plaid paper to measure 12” x 1”. Adhere along the bottom edge of the layout.
Step 5: Using the Green and White Shimmer Brush Pens, flick some of the “ink” from the tip of the brush onto the cardstock base as desired.
Step 6: Cut photo mats from Dark Green Solid Cardstock to measure: (2) 3-1/2” x 4-1/2” and (1) 5” x 4-1/2”. Adhere to the layout.
Step 7: Cut photo mats from Cranberry Solid Cardstock to measure: (2) 3-1/4” x 4-1/4” and (1) 4-3/4” x 4-1/4”. Run the White Shimmer Brush Pen along the edges of the cardstock to make it look frosted. Adhere to the Dark Green Solid Cardstock mats.
Step 8: Cut photos to measure: (2) 3”x 4” and (1) 4-1/2” x 4”. Adhere to the Cranberry Solid Cardstock photo mats.
Step 9: Run the Green Shimmer Brush Pen along the edges of the Christmas tree embellishments. Then flick some of the White Shimmer Brush Pen onto the trees to make it look like snow.
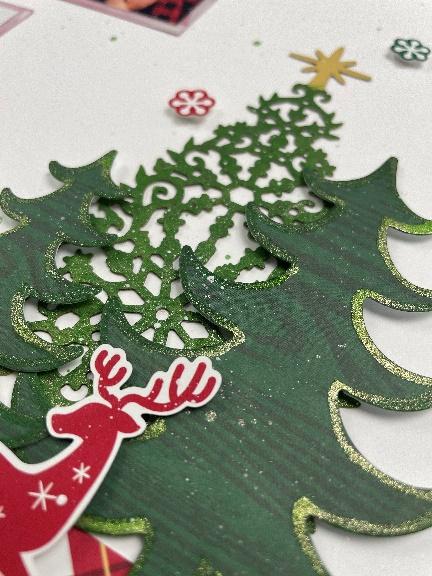
Step 10: Using the laser cut tree embellishment, dab a tissue into the shimmer/ink, then blot onto the tree.
Step 11: Adhere stickers and embellishments to the layout, using Foam Squares on some for added dimension.
Step 12: Journal as desired.
What other ways do you add some sparkle to your holidays?
P.S. Are YOU a member of the Virtual Crop Facebook Group? It’s your go-to place for MONTHLY Virtual Crops, MONTHLY Completed Album Challenges, QUARTERLY Secret Box Openings with project tutorials and so much more! We hope you’ll join our community of more than 40,000 fellow memory-keeping enthusiasts — you’ll feel right at home!
