December 10, 2024
Do You Want to Build a Border?
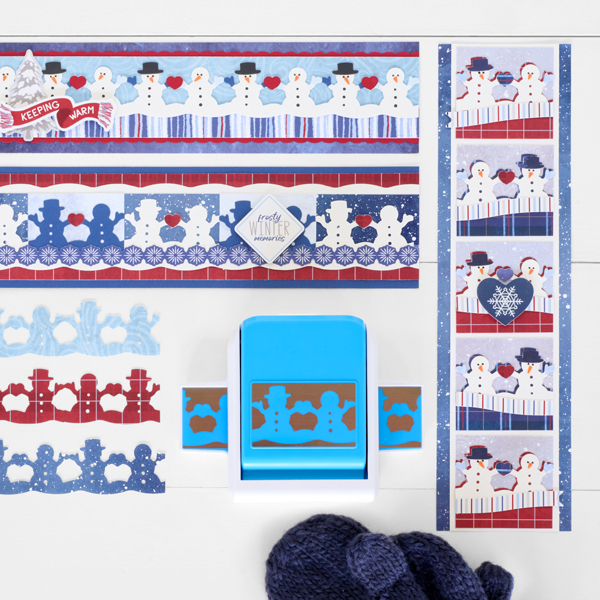
Enjoy the fun of building snow pals, but without the cold! Using the Snow Pals Border Punch and Flurry of Fun collection, you can create abominably adorable borders fit for the coldest and snowiest of seasons. Keep reading to see how you can create THREE borders!
To create these borders you will need:
- Flurry of Fun Designer Paper Pack or (Shop Canada | Shop Australia)
- Flurry of Fun Stickers or (Shop Canada | Shop Australia)
- White, Black, Pumpkin, Blue, Baby Blue and Cranberry Solid Cardstock or (Shop Canada | Shop Australia)
- Snow Pals Border Punch
- 12-inch Trimmer with Straight Scallop Blades or (Shop Canada | Shop Australia)
- Tape Runner or (Shop Canada | Shop Australia)
- Repositionable Tape Runner or (Shop Canada | Shop Australia)
- Foam Squares Variety Pack or (Shop Canada | Shop Australia)
- Precision Point Adhesive Pen or (Shop Canada | Shop Australia)
- Black Dual-Tip Pen or (Shop Canada | Shop Australia)

Frosty Winter Memories Border
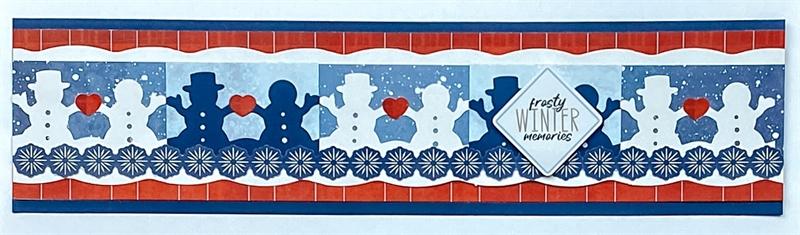
Step 1: Cut a 12” x 3” strip with ice blue paper for the base. Cut a 12” x 2-5/8” strip with red plaid paper and adhere on the base.
Step 2: Using the Snow Pals Border Punch, punch two borders with white cardstock. Trim off the snow pals and adhere the wavy bases of the borders on the red plaid strip. Cut a 12” x 1-1/2” strip with blue dots paper and adhere between the white waves borders. Cut two 2-3/8” x 1-1/2” pieces with snowy ice paper and adhere on the blue dots strip, 2-3/8” apart.
Step 3: Using the Snow Pals Border Punch, punch borders with both white and blue cardstock. Trim out snow pals pairs (with a heart between them) and adhere as shown on the border. Punch another border with cranberry cardstock. Trim out the hearts and adhere on the border.
Step 4: Adhere a snowflakes border sticker. Adhere the title sticker using foam squares.
Keeping Warm Border
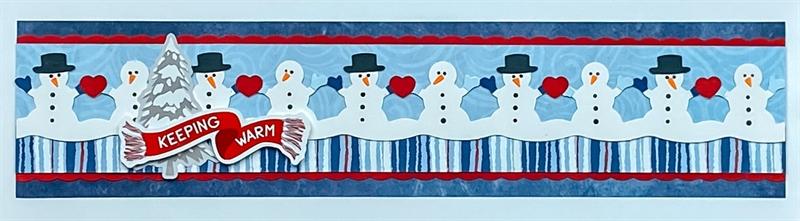
Step 1: Cut a 12” x 2-3/4” strip with ice blue paper for the base. Using the scallop blade, cut a 12” x 2-1/4” strip with cranberry cardstock and adhere on the base.
Step 2: Cut a 12” x 1-1/4” strip with light blue swirls paper and adhere near the top of the cranberry strip. Cut a 12” x 3/4” strip with stripes paper and adhere just below it.
Step 3: Using the Snow Pals Border Punch, punch a border with white cardstock. Adhere small strips of black cardstock behind the bellies for “charcoal” accents. Adhere on the border. Punch out borders with black, light blue, blue and cranberry cardstock. Trim out hats, mittens and hearts and place them on the snow pals. Using scissors, cut out small triangle carrot noses with pumpkin cardstock. Use a black dual-tip pen to draw on the eyes. Use precision point adhesive to adhere tiny pieces.
Step 4: Adhere stickers, popping the scarf up with foam squares for dimension.
Snow Pals Love Border
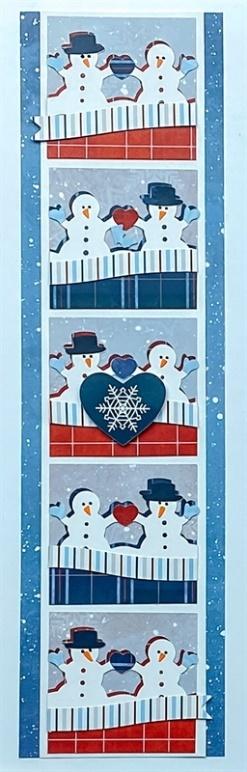
Step 1: Cut a 12” x 3-1/4” strip with blue dots paper for the base. Cut a 12” x 2-5/8” strip with white cardstock and adhere on the base.
Step 2: Cut five 2-3/8” x 2-1/4” pieces with snowy scene paper. Adhere at regular intervals on the border.
Step 3: Cut three 2-3/8” x 3/4” strips with red plaid paper and two with blue plaid paper. Adhere on the bottoms of the gray pieces, alternating colors.
Step 4: Using the Snow Pals Border Punch, punch a border with red paper. Trim out pairs of snow pals; adhere the red plaid snow pals on the squares with red. Punch a border with blue plaid paper. Trim out pairs of snow pals with the hatless one on the left this time; adhere the blue plaid snow pals on the squares with blue.
Step 5: Punch a border with white cardstock. Trim out the snow pal pairs. Adhere just offset on the plaid pairs, flipping the ones on the blue pair to the reverse side.
Step 6: Punch out borders forest scene (navy) and light blue swirl papers. Trim out hats, mittens and hearts from these and scraps of red plaid and blue plaid borders and place them on the snow pals. Using scissors, cut out small triangle carrot noses with pumpkin cardstock. Use a black dual-tip pen to draw on the eyes. Use precision point adhesive to adhere tiny pieces.
Step 7: Adhere a large heart sticker with foam squares.
When building snow pals, what are your favorite accessories to include?
P.S. Are YOU a member of the Virtual Crop Facebook Group? It’s your go-to place for MONTHLY Virtual Crops, MONTHLY Completed Album Challenges, QUARTERLY Secret Box Openings with project tutorials and so much more! We hope you’ll join our community of more than 40,000 fellow memory-keeping enthusiasts — you’ll feel right at home!

The border maker isn’t available any more. There was a very short time to get it ordered.
Would love to make this, however the Snow Pals punch was sold out almost immediately – very disappointing!
Agree, very disappointed how short this was available. I find it really hard to keep up with CM products.