December 23, 2024
Deck Your Pages With Plaid Borders
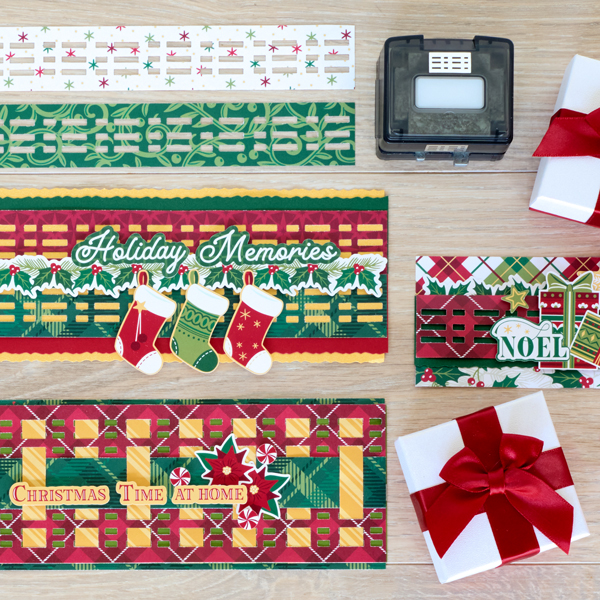
Merry early Christmas! Get into the spirit and get your scrapbooks ready for new holiday photos and memories with these borders created with the Christmas Charm collection and Linear Plaid BMC! Keep reading to see how to recreate them, and may your scrapbooks be merry.
To create these borders you will need:
- Christmas Charm Paper Pack or (Shop Canada | Shop Australia)
- Christmas Charm Stickers or (Shop Canada | Shop Australia)
- Christmas Charm Embellishments or (Shop Canada | Shop Australia)
- Gold Shimmer, Avocado and Dark Green Solid Cardstock or (Shop Canada | Shop Australia)
- 12-inch Trimmer Colonial Blade or (Shop Canada | Shop Australia)
- Original Border Maker System with Linear Plaid BMC or (Shop Canada | Shop Australia)
- Tape Runner or (Shop Canada | Shop Australia)
- Repositionable Tape Runner or (Shop Canada | Shop Australia)
- Foam Squares Variety Pack or (Shop Canada | Shop Australia)

Noel Border

Step 1: Cut a piece of multi-plaid paper to measure 12” x 2-1/2”. Use this as the base of the border.
Step 2: Cut a piece of the holly and pine paper to measure 12” x 3”. Using the Linear Plaid BMC with the Border Maker System, punch along one of the 12” edges. Score 1-1/4” from the edge of the side you punched on. Fold on the score line.
Step 3: Cut a piece of Dark Green Solid Cardstock to measure 12” x 1-1/2” using the Colonial Blade on the Trimmer on one edge. Adhere this strip under the folded over piece with the Linear Plaid border. Then adhere the Linear Plaid edge to the top.
Step 4: Adhere a border sticker from the back folded edge of the previous piece, then adhere the whole piece to the bottom edge of the border.
Step 5: Adhere stickers and embellishments using Foam Squares.
Holiday Memories Border

Step 1: Cut a piece Gold Shimmer Cardstock to measure 12” x 3-1/2” using the Colonial Blade on the Trimmer. This is the base of the border.
Step 2: Cut a piece from Dark Green Cardstock, using the Colonial Blade on one edge to measure 12” x 1-1/2”.
Step 3: Using the red tonal stars paper, punch a border using the Linear Plaid BMC with the Border Maker System, then cut to measure 1-1/4” from the edge.
Step 4: Cut a piece of Gold Shimmer Paper to measure 12” x 1” Adhere to the back side of the previous piece, then adhere to the inside straight edge of the Dark Green Solid Cardstock piece. Adhere to the top of the border, leaving approx. 1/8” in between the edge of the Dark Green Solid Cardstock piece and the Gold Shimmer Cardstock edge.
Step 5: Cut a piece of Cranberry Solid Cardstock to measure 12” x 1-1/2” using the Colonial Blade on one edge.
Step 6: Using the green plaid paper, punch a border using the Linear Plaid BMC with the Border Maker System, then cut to measure 1-1/4” from the edge.
Step 7: Cut a piece of Gold Shimmer Cardstock to measure 12” x 1”. Adhere to the back side of the previous piece, then adhere to the inside edge of the Cranberry Solid Cardstock piece. Adhere to the bottom of the border, leaving approximately 1/8” in between the edges of the cardstock.
Step 8: Adhere sticker border to the center of the border using Foam Tape.
Step 9: Adhere the remaining stickers to the border using Foam Squares.
Christmas Time At Home Border
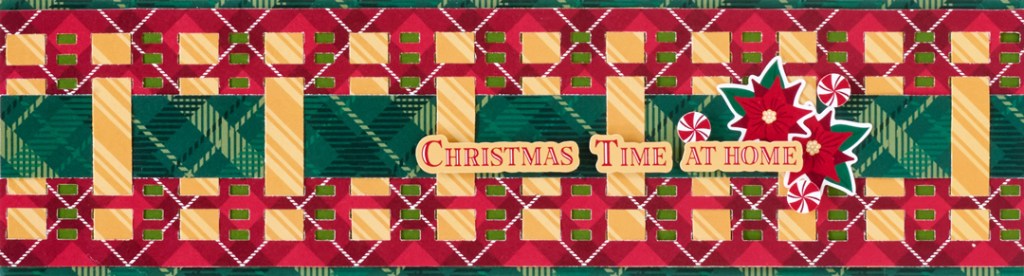
Step 1: Cut a piece of green plaid to measure 12” x 3-1/4”. Use this as the base of the border.
Step 2: Cut a piece of Avocado Solid Cardstock to measure 12” x 3”. Adhere to the border.
Step 3: Cut a piece of red plaid paper to measure 12” x 3”. Using the Linear Plaid BMC punch along one edge, then turn the piece over and punch along the other edge.
Step 4: Cut 12 strips that measure ½” x 3” from yellow stripes paper. Weave through the punched edges, adhering to the back side of the red plaid paper on the ends only.
Step 5: Adhere the red plaid piece with weaved pieces to the top of the Avocado Cardstock piece.
Step 6: Cut a piece of green plaid paper to measure 12” x 1”. Weave this strip through the yellow stripe paper strips.
Step 7: Adhere stickers to the border for the title, using Foam Squares.
What’s your favorite holiday tradition? Sound off in the comments!
P.S. Are YOU a member of the Virtual Crop Facebook Group? It’s your go-to place for MONTHLY Virtual Crops, MONTHLY Completed Album Challenges, QUARTERLY Secret Box Openings with project tutorials and so much more! We hope you’ll join our community of more than 40,000 fellow memory-keeping enthusiasts — you’ll feel right at home!

I love the borders, but can we PLEASE go back to having the full border being shown with each of the instructions, vs the half- to two-thirds ‘group image’ as is with these instructions (and a few other recent posts)? A lot of us save the individual titled instructions with the full border image (or page layout image, as the case may be) . . . you know, the way that CM has always posted the instructions (until recently). TIA
Thank you for making the change and showing the full border with each set of instructions . . . this is so greatly appreciated!!