January 9, 2025
Bundle Up With These Winter Borders
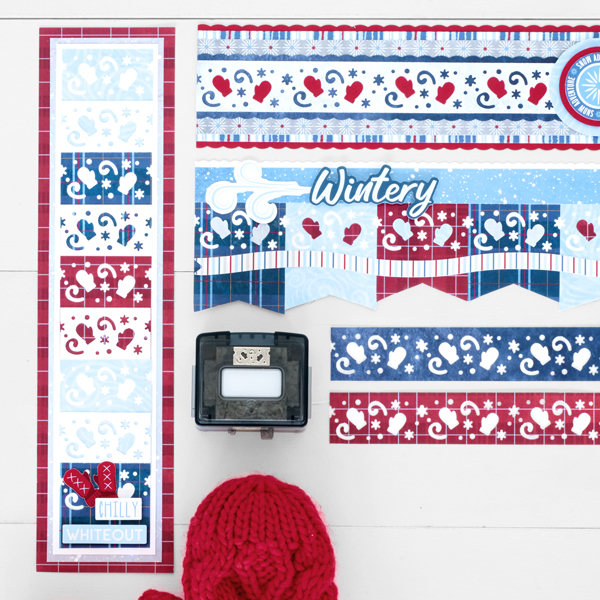
Here are two ways to stay warm in the winter: wear mittens when you go out or stay inside and make these winter borders with the Mittens and Flurries BMC! In a usually cold season, this BMC adds a touch of warmth to your scrapbooks. See how you can use it to make three different borders below.
To create these borders you will need:
- Flurry of Fun Designer Paper Pack or (Shop Canada | Shop Australia)
- Flurry of Fun Stickers or (Shop Canada | Shop Australia)
- Bright White & Cranberry Solid Cardstock or (Shop Canada | Shop Australia)
- Original Border Maker System with Mittens & Flurries Cartridge or (Shop Canada | Shop Australia)
- Custom Cutting System with Circle Patterns or (Shop Canada | Shop Australia)
- Circle Punch or (Shop Canada | Shop Australia)
- 12-inch Trimmer with Straight, Pinking and Scallop Blader or (Shop Canada | Shop Australia)
- All-Purpose Scissors or (Shop Canada | Shop Australia)
- Tape Runner or (Shop Canada | Shop Australia)
- Repositionable Tape Runner or (Shop Canada | Shop Australia)
- Foam Squares Variety Pack or (Shop Canada | Shop Australia)


Snow Adventure Border
Step 1: Using the scallop blade, cut a 12” x 2-3/4” strip with Cranberry Solid Cardstock for the base. With the straight blade, cut a 12” x 2-1/2” strip with stripes paper and adhere on the base. Cut a 12” x 2-1/8” strip with gray star dots paper and adhere on top.
Step 2: Using the scallop blade, cut a 12” x 1-1/2” strip with ice blue paper and adhere on the center of the border. Using the Mittens & Flurries BMC, punch a border with snowy ice paper. Trim to 12” x 1-1/8” and adhere on the ice blue strip. Punch another border with Cranberry Solid Cardstock. Adhere the mittens on the border.
Step 3: Using the inside of the medium circle pattern and the green blade, cut a circle with light blue swirls paper. Using the circle punch, punch a circle with cranberry cardstock and mount on top using foam squares. Top with the Snow Adventure sticker and adhere on the border. Add boots and hat stickers.

Wintery Border
Step 1: Using the pinking blade, cut a 12” x 2-1/2” strip with bright white cardstock for the base. Cut a 12” x 3/4″ strip with blue dots paper and adhere on the base so just the white pinking edge shows.
Step 2: Cut two 2” x 2-1/2” pieces with each blue plaid, red plaid and light blue flurry papers. Using the Mittens & Flurries BMC, punch one 2” edge of each piece. Using scissors, cut a V in the opposite ends of each, varying the cut so the pieces are different lengths. Adhere as shown on the border, just below the blue dots strip.
Step 3: Adhere stickers, popping some up with Foam Squares for dimension.
Chilly Whiteout Border

Step 1: Cut a 3” x 12” strip with red plaid paper for the base. Cut a 2-1/2” x 11-1/2” strip with snowy scene paper and adhere on the base. Cut a 2-1/4” x 11-1/4” strip with Bright White Solid Cardstock and adhere on top.
Step 2: Using the Mittens & Flurries BMC, punch borders with each bright white, light blue swirls, blue plaid and red plaid papers. Trim borders out to 12” x 2-1/2”, then cut into 2” pieces. Starting at the top, adhere a swirls piece followed by a white piece. Continue until nine pieces have been layered, trimming the bottom piece as necessary.
Step 3: Add stickers, popping the titles up with Foam Squares.
Do you find yourself scrapbooking more in colder weather?
