January 10, 2025
Highlight Your Best Days With This Layout
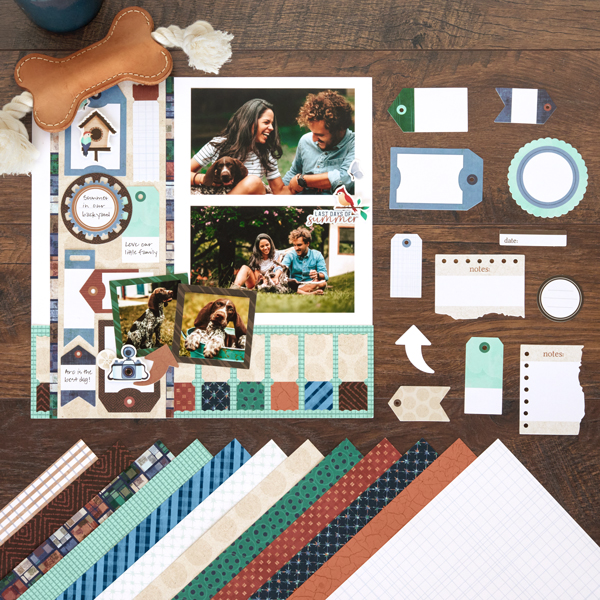
One of the best things about scrapbooking is being able to hold your best memories in your hands. This everyday layout helps you give them the decoration they deserve. See how you can recreate this layout below!

To create this layout you will need:
- Noteworthy Days Designer Paper Pack or (Shop Canada | Shop Australia)
- Noteworthy Days Embellishments or (Shop Canada | Shop Australia)
- Noteworthy Days Stickers or (Shop Canada | Shop Australia)
- Bright White Solid Cardstock or (Shop Canada | Shop Australia)
- 12-inch Trimmer with Straight and Stamping Blader or (Shop Canada | Shop Australia)
- Handheld 1-Hole Punch or (Shop Canada | Shop Australia)
- Photo Trimmer or (Shop Canada | Shop Australia)
- Tape Runner or (Shop Canada | Shop Australia)
- Repositionable Tape Runner or (Shop Canada | Shop Australia)
- Foam Squares Variety Pack or (Shop Canada | Shop Australia)
- Tape Chips or (Shop Canada | Shop Australia)
- Black Dual-Tip Pen or (Shop Canada | Shop Australia)

Step 1: Use a sheet of Bright White Solid Cardstock as the base for this layout. Cut a 12” x 3-1/4” strip with mint gingham paper and adhere on the bottom of the layout.
Step 2: Cut seven 1” x 1-3/4” strips with kraft dots paper. Cut seven 1” x 1-1/8” pieces with a variety of designer paper scraps. Flip all pieces to their back sides. Align one kraft dots strip and one square piece. Place a tape strip on the seam to hold the piece together. Using the Handheld 1-Hole Punch, punch half circles along the seams on both long sides, as shown. Using the stamping blade, cut 1/8” off each short end. Repeat with the remaining pieces. Adhere side by side along the mint strip, alternating colors.
Step 3: Cut a 4-1/4” x 12” strip with tiled collage paper. Adhere about 3/4″ from the left edge of the layout. Cut a 3-3/4” x 12” strip with kraft dots paper and adhere on top. Arrange and adhere a variety of tag embellishments on top, as shown.
Step 4: Crop two photos to 5-3/4” x 3-3/4” and mount on the layout. Crop two photos to 2-1/4” x 2-1/4” and mount on two square embellishments. Adhere on the layout.
Step 5: Adhere stickers popping some up with foam squares for dimension. Journal on the tags as desired.
Have you scrapbooked a core memory?
P.S. Are YOU a member of the Virtual Crop Facebook Group? It’s your go-to place for MONTHLY Virtual Crops, MONTHLY Completed Album Challenges, QUARTERLY Secret Box Openings with project tutorials and so much more! We hope you’ll join our community of more than 40,000 fellow memory-keeping enthusiasts — you’ll feel right at home!
