March 4, 2025
Sprinkle In These Spring Borders

Tend to your creativity with a bouquet of spring borders! The Watering Cans BMC crafts an adorable border of watering cans of various sizes. See how you can use this BMC with the Springtime Soiree collection to make fresh borders that will make your layouts bloom.
To create these borders you will need:
- Springtime Soiree Designer Paper or (Shop Canada | Shop Australia)
- Springtime Soiree Layered Borders or (Shop Canada | Shop Australia)
- Springtime Soiree Stickers or (Shop Canada | Shop Australia)
- Canary, Avocado, Eggplant and Purple Ice Solid Cardstock or (Shop Canada | Shop Australia)
- 12-inch Trimmer with Straight and Decorative Blades or (Shop Canada | Shop Australia)
- Original Border Maker System with Watering Cans Cartridge or (Shop Canada | Shop Australia)
- Circle Punch or (Shop Canada | Shop Australia)
- All-Purpose Scissors or (Shop Canada | Shop Australia)
- Tape Runner or (Shop Canada | Shop Australia)
- Repositionable Tape Runner or (Shop Canada | Shop Australia)
- Foam Squares Variety Pack or (Shop Canada | Shop Australia)
- Foam Tape or (Shop Canada | Shop Australia)
- Brown Dual-Tip Pen or (Shop Canada | Shop Australia)

Hooray for Spring

Step 1: Fussy cut the top edge of a piece of framed flowers paper, then cut 2-3/4” from the top points. This will be the base of the border.
Step 2: Using the Circle Punch, punch four circles from the yellow lines paper and four circles from the green floral paper. Adhere the circles from the back side of the border in between each point of the previous piece.
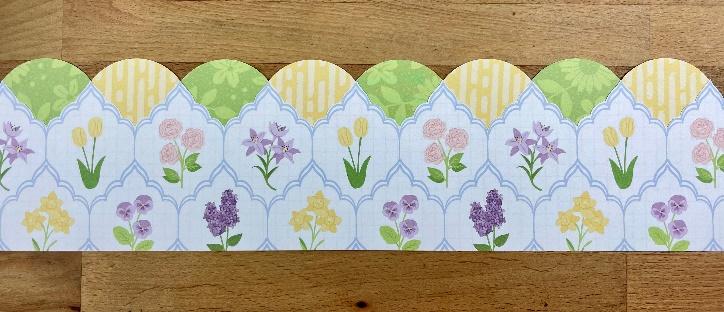
Step 3: Using Avocado Solid Cardstock, punch one edge using the Watering Cans BMC in the Border Maker System.
Step 4: Using green floral paper, punch one edge using the Watering Cans BMC.
Step 5: Adhere the green floral piece to the top of the cardstock piece, slightly offset to give it a “shadow.” Cut this piece 1-5/8” from the top edge of the watering cans on your trimmer. Adhere to the lower edge of the border.
Step 6: Cut a piece of yellow lines paper to measure 12” x ¾”. Adhere about ¼” from the bottom edge of the border.
Step 7: Cut a piece of avocado cardstock to measure 12” x ¼”. Adhere about 1/16” from the bottom edge of the yellow lines paper.
Step 8: Use Brown Dual-Tip Pen to draw faux stitching along the arches of the circles.
Step 9: Adhere stickers for title as desired.
Welcome Spring

Step 1: Cut a piece of Canary Solid Cardstock to measure 12” x 2-1/2”, using the Colonial Blade on the 12-inch Trimmer on one edge. Use this piece as the base of the border with the decorative edge along the bottom.
Step 2: Cut a piece from Eggplant Solid Cardstock to measure 12” x 2”, using the Colonial Blade on the 12-inch Trimmer on one edge. Adhere to the border with the decorative edge on the top.
Step 3: Cut a piece of purple petals paper to measure 12” x ½”. Adhere along the bottom edge of the eggplant cardstock piece.
Step 4: Using the Watering Cans BMC in the Border Maker System, punch an edge from yellow lines paper, then cut 1-5/8” from the top. Adhere to the top edge of the purple petals paper.
Step 5: Adhere the layered border over the yellow lines, along the edge of the purple petals paper.
Step 6: Adhere title sticker and bicycle sticker using Foam Squares.
Floral Border

Step 1: Using the Scallop Blade on the 12-inch Trimmer, cut a piece of Purple Ice Solid Cardstock to measure 2-3/8” x 12”. This is the base of the border.
Step 2: Cut a piece of multicolored stripes paper to measure 2” x 12”. Adhere to the center of the border.
Step 3: Using the Watering Cans BMC in the Border Maker System, punch along the edge of Eggplant Solid Cardstock. Cut from the top edge of the watering cans 2”. Then cut into 2” increments. Adhere to the multicolored stripes paper, flipping every other one.
Step 4: Cut six pieces from the beige dots paper to measure 1-3/4” x 1”. Adhere to the lower portion of each segment.
Step 5: Adhere flower sticker and title to each beige dots piece, rotating by placing the sticker on the right side of left side of the beige dots piece. Use scissors to cut any excess stickers off along the bottom edges of each piece.
Tell us in the comments which border is your favorite! ?
P.S. Are YOU a member of the Virtual Crop Facebook Group? It’s your go-to place for MONTHLY Virtual Crops, MONTHLY Completed Album Challenges, QUARTERLY Secret Box Openings with project tutorials and so much more! We hope you’ll join our community of more than 44,000 fellow memory-keeping enthusiasts — you’ll feel right at home!
