September 9, 2025
An Adventure In Nature with Deeper In The Woods
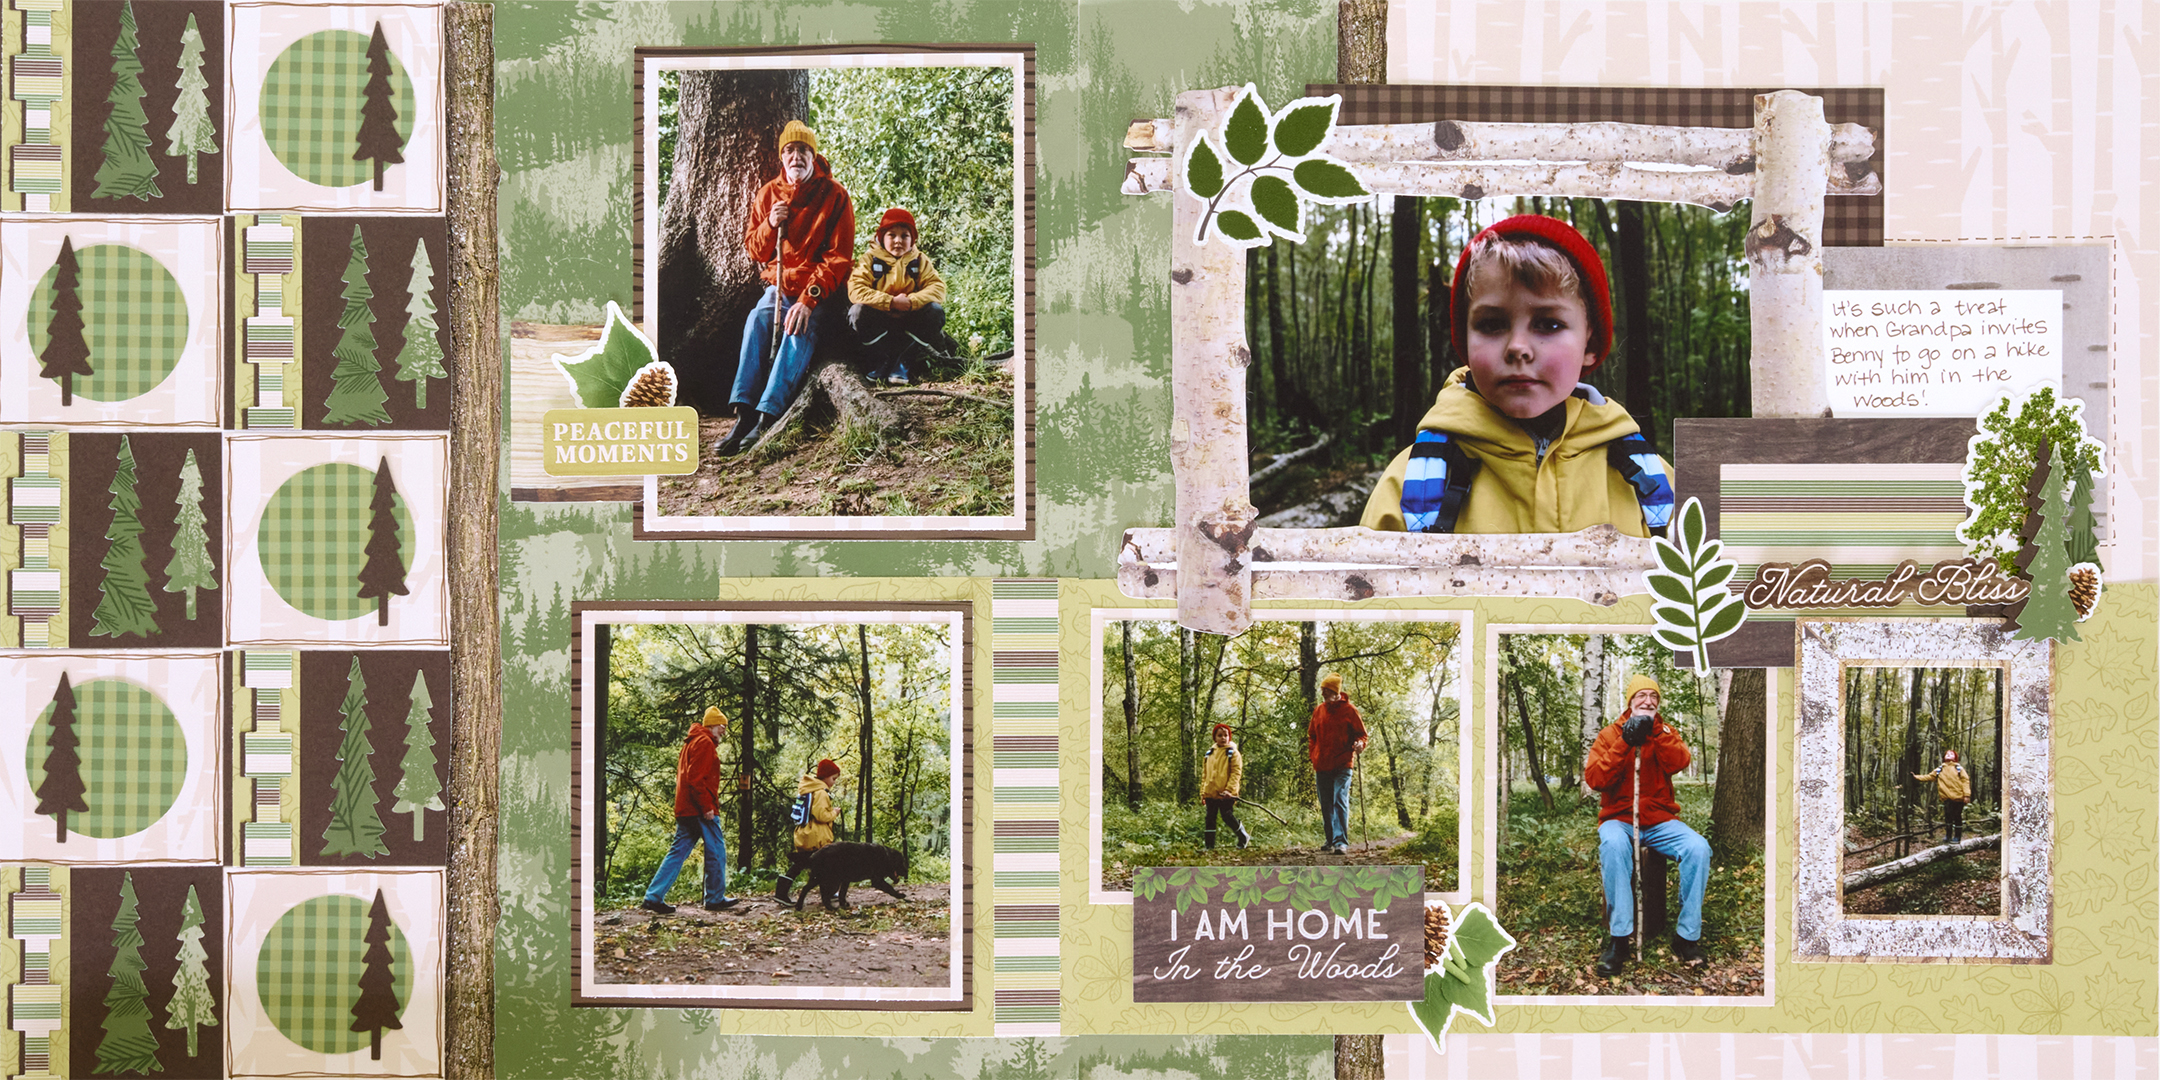
Woodsy vibes, fresh patterns and a natural aesthetic — this spread is an absolute stunner for all your scenic strolls!
To create this layout you will need:
- Deeper in the Woods Paper Pack ( Shop Canada | Shop Australia )
- Deeper in the Woods Stickers ( Shop Canada | Shop Australia )
- Deeper in the Woods Embellishments ( Shop Canada | Shop Australia )
- Hot Fudge Solid Cardstock or (Shop Canada | Shop Australia)
- White Solid Cardstock or (Shop Canada | Shop Australia)
- Border Maker System with Square Link Chain BMC ( Shop Canada | Shop Australia )
- Circle Punch ( Shop Canada | Shop Australia )
- 12-inch Trimmer or (Shop Canada | Shop Australia)
- Photo Trimmer or (Shop Canada | Shop Australia)
- Tape Runner or (Shop Canada | Shop Australia)
- Repositionable Tape Runner or (Shop Canada | Shop Australia)
- Foam Squares Variety Pack or (Shop Canada | Shop Australia)
- Brown Dual-Tip Pen or (Shop Canada | Shop Australia)
- Deeper in the Woods Mat Pack
- Evergreen Trees Border Punch

Step 1: Use a piece of White Cardstock as the base for the left-hand side of the spread, or you can use the blank side of the photo-safe insert sheet from your paper pack. Use the birch trees paper as the base for the right-hand side.
Step 2: Using Hot Fudge Cardstock, punch the Evergreen Trees Border Punch along one edge and set aside the punched tree pieces. Cut the border to measure 2-1/2″ wide.
Step 3: Cut a piece of the leaves designer paper to 3/4″ x 12″ and adhere to the left side of the border. Use the Original Border Maker System with Square Link Chain BMC to punch one border from Hot Fudge Cardstock, and another from the stripes designer paper. Adhere the stripes chain offset from the hot fudge chain, then adhere to the leaves strip.
Step 4: Cut in between the tree segments to get five 2-1/2″ x 2-3/8″ pieces. Cut five 2-1/2″ x 2-3/8″ pieces from birch trees paper. Adhere on the left side of the spread, alternating in a checkered pattern.
Step 5: Punch five circles from the gingham designer paper using the Circle Punch. Adhere to the center of each birch trees segment.
Step 6: Punch a border from the forest designer paper with the Evergreen Trees Border Punch. Use the punched tree pieces inside the small trees on the Hot Fudge Cardstock squares. From the same paper, cut two pieces measuring 3″ x 12″ and 7″ x 12″. Adhere the 7″ x 12″ to the inside of the left page and the 3″ x 12″ to the inside of the right page.
Step 7: Punch a border from pine paper with the Evergreen Trees Border Punch. Use the larger punched trees in the large tree openings on the Hot Fudge Cardstock squares. Use the previously punched Hot Fudge trees around each gingham circle.
Step 8: Adhere the log sticker border along the edges of the forest designer papers on each page.
Step 9: Cut two pieces from the leaves designer paper to measure 12″ x 5″ and 4″ x 5″. Adhere the 12″ x 5″ piece to the lower right about 1/2″ from the bottom, and match the 4″ x 5″ piece on the left side.
Step 10: Cut two mats from woodgrain paper to 4-1/2″ x 5-1/2″ and 4-1/2″ x 4-1/2″. Adhere to the left page.
Step 11: Cut four mats from the birch trees designer paper to 4-1/4″ x 5-1/4″, 4-1/4″ x 4-1/4″, 4-1/4″ x 3-1/4″ and 3-1/4″ x 4-1/4″. Adhere as shown on the right page.
Step 12: Cut a stripes designer paper strip to 3/4″ x 5″ and adhere next to the photo on the lower inside of the left page.
Step 13: Adhere a 6″ x 4″ photo behind the birch tree embellishment frame on the right page. Add the hot fudge gingham mat behind the upper right of the photo and embellishment frame, or use a 6″ x 4″ piece of brown designer paper. Adhere a 4-1/2″ x 3-1/4″ journaling mat to the right of the embellishment frame. Offset and add small birch bark frame embellishments to the right page.
Step 14: Adhere photos measuring: 4″ x 5″, 4″ x 4″, 4″ x 3″, 3″ x 4″ and 2-1/2″ x 3-1/2″. Add stickers and embellishments with Foam Squares for dimension.
Step 15: Journal as desired. Use a Brown Dual Tip Pen to doodle around the outer edges of the birch tree segments.
What a breathtaking forest-themed spread! Let us know how you’d personalize this layout in the comments below.
P.S. Are YOU a member of the Virtual Crop Group? It’s your go-to place for MONTHLY Virtual Crops, MONTHLY Completed Album Challenges, QUARTERLY Secret Box Openings with project tutorials and so much more! We hope you’ll join our community of more than 47,000 fellow memory-keeping enthusiasts — you’ll feel right at home!

Love this Layout–Thank You Melissa!!