November 12, 2020
Ice Out Your Albums With These Winter Scrapbook Borders
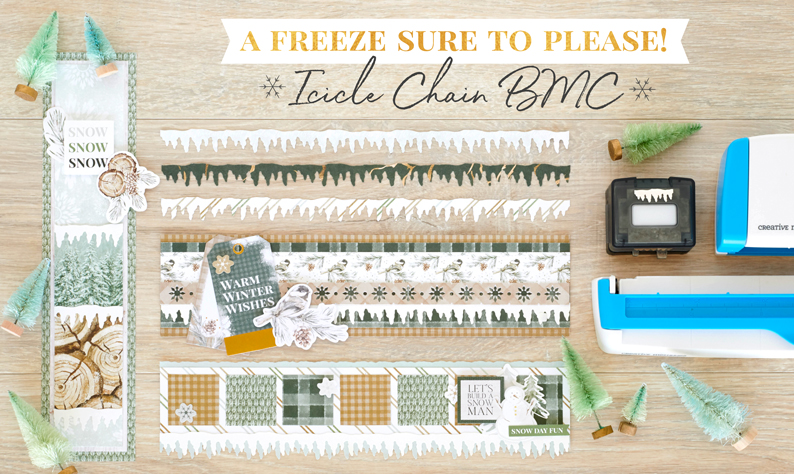
A classic symbol of winter’s chill, rows of icicles hanging off rooftops or dangling from frosty-tipped trees add a bit of a dramatic aesthetic to the cold-weather season. And with the Icicle Chain Border Maker Cartridge, you can easily create a freeze that’s sure to please with its continuously cool icicles border design! Take a look at these ent-ice-ing winter scrapbook borders and start imagining your own frozen creations!

To create these borders you’ll need:
- Winter Woods Paper Pack or (Shop Canada | Shop Australia)
- Winter Woods Foiled Embellishments or (Shop Canada | Shop Australia)
- Winter Woods Laser Cut Borders or (Shop Canada | Shop Australia)
- Winter Woods Stickers or (Shop Canada | Shop Australia)
- White Solid Cardstock or (Shop Canada | Shop Australia)
- Original Border Maker System or (Shop Canada | Shop Australia)
- Icicle Chain Border Maker Cartridge or (Shop Canada | Shop Australia)
- 12-inch Trimmer or (Shop Canada | Shop Australia)
- 12-inch Trimmer Straight Blade or (Shop Canada | Shop Australia)
- 12-inch Trimmer Deckle Blade or (Shop Canada | Shop Australia)
- Repositionable Tape Runner or (Shop Canada | Shop Australia)
- Foam Squares or (Shop Canada | Shop Australia)

Warm Winter Wishes Border

Step 1: Cut a 12″ x 3″ strip of tan gingham paper for the base. Cut a 12” x 2-1/2” strip of green plaid paper and adhere on top.
Step 2: Cut a 12” x 1” strip of chickadees patterned paper and mount 1/4″ from the top of the green plaid strip. Adhere the snowflakes laser cut border underneath. Take the Icicle Chain Border Maker Cartridge and punch out a border. Adhere just below the snowflakes laser cut border.
Step 3: Add gift tags and bird embellishments and a snowflake sticker.
Let’s Build a Snowman Border
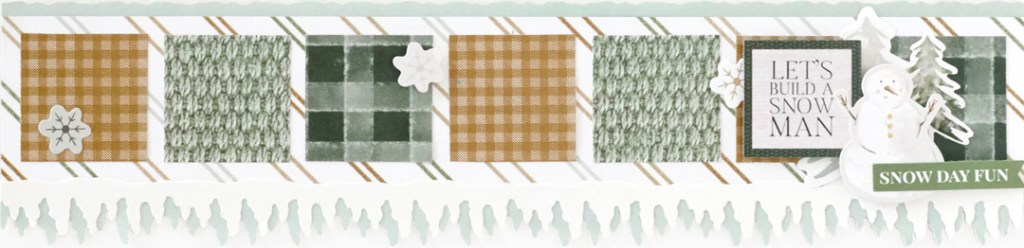
Step 1: Using the 12-inch Trimmer and the Deckle Blade, cut a 12″ x 2-1/2″ strip of snowy pines paper (the top light green section) for the base. With the Straight Blade, cut a 12″ x 2″ strip of diagonal stripes paper and adhere on top.
Step 2: Cut seven 1-1/2″ squares of tan gingham, green knitwear and green plaid papers. Adhere them across the diagonal stripes piece.
Step 3: Take the Icicle Chain Border Maker Cartridge and punch with both snowy pines paper (the top light green section) and White Solid Cardstock. Layer and adhere near the bottom of the border as shown.
Step 4: Add stickers, popping some up with Foam Squares.
Snow Snow Snow Border

Step 1: Cut a 2-3/4″ x 12″ strip of green knitwear paper for the base. Cut a 2-1/4″ x 11-1/2″ strip of white wood grain patterned paper and adhere on top. Cut a 2″ x 11-1/4″ strip of snowflakes patterned paper and mount on top.
Step 2: Cut a 2″ x 2-1/2″ piece of snowy pines paper and adhere to the border, about 5″ from the top. Cut a 2″ x 3″ piece of logs patterned paper and adhere just beneath the snowy pines piece.
Step 3: Take the Icicle Chain Border Maker Cartridge and punch a border with White Solid Cardstock. Trim off three 2″ sections and adhere to the border as shown.
Step 4: Add stickers, popping some up with Foam Squares for added dimension.
Which one of these winter scrapbook borders gives you a thrill for the chill? Let us know in the comments below!

You are doing such a great job with the new designer papers that have been coming out! Just beautiful! Keep up the good work!
Would love to see a National Park theme pack! I love to hike and be outdoors in nature and of course don’t forget man’s best friend.
[…] Get a thrill for the chill in Sketch #2! Create border (and others!) by following the easy steps in this blog post! […]