May 21, 2021
Galactic, Great and Geometric: Try Out These Outer Space Scrapbook Borders

Whether you enjoyed geometry class in school or not, decorating with geometric shapes can be an easy A, especially when you use the Geometric Frame Punch! Geometric patterns are widely considered to be an appealing style when it comes to design, from graphic design to interior design (and even scrapbooking!), and the shapes can give a sense of stability, futurism and minimalism, while also adding a bit of boldness. Ready to feel bold with your borders and futuristic with your frame game? Then take a look at these three geometric and galactically cool outer space scrapbook borders!
To create these borders you will need:
- Outta This World Paper Pack or (Shop Canada | Shop Australia)
- Outta This World Foiled Embellishments or (Shop Canada | Shop Australia)
- Outta This World Stickers or (Shop Canada | Shop Australia)
- Geometric Frame Punch or (Shop Canada | Shop Australia)
- Custom Cutting System with Circle Patterns or (Shop Canada | Shop Australia)
- 12-inch Trimmer with Straight & Wave Blades or (Shop Canada | Shop Australia)
- Tape Runner or (Shop Canada | Shop Australia)
- Repositionable Tape Runner or (Shop Canada | Shop Australia)
- Foam Squares or (Shop Canada | Shop Australia)
- Black Dual-Tip Pen or (Shop Canada | Shop Australia)
Take a peek at how to use the Geometric Frame Punch in the video below!

Cuties Border
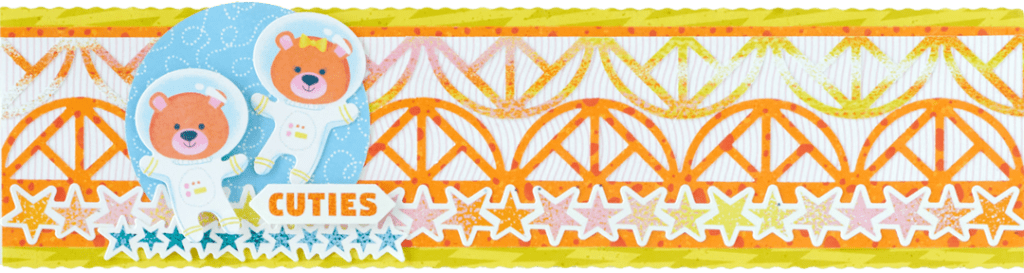
Step 1: Using the 12-inch Trimmer with the Wave Blade, cut a 12″ x 3″ strip of lemon yellow lightning paper for the base. With the 12-inch Trimmer and the Straight Blade, cut a 12″ x 1/4″ strip of orange craters paper and adhere about 1/4″ from the top of the border. Cut a 12″ x 1-3/4″ strip of cotton candy pink waves paper and adhere about 1/8″ from the top of the orange craters strip.
Step 2: Punch a border with the Geometric Frame Border Punch with orange craters paper, aligning the edge with the black mark on the front of the punch. Trim to 12″ x 1-3/4″ and adhere to the border, about 1/4″ from the bottom edge.
Step 3: Punch a border with the Geometric Frame Border Punch with warm dotted texture paper, this time aligning the edge in the middle of the punch (not at the marking). Trim to 12″ x 1″ and adhere to the border as shown.
Step 4: Using the inside of the large Custom Cutting System Circle Pattern and the Blue Blade, cut a circle from sky blue winding path paper. Adhere to the border.
Step 5: Adhere a warm dotted texture stars border sticker and a 3-1/2″ section of cool dotted texture stars border sticker. Add astronaut bears embellishments and “Cuties” sticker, popping some up with Foam Squares.
My Whole Wide World Border
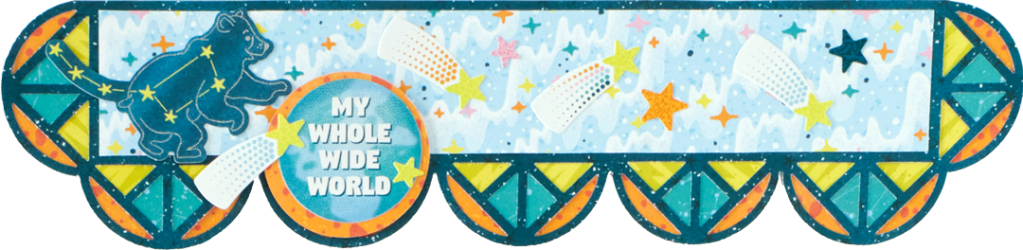
Step 1: Cut a 12” x 3” piece of night sky blue stars paper. Using the Geometric Frame Punch, punch two corners and one long side. Cut a 9-1/2″ x 1-5/8″ strip of light blue stardust paper and adhere to the border.

Step 2: Using the inside of the medium Custom Cutting System Circle Pattern and the Blue Blade, cut four circles from orange craters paper. Cut three of them in half. Cut six 1-1/2″ lemon yellow lightning squares and six 5/8″ aquamarine green constellations squares. Adhere together, using the photos as a guide. Adhere each behind six of the geometric half-circles/scallops so they resemble stained glass.
Step 3: Mount the “My whole wide world” sticker on the remaining orange crater circle and adhere to the remaining geometric half-circle/scallop with Foam Squares. Add additional stickers and embellishments.
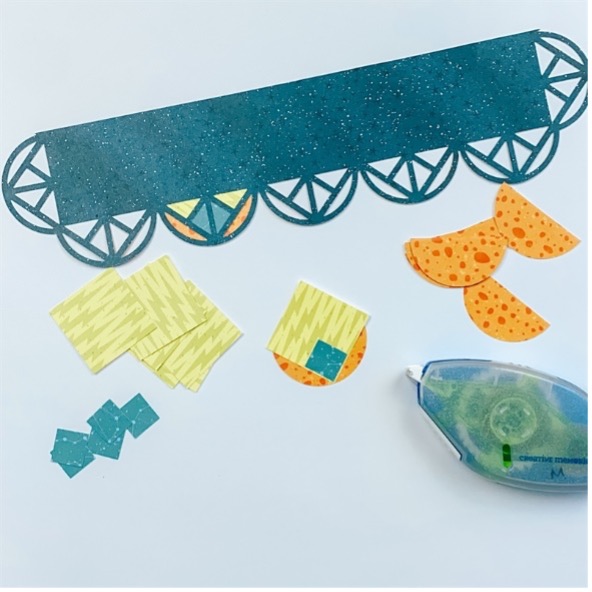
You’re a Star Border
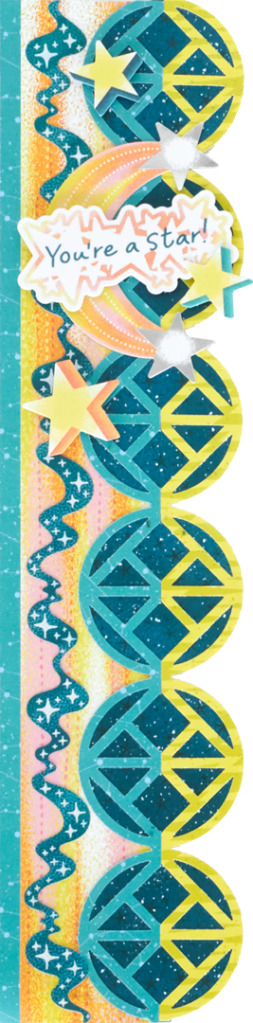
Step 1: Cut a 2″ x 12″ strip of aquamarine green constellations paper for the base. Cut a 1-3/4″ x 12″ strip of warm dotted texture paper and adhere flush with the right side of the base.
Step 2: Punch a border with the Geometric Frame Punch with aquamarine green constellations paper and another with lemon yellow lightning paper. Trim both to 12″ x 1″.
Step 3: Using the inside of the medium Custom Cutting System Circle Pattern and the Blue Blade, cut six circles from night sky blue stars paper. Adhere the circles behind the geometric border as shown. Mount on the border so just the lemon yellow lightning border extends beyond the base.
Step 4: Add stickers and embellishments.
What have you created so far with your Geometric Frame Punch (or are you going to buy one now?!)? And which of these three outer space scrapbook borders do you enjoy the most? Feel free to drop a comment below!
